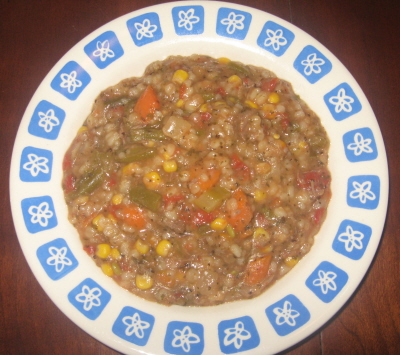
This recipe is so good and while I didn’t use an actual recipe for it, I can’t say that I came up with it all by myself. It’s beef barley soup for cryin out loud! I hardly invented it! But it’s not too hard to figure out and you can actually add just about anything that you want to it. I’ve even seen recipes for beef barley soup that include green peppers, which is something so strange to me and also something that I probably would never put in beef barley soup. But, nevertheless, it’s tasty, it’s easy, and the cleanup is simple. Plus, it’ll just fill you with that warm scrumptious goodness on a cold winter’s night. What more could you want?
Ingredients:
2 pounds stewing beef 2 tablespoons canola oil 2 cups chopped carrots (about 2 large carrots) 1 stalk celery 1 large onion 1 can diced tomatoes 1/2 cup frozen corn 1/2 cup frozen green bean 2/3 cup barley 1 tablespoon dried parsley flakes 2 teaspoons salt 1 teaspoon dried basil 4 cups beef broth
Directions:
1.) In a frying pan, heat oil and brown beef.
2.) Place carrots, celery, onion, corn, and green beans in crock pot. When beef is finished browning, add meat on top.
3.) Combine tomatoes, barley, parsley, salt, and basil. Pour over meat and then add beef broth.
4.) Cover and cook on low for 6 – 8 hours or high for 4 – 6 hours.
I was really worried when I decided that I was going to tackle a souffle. Especially when I heard that you can’t make any noise or bang around in the kitchen while the souffle is cooking because it will fall and become a big egg mess in the oven. Thankfully, I learned that it’s not actually the noise or the stability level that makes a souffle turn out. It’s not having an even and consistent heat so, while stomping around the kitchen won’t affect this souffle, opening and closing the oven door will ruin this dish. That, and not having peaks that are quite right when mixing the egg whites. That was actually the part that I was most worried about but that turned out okay too. Just keep mixing until the peaks form, you’ll know when they’re “stiff.”
So, even though it worked out, does it taste good? You betcha! My girls didn’t like it that much but hey, seeing as how they’re both under the age of 4, you can’t really blame them for not being all over the souffle. And Brent, well, I didn’t even try it on him. But it certainly is good for those adults who like eggs, broccoli, cheese, and all good things!
Ingredients:
1 tablespoon freshly grated Parmesan cheese 1 1/2 cups broccoli florets (1 large head of broccoli) 1/4 cup butter 1/4 cup flour 1 1/2 cups whole milk 1 teaspoon kosher salt 1/2 teaspoon Dijon mustard 1 cup shredded cheddar cheese 6 large egg yolks 6 large egg whites 1/2 teaspoon cream of tartar
Directions:
1.) Preheat oven to 325 degrees Fahrenheit. Coat the bottom (not the sides) of a 2-quart souffle dish with non-stick cooking spray. Sprinkle Parmesan cheese on the bottom of the dish and shake to coat. Set aside.
2.) Bring a large pot of water to boil over high heat and add broccoli, turn to low and cook 2-3 minutes until tender but not mushy. Drain well and chop florets into smaller pieces. Set aside.
3.) In a medium saucepan, melt the butter over medium heat. Add flour, whisking constantly until smooth, 1 minutes. Slowly pour in milk and continue whisking constantly until smooth, 1 minute. Slowly pour in milk and continue whisking constantly to prevent lumps from forming. Add salt and Dijon mustard, continuing to stir until mixture thickens, about 2 minutes. Remove from heat and stir in cheese and broccoli.
4.) In a small bowl, lightly whisk egg yolks. While constantly whisking, add a small amount of warm cheese mixture to the yolks. Once combined, add the rest of the yolks to the remaining cheese mixture, whisking briskly to mix. Transfer to a large bowl and set aside to cool slightly.
5.) Using an electric mixer, beat the egg whites and cream of tartar on high speed until stiff peaks form. Lightly fold half of the egg whites into the cheese sauce. Gently fold in the remaining egg whites taking care not to over-mix. Carefully pour batter into prepared souffle dish. Bake 50 – 55 minutes until puffy and golden brown.
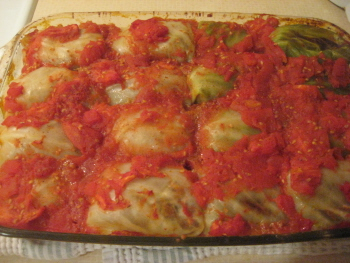
Cabbage rolls do take quite a bit of work but it’s always well worth it! I’m the only one who likes them in my family so when I make them, I freeze most of the tray in smaller portions and have them ready for whenever I want them. Instead of freezing the cabbage to loosen the leaves, you can also drop it in rolling boiling water for about 60 seconds and then give it enough time to cool so you can pull the leaves off. I’ve done it both ways and usually use the freezer method only because I find it easiest.
Ingredients:
1 pound ground beef 2 cups cooked rice 1/2 cup bread crumbs 1 medium onion, chopped 6 cloves garlic, minced 1 head green cabbage 1 can diced tomatoes, drained
Directions:
1.) The night before, make sure your head of cabbage is in the freezer, whole and in tact. The next morning, take out the cabbage and allow it to thaw. Once it has thawed, peel off the leaves and cut of the hard stem at the bottom of each leaf.
2.) Preheat the oven to 350 degrees Fahrenheit.
3.) Mix all ingredients except for the cabbage and the diced tomatoes in a large bowl.
4.) Take one of the separated cabbage leaves and hold it in your hand so that you can see the inside of the leaf. Place into the leaf a small amount of meat mixture. Fold one side of the cabbage roll over and then tuck the end over the folded piece. Fold the other side in over the tucked in edge piece and fold the other end over so that the entire cabbage leaf has enclosed over the meat mixture.
5.) Lay the finished cabbage roll in a 9″ x 13″ casserole dish and continue on with the rest of the cabbage leaves, filling them with the meat mixture and laying them in the prepared pan. Make sure you lay the cabbage rolls down in the pan seam-side down to ensure that they don’t pop open while cooking.
6.) Spoon the tomatoes evenly over the cabbage rolls.
7.) Bake in the preheated oven for approximately 90 – 105 minutes. Allow to cool for 5 minutes after removing them from the oven.
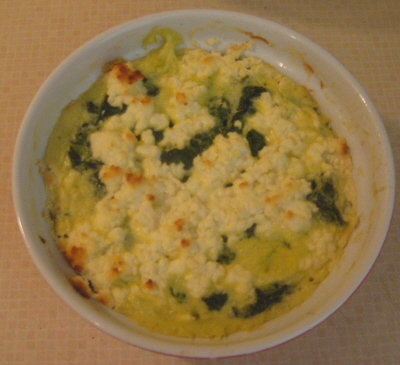
This is a recipe that I got from Martha Stewart’s website and it is fantastic! I actually used goat cheese in place of Gruyere cheese and I think it turned out even better. (I mean really, who doesn’t like goat’s cheese?) It was also super easy to make with all of the ingredients being already chopped up, all you have to do is mix it up! And it makes a lot too. From this recipe, I got two of the dishes that are in the pic. And I’m a huge fan of anything that you can store for baking later!
Ingredients:
Butter, for baking dish 3 packages frozen spinach, thawed and squeezed dry 1 1/2 cups half and half 3 large eggs, lightly beaten 1 1/2 cups Gruyere cheese Coarse salt and ground pepper 1/4 teaspoon ground nutmeg
Directions:
1.) Preheat oven to 350 degrees Fahrenheit. Butter a shallow 1-quart baking dish.
2.) In a large bowl combine spinach, half and half, eggs, 1 cup of cheese, 2 teaspoons salt, 1/8 teaspoon nutmeg and pepper; stir to combine. Spread evenly in prepared baking dish and top with remaining cheese. Bake until set and top is golden brown, about 30 – 35 minutes. These can be prepared one day in advance and placed in the fridge. When ready to serve, take them out of the fridge and bring them up to room temperature and baking.
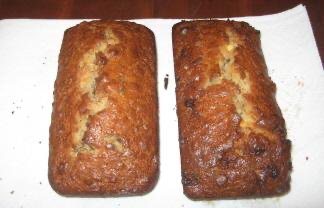
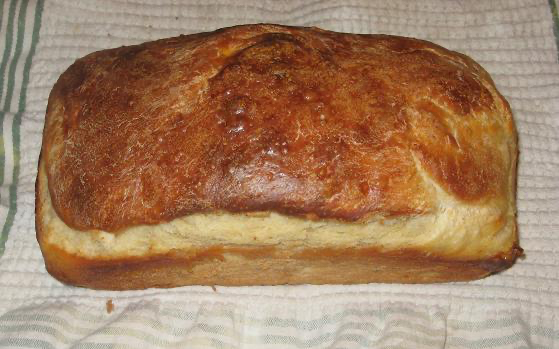
Who doesn’t love banana bread? It’s just one of those foods that’s sweet, filling, and very very comforting. I don’t know where I got this recipe originally but I recently dug it out from the waaaay back of my recipe box and am I ever glad that I found it! So simple to prepare and you can add anything in it that you’d like. I actually added the lemon zest myself because I’ll take any chance I can to throw a little lemon into something. And the one on the left hand side in the picture is actually made with white chocolate chips instead of pecans and I can’t even tell you how good that is! (But I would suggest leaving the lemon zest out of that recipe!) The chocolate melts and oozes out all over the top, giving it a crisp and sugary crust. Now what’s wrong with that?! And so cheap too!
Ingredients:
5 tablespoons butter 1/2 cup granulated sugar 1/2 cup firmly packed brown sugar 1 large egg 2 egg whites 1 teaspoon vanilla extract 1 1/2 cups mashed, very ripe bananas (about 2) 1 3/4 cups all-purpose flour 1 teaspoon baking soda 1/2 teaspoon salt 1/4 teaspoon baking powder 1/2 cup heavy cream 1/3 cup chopped pecans Zest of one lemon
Directions:
1.) Preheat oven to 350 degrees. Spray bottom only of loaf pan with non-stick cooking spray.
2.) Beat butter in large bowl with an electric mixer set at medium speed until light and fluffy. Add granulated sugar and brown sugar; beat well. Add egg, egg whites, and vanilla. Beat until well blended. Add mashed banana and beat on high for 30 seconds.
3.) Combine flour, baking soda, salt, baking powder, and lemon zest in medium bowl. Add flour mixture to butter mixture alternately with cream, ending with flour mixture. Add pecans to batter; mix well.
4.) Pour batter evenly into prepared loaf pan. Bake until browned and toothpick inserted near centre comes out clean, about 1 hour and 15 minutes.
5.) Cool bread in pan on wire rack for 10 minutes. Remove bread from pan; cool completely on wire rack.
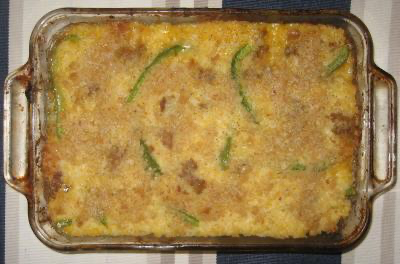
I came up with this recipe one day when I really wanted macaroni and cheese, but I wanted something different. And this one’s pretty good! The rice sort of takes on a creamy texture due to the sauce, and the spice of the Italian sausage adds a really good punch of flavour to it. And green peppers go so well with sausage, don’t they? Although there are quite a few steps to this recipe, it’s actually pretty simple, especially if you have some frozen rice that you can just thaw out for it. Good ol’ fashioned comfort food, in a slightly different way!
Ingredients:
3/4 cup dry bread crumbs, soaked in 2 tablespoons melted butter 2 tablespoons melted butter 1 tablespoon all-purpose flour Salt and pepper to taste 1/4 teaspoon dry mustard 1 1/2 cups milk 2 cups shredded Cheddar cheese 1 onion 1 green bell pepper, julienned 4 mild Italian sausages, cut into 1″ rounds 2 cups cooked rice 2 tablespoons canola oil
Directions:
1.) Preheat oven to 350 degrees.
2.) Heat canola oil in a large skillet over medium-high heat. Add onion and saute for 5 minutes, or until soft. Add Italian sausage and brown.
3.) Meanwhile, place butter in a saucepan over medium-high heat. Wait until butter just starts to bubble and add flour, pepper, salt, and mustard. Stir until all ingredients are well combined. Slowly add the milk while stirring and bring to a simmer. Continue simmer for 10 minutes. Make sure that you stir constantly while the milk is simmering or it will burn. Continue stirring until the milk has started to thicken, about 10 minutes. Once milk has thickened, remove pan from heat and add cheese. Stir the cheese until it has melted.
4.) Drain the sausage and place in a 9″ x 13″ casserole dish sprayed with non-stick cooking spray.
5.) Add the rice and green peppers to the sausage in the casserole dish. Pour cheese sauce over the entire thing and stir until it is well combined. Sprinkle the butter-soaked bread crumbs over the entire casserole.
6.) Place in the oven for 20 – 25 minutes, until the cheese sauce has started to bubble and the top is golden brown and crispy.
I was lucky enough to be given a bunch of acorn squash and wanted something more to do with it than just roast it. So I came up with this stuffed squash recipe and it is delicious! To be honest, I didn’t even know if I was going to like it. But, pork and cheese, what more could you ask for? And, even though it looks like you slaved over it, the most you really have to do is brown the sausage. The rest of it pretty much takes care of itself.
This squash can be used as a side, an entree, or an appetizer at a dinner party. I also froze a few of mine and they freeze beautifully. Just remember to either thaw them fully or to cover them and keep them in the oven for at least an hour, if you’re baking them from frozen. They take a long, long time to cook after you’ve frozen them – but they taste just as great!
And the best, and most surprising part of this recipe? My 2-year-old loooooooves them!
Ingredients:
4 acorn squashes 1 onion 4 cloves of garlic, minced 2 tablespoon canola oil Salt and pepper to taste 4 Italian sausages, casings removed 1 1/2 cups Ricotta cheese 1 red bell pepper, chopped 1 1/2 cups Asiago PDO cheese, shredded
Directions:
1.) Preheat oven to 350 degrees. Then cut the bottoms of the squash and remove the seeds. Stand the squash up so that the open tops are on top and place them in a casserole dish. Brush the inside and the top of the squash with the canola oil, season with salt and pepper, and bake for about 25 – 30 minutes.
2.) Once the squash has been removed from the oven, preheat the broiler.
2.) Meanwhile, heat up 1 tablespoon of oil in a frying pan over medium-high heat. Add the onion and saute for about 5 minutes. Then add the garlic and the red bell pepper. Break up the sausage so that it’s in small pieces and fry until it’s browned. When browned, remove everything from the pan with a slotted spoon and transfer to a large bowl.
3.) Add the ricotta cheese to the sausage mixture and mix until it is all well combined. Stuff each of the squashes with 1/4 of the mixture. Once stuffed, top each squash with a handful of the Asiago cheese.
4.) Place the squash about four inches under the broiler and broil until the cheese on top has melted and is bubbly and golden brown.
Another classic soup for a cold winter or fall day! This one combines deliciously sweet flavours with salty and deep flavours. All for one perfect bowl of wonderfulness! This soup freezes beautifully, so you can make a huge batch of it and freeze it for another cold day. For some reason though, my kids gobble this one up the day I make it and won’t touch it when it comes out of the freezer. It’s a mystery to me, I can’t tell a difference.
1.) Place olive oil in a large heavy pot set over medium heat. When oil is hot, add onion and garlic and saute for about 5 minutes. Then add diced squash and cook for about three minutes.
2.) Add chicken broth, cloves, nutmeg, salt and pepper and turn heat to medium-high. Allow to cook for approximately 20 – 30 minutes, until squash is very tender and falling apart.
3.) When ready, transfer to food processor and puree until smooth. Transfer back to soup pot and heat up to boiling. Once boiling, turn down to medium-low. When soup has cooled down, add milk and heat until just heated through.
4.) Once milk is heated through, remove from heat and sprinkle top of soup with fresh or dried parsley flakes.
I got this recipe from Cooking Bread, and while it was titled “Buttermilk Bread”, and I thought I was just going to make a rich and delicious white bread, it turned out to be sourdough bread. Whether that’s because it’s actually a sourdough recipe, or because the substitutions I made turned it into sourdough, I don’t know. I didn’t have buttermilk (as usual), and so I did what I always do – add a teaspoon of lemon juice to 2% milk. It looked like it had the same effect, and did look a bit curdled, so I wasn’t worried. I also had just ran out of sugar and so, only used about a tablespoon or so of it.
But whatever I did, and whatever kind of recipe this sourdough bread was originally intended to be, it is delicious, and we ate an entire loaf of it in just one dinner! I imagine it would freeze well too but both loaves are gone so now we won’t know until next time, I suppose.
Ingredients:
5 – 6 cups bread flour 3 tablespoons sugar 2 teaspoons salt 1/4 teaspoon baking soda 1 package dry yeast 1 cup water 1 1/3 cup buttermilk 1 teaspoon olive oil 1 egg
Directions:
1.) Preheat oven to 375 degrees Fahrenheit.
2.) Add buttermilk and water to a saucepan. Over medium heat, warm liquid until it is lukewarm; it may start to look as though it has curdled. Make sure not to make the mixture too hot or else it will kill the yeast.
3.) In a large bowl mix two cups of flour; sugar; salt; baking soda; and yeast. Add the lukewarm buttermilk to the dry ingredients. Use a wooden spoon or your hands and mix for two minutes. Then add another cup of flour and mix just until it’s combined.
4.) Pour out dough onto a lightly floured surface and knead for 8 – 10 minutes, add more flour 1/2 cup at a time as necessary, until dough is silky and smooth. Do not feel as though you have to use all the flour, just enough to get you to this point.
5.) Place the teaspoon of olive oil into the bottom of a bowl and then place the dough on top. Turn the dough to make sure that it’s completely covered in olive oil. Then, wrap bowl with plastic wrap and place in a warm spot; allow dough to rise until nearly double in volume.
6.) Once the dough has nearly doubled, punch it down lightly. Divide the dough into two equal sections and place in two greased loaf pans. Cover and let it rise again for another 45 minutes.
7.) When dough is ready, mix the egg with a little bit of water, then brush this mixture over both of the loaves. Place in the oven for 45 minutes or until top is lightly golden brown. Remove from the oven and allow to completely cool before removing from loaf pans.
There are tons of different ways to make meatballs. You can bake them, cook them right in the sauce, throw them straight into the slow cooker, or cook them just about any other way that you want. I’m sure you could even try poaching some! But breading them and then frying them has got to be my new favourite way to eat meatballs! I came up with this idea one night when I really wanted meatballs, but I wanted to do something a little bit different with them. As I just said, there’s not a whole lot that hasn’t been tried with meatballs. And even though I’m sure I’m not the first one to try this method of cooking meatballs, I also know I won’t be the last – these were simply delicious!
Ingredients:
1 pound lean ground beef 1/2 cup Parmesan cheese 1/2 cup bread crumbs 1 egg, lightly beaten 1/2 cup chopped fresh parsley 6 cloves garlic, minced 1 onion, diced 2 tablespoons Worcestershire sauce 1 tablespoon dried basil Salt and pepper 1 cup all-purpose flour 2 eggs, beaten 2 cups bread crumbs 3 tablespoons vegetable oil
Directions:
1.) In a large bowl mix together: lean ground beef; 1/2 cup Parmesan cheese; 1/2 cup bread crumbs; 1 egg; fresh parsley; garlic; onion; worcestershire sauce; basil; and a pinch of salt and pepper. Mix with your hands until thoroughly combined.
2.) Then, prepare your breading area. In one large bowl, place 1 cup all-purpose flour. In another large bowl, place 2 beaten eggs; and in the third bowl, place two cups of bread crumbs.
3.) Using the meat mixture, take a tablespoon of meat and form it into a ball with your hands. Then, roll the meatball around in the breading flour. Then dip it into the egg, rolling it to make sure it’s entirely covered. Lastly, roll the meatball in the bread crumb mixture until the entire ball is covered with bread crumbs. Set aside on a plate and do this with the rest of the meat mixture – first forming it into small balls, and then breading each of the balls separately.
4.) In a large skillet, heat vegetable oil over medium-high heat. When the oil is hot, add enough meatballs to fill the pan, but still leave them enough room to breathe. You may have to cook them in batches. Cook first one one side, and then turn, making sure that all sides of all balls are thoroughly browned and cooked. When meatballs are done, place onto plate and continue with another batch, if necessary.