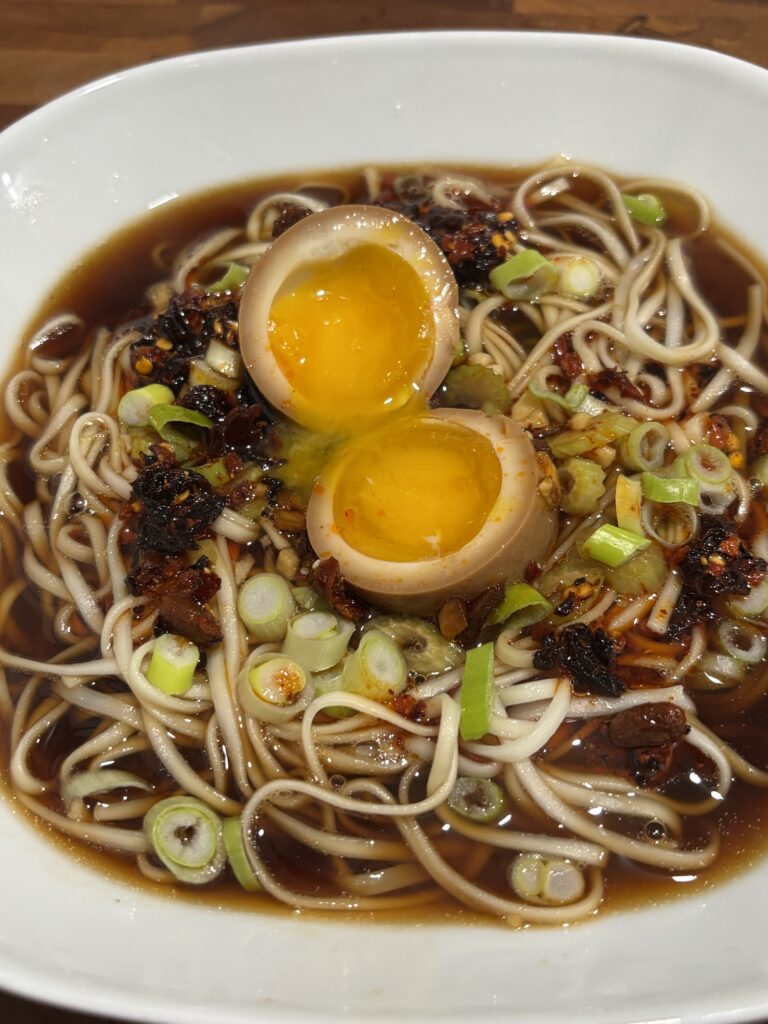
My past couple of recipes for chicken stock and Mayak eggs culminate in this delicious recipe for a quick ramen. I typically use lo mein noodles for the dish, as I can rarely find ramen noodles on their own and I can’t use the flavoured packages, as they may be contaminated with shellfish. Using this recipe, I can get around my allergy and still enjoy a steaming hot, delicious bowl of ramen. And now you can, too!
1.) Add chicken stock, garlic, ginger, celery, hoisin sauce, and soy sauce to a medium-sized saucepan. Bring up to a boil and then reduce to a simmer for about 20 minutes.
2.) While broth is simmering, cook lo mein noodles according to package instructions and strain.
3.) Place one portion of noodles into a bowl. Ladle desired amount of hot broth over noodles.
4.) Top noodles with green onions, chili crunch oil, a Mayak egg, cut in half, and juice from 1 lime wedge.
Over the past year or so, these Mayak eggs have taken the internet by storm and they have gone viral for a reason. They’re sometimes even called ‘drug eggs’ because the term ‘mayak’ in Korean means ‘drug’ or ‘narcotic.’ Also known as Korean soy sauce marinated eggs, these beauties are soft boiled just until their yolks are soft and jammy and then they are placed into a tasty mixture of soy sauce, chili crunch oil, and other goodness. After submerging them in the liquid, the eggs should marinate for at least six hours but they’ll keep their optimal freshness for three to four days after that. They are truly addictive, though, so they might not last that long!
Ingredients:
6 eggs
1/2 cup soy sauce
1/2 cup water
1/4 cup honey
1/4 yellow onion, finely diced
2 green onions, sliced
3 cloves garlic, minced
1 tablespoon chili crunch oil
1 tablespoon toasted sesame seeds
Directions:
1.) Bring a heavy-bottomed, medium-sized pot of water to a boil. Add eggs, straight from the fridge, and boil for 7 minutes.
2.) Remove eggs from the pot and place in an ice bath for 15 minutes. This stops the cooking process and makes them easier to peel.
3.) In a small saucepan set over medium heat, warm soy sauce, water, and honey together. You don’t need to make sure the liquid is hot. You only need to warm it until the honey is melted into the sauce.
4.) Place soy sauce mixture in a container that has a lid and is large enough to hold all of the eggs. To the container add the yellow onion, green onions, garlic, chili crunch oil, and sesame seeds. Cover and shake to mix.
5.) Peel the eggs and place in the container with the liquid, making sure eggs are submerged. Place in fridge for at least six hours.
Whether you are making ramen, chicken pot pie, or just need a great base for a sauce, you need a deeply rich chicken stock. The only way to get that is to roast the chicken bones and the veggies at high heat before slowing simmering them for hours on the stove. The key word here is ‘simmer.’ It’s important that you don’t boil the stock, as this will result in a murky and greasy stock, not one that is deeply rich with a nice mouthfeel (God I hate that word but sometimes, it’s the only one that will do.) Simmering the stock slowly allows you to skim the fat that rises to the top, instead of it breaking down into the stock.
While some recipes do require a deep brown chicken stock, there are times when you may want one that is a little lighter. Traditional chicken noodle soup is a great example of a lighter stock. To make a light stock, simply skip the roasting step in this recipe and simmer raw bones and veggies on the stove.
Ingredients:
3 to 5 pounds of chicken bones
1 to 2 pounds of boneless chicken pieces, optional
2 tablespoons olive oil
2 onions, quartered
3 or 4 large carrots, roughly chopped
4 celery stalks, roughly chopped
1 stalk rosemary
1 bunch of thyme
2 to 3 bay leaves
1 tablespoon whole peppercorns
2 lemons halved, optional
Directions:
1.) Preheat oven to 400 degrees Fahrenheit. Place chicken bones in a large casserole dish. Drizzle with olive oil and season with salt and pepper. Roast bones for 30 minutes.
2.) Remove casserole dish from the oven and add onion, carrots, celery, rosemary, and thyme. If using boneless chicken pieces, add them now as well. Drizzle with olive oil and season with salt and pepper. Place back in the oven and roast for another 30 to 45 minutes, until everything is deeply brown.
3.) Transfer all chicken pieces, veggies, and any collected juices, to a large stock pot. Add bay leaves, whole peppercorns and, if using, lemons. Fill pot with water until everything is just covered.
4.) Bring water just to a brief boil and then immediately lower to a bare simmer.
5.) Simmer the stock for 3 to 4 hours until it reduces slightly and becomes deeply brown and rich. Skim off any impurities as they rise to the top throughout the entire cook (you’ll have to do this more in the beginning.) Taste and adjust seasonings as you go.
6.) Place a large sieve over a large bowl and drain the stock. Discard the solids.
7.) Portion stock into smaller containers. Use immediately, keep in the fridge for up to one week, or freeze for up to six months for the best flavour.
Anyone who knows me knows how much I love a good Reuben sandwich. This Reuben casserole brings all the goodness of the classic sandwich but, as it is a knife-and-fork meal, it’s not nearly as messy. As I’m the only one in the house who loves combining pastrami, Russian dressing, cheese, and sauerkraut, I made this one just for me. Still, four servings is a lot for one person so it worked out well that the leftovers also freeze beautifully!
Ingredients:
1/2 cup mayonnaise
2 tablespoons ketchup
1 tablespoon Worcestershire sauce
1 tablespoon prepared horseradish
1 teaspoon diced onion
1 tablespoon yellow mustard
3 cups Rye bread, cubed
2 pounds sliced pastrami, divided
1 cup sauerkraut
1 cup pickles, chopped
2 teaspoons caraway seeds, divided
2 cups Swiss cheese, grated
2 eggs
1 cup milk
Directions:
1.) Preheat oven to 350 degrees Fahrenheit.
2.) Make the Russian dressing by combining the mayonnaise, ketchup, Worcestershire sauce, prepared horseradish, diced onion, and yellow mustard. Set aside.
3.) Spray an 8″ x 8″ casserole dish with non-stick spray.
4.) Add cubed Rye bread to the casserole dish. Add one pound of sliced pastrami over top. Layer sauerkraut on top.
5.) Sprinkle sauerkraut with chopped pickles and 1 teaspoon of caraway seeds. Add 1 cup of grated Swiss cheese on top.
6.) Layer on another one pound of sliced pastrami. Press layers down slightly with your hands to ensure even thickness.
7.) Add remaining cup of grated Swiss cheese and remaining teaspoon of caraway seeds.
8.) Whisk together two eggs, 1/2 cup of milk, and 1/2 cup of the Russian dressing. Pour egg mixture over the layers in the casserole dish and cover with aluminum foil.
9.) Bake in preheated oven for 25 minutes.
10.) Remove casserole from the oven and uncover. Place back in the oven and bake for another 20 – 25 minutes until cheese starts to brown and the entire dish is bubbling throughout.
11.) Serve with remaining Russian dressing for dipping and enjoy!
I have a lot of grilled cheese sandwiches on this site and before now, it was hard to choose a favourite. Now, I think I’ve found the one.
This grilled cheese does not use any fancy or unusual ingredients for the filling. However, it does move the process from the stovetop to the air fryer and that’s really the best thing about it.
Using the air fryer, the bread gets that crispy crunch I look for in a grilled cheese, but that’s hard to find when you’re using just a pan. And while there’s not a lot of babysitting involved with traditional grilled cheese sandwiches, there’s even less when an air fryer is involved.
I got the recipe from TikTok and I can safely now say it is the only way I will ever make grilled cheese again. This recipe makes just one sandwich but you can double or triple up depending on how many people you’re feeding, or how hungry you are!
Ingredients:
2 to 3 tablespoons of butter
2 slices of sourdough bread
2 slices of provolone cheese
2 slices of Cheddar cheese
Directions:
1.) Liberally butter two pieces of sourdough on just one side.
2.) Lay the cheeses on an unbuttered side of one piece of bread.
3.) Close sandwich and place in the air fryer basket. Set temperature to 375 degrees Fahrenheit and air fry for 3 to 4 min, until the bread is just starting to brown. Check halfway to ensure the bread has not flown off of the sandwich.
4.) After the bread has started to brown, flip the grilled cheese sandwich and increase temperature to 400 degrees Fahrenheit. Air fry for another 2 to 3 minutes until the top is nicely browned, then flip and air fry for another 2 to 3 minutes.
5.) Remove grilled cheese from the air fryer and let sit for 2 minutes.
I’m really not picky when it comes to pasta salad. Take some pasta, mix it up with some veggies and a dynamite sauce and I’m all in, all the time. I’m always surprised to learn that I don’t have some of my favourite recipes on this site; this one included. There’s just one measly pasta salad recipe on here. Today is the day to fix that egregious wrong.
When playing around with this recipe, I really debated whether or not to include the croutons. Little bits of toast just sounded weird in pasta salad. But, it is a club sandwich pasta salad after all, so I didn’t see any way around it. I’m very happy that I decided to put them in. They’re not weird and they really do make the salad.
Ingredients:
2 slices of bread, cubed
2 tablespoons butter, melted
Salt and pepper
8 ounces of rotini pasta
3/4 cup mayonnaise
2 tablespoons Ranch dressing
1 tablespoon Dijon mustard
1 teaspoon garlic powder
Salt and pepper
5 slices thick cut bacon
1 cup cherry tomatoes, halved
1 cup cooked chicken, chopped
1/2 cup Cheddar cheese, cubed
1/4 red onion, diced
Directions:
1.) Preheat oven to 350 degrees Fahrenheit.
2.) Toss cubes of bread with melted butter, salt and pepper.
3.) Place cubed bread on a baking sheet and bake in preheated oven for 10 – 15 minutes, until they have just started to brown and are crisp.
4.) Cook pasta until al dente as directed on package. Drain and rinse with cold water to stop the cooking process.
5.) Combine mayonnaise, Ranch dressing, Dijon mustard, garlic powder, salt and pepper.
6.) To a large bowl add the cooked pasta, bacon, cherry tomatoes, chicken, Cheddar cheese, and red onion. Toss, add dressing, and toss again.
7.) Top with croutons just before serving and enjoy!
It’s no exaggeration to say that I haven’t bought bottled Caesar salad dressing in over a decade. This dressing is so incredibly easy to make and like anything homemade, it tastes so much better than store-bought. It’s been said before but it’s worth saying again. Don’t skip the anchovy paste in this recipe. It doesn’t make the dressing taste fishy and you really will miss the umami flavour if you don’t add it in. If you have a fish allergy and absolutely cannot add it, a splash of soy sauce can help make up for it.
Ingredients:
1 clove garlic, chopped
1 teaspoon Worcestershire sauce
1 tablespoon Dijon mustard
1 teaspoon anchovy paste
Juice of one lemon
1 cup mayonnaise
1/2 cup Parmesan cheese
Directions:
1.) To a small bowl add garlic, Worcestershire sauce, Dijon mustard, anchovy paste, and lemon juice. Mix well.
2.) Add mayonnaise and Parmesan cheese to the bowl and mix again.
3.) Toss with Caesar salad, serve and enjoy! (Can also store in an airtight container for up to one week in the fridge).
I have a number of different meatball recipes on this site. I’ve posted recipes for baked meatballs, meatballs that are cooked in sauce, and even a deep fried recipe. However, I have not yet posted a recipe for cocktail meatballs, which is kind of weird considering that they are one of my favourite go-to meals when I need something quick yet tasty for dinner. They are also really popular as appetizers when feeding a large crowd. If this is what you’re using them for, you can add the meatballs and the sauce into a slow cooker and keep it on warm to keep them nice and hot for your guests.
Ingredients for meatballs:
1 cup bread crumbs
1/2 cup milk
1 pound ground beef
1 teaspoon onion powder
1 teaspoon garlic powder
1 tablespoon Italian seasoning
1 egg, beaten
Salt
Pepper
1 tablespoon olive or avocado oil
Ingredients for sauce:
1 1/2 cups ketchup
3/4 cups grape jelly
3 green onions, sliced
Directions:
1.) Preheat oven to 400 degrees Fahrenheit.
2.) Add bread crumbs and milk to a large bowl and mix well. Let sit for 5 minutes, until bread crumbs have absorbed milk.
3.) Add the rest of the ingredients for the meatballs and mix just until everything is incorporated. Using a melon baller, scoop out portions of meatballs. Roll to ensure meatballs are smooth and place on a baking sheet lined with parchment paper.
4.) After all meatballs have been formed, drizzle avocado oil over them.
5.) Place meatballs into preheated oven and bake for 10 – 15 minutes, just until they are cooked through.
6.) Add ketchup and grape jelly to a large frying pan. Mix well and bring to a bol.
7.) Add meatballs to the mixture and stir to ensure they are thoroughly coated. Cook for a few minutes, until meatballs are heated all the way through.
8.) Remove meatballs to a serving platter and garnish with green onions.
Full disclosure, this is not my recipe. It’s Alison Roman’s and if you haven’t yet checked her out, head on over to YouTube and watch some of her Home Movies or other videos from when she was still cooking for The New York Times. But before you do, check out this recipe for her Chickpea Stew that went absolutely viral a few years back.
When I first saw the recipe, I was so intrigued because I love chickpeas so much but they never seemed like the star of a dish to me. I mean, hummus is great but it’s an appetizer or light lunch at best. Roasted chickpeas are awesome, but they too, are a snack and not a meal. The fact that someone went to the time and trouble to create a recipe that truly celebrated the humble chickpea was fascinating and I knew it was something I had to try. I’m so happy I did. Now me and my daughter, who also loves chickpeas, enjoy it on a regular basis.
Ingredients:
3 tablespoons olive or avocado oil
1 onion, sliced
2 cans chickpeas, rinsed and drained
3 cloves garlic, minced
2 teaspoons ginger, minced
1 tablespoon turmeric
1 teaspoon chili flakes
2 cups of chicken or vegetable stock
2 cans full fat coconut milk
1 bunch kale or Swiss chard, torn into bite-size pieces
Fresh dill, for garnish
Chili flakes, for garnish
Olive oil, for garnish
Directions:
1.) Heat oil in a large pot set over medium-high heat.
2.) Add onion slices, salt and pepper. Stir to coat in the fat and cook for 8 – 10 minutes, until the onions are slightly charred.
3.) Add the garlic, ginger, turmeric, and chili flakes. Stir and cook for 30 seconds.
4.) Add the stock, coconut milk and season again with salt and pepper. Bring to a boil and then reduce to a simmer.
5.) Simmer the soup for 20 – 30 minutes until the chickpeas are tender. Crush some of the chickpeas against the pot to thicken the soup and make for varying textures.
6.) Add in kale or Swiss chard and cook just until the greens are wilted.
7.) Ladle into bowls and garnish with fresh dill, chili flakes, and a drizzle of olive oil, if desired.
It’s taken me some time to get this recipe to you, as I made these Air Fryer Pinwheels as part of my Super Bowl Snack Week on TikTok (@katescuisine5 if you don’t follow me there already). Of all the recipes I made that week, though, these pinwheels were by far the easiest. The hardest part is probably remembering to take the cream cheese out of the fridge an hour or so earlier to ensure it is super soft. When playing around with this recipe I also found that it’s super important to lay the pinwheels seam-side down in the air fryer. This prevents all of that delicious cheese from spilling out of the pinwheel and into the bottom of the fryer.
Ingredients:
3 ounces cream cheese, softened
3 tablespoons hot pepper jelly
2 slices bacon, cooked and chopped
3 green onions, sliced
1 cup Cheddar cheese
1 burrito-sized tortilla
Directions:
1.) Add cream cheese and pepper jelly to a medium-sized bowl and mix well.
2.) Add bacon, green onions, and Cheddar cheese and mix again.
3.) Place cheese mixture into the centre of the tortilla and spread to the edges, leaving about 1/2″ space around the sides.
4.) Roll the tortilla tightly, starting with the longest edge and tucking the tortilla under tightly as you go.
5.) Using a serrated knife, slice the tortilla into 1″ pieces.
6.) Spray the air fryer with non-stick cooking spray. Place the pinwheels seam-side down into the air fryer.
7.) Air fry for 5 minutes, until cheese is hot and bubbling and edges of tortilla are starting to brown and crisp.