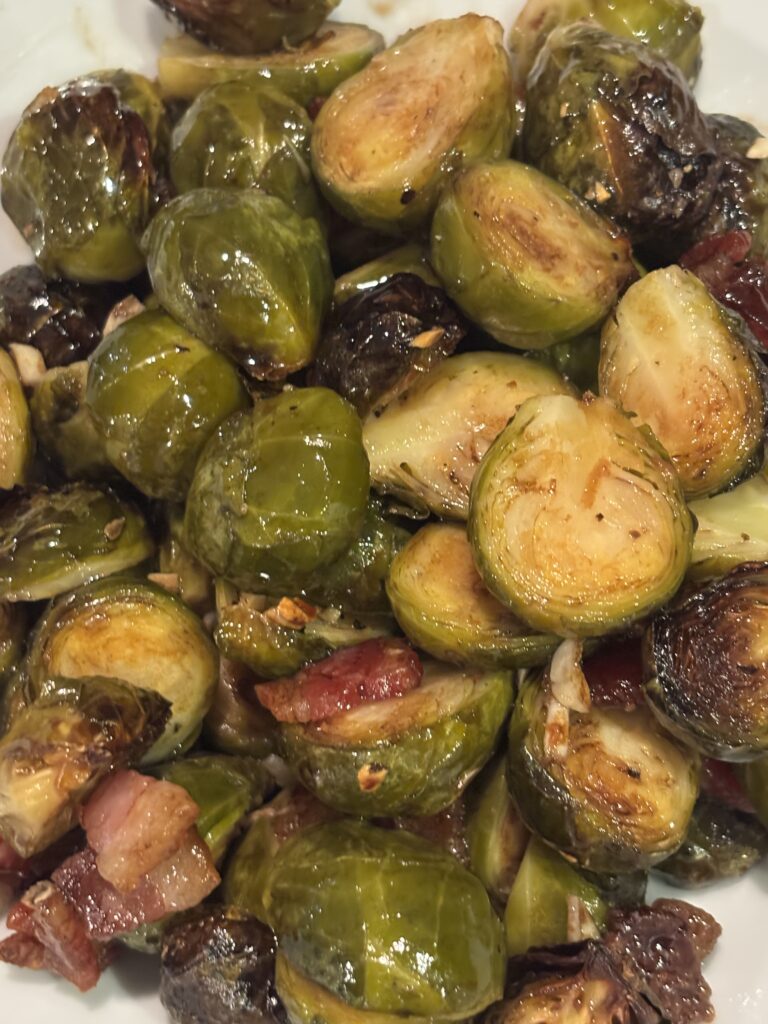
Martha’s Barbecue Sauce

Originally published on August 21, 2009

As the name suggests, this barbecue sauce recipe comes from Martha Stewart, off of her own website www.marthastewart.com. I found it one day when I really wanted to make ribs but went to the fridge and, to my dismay, discovered that I was all out of barbecue sauce! Quick and easy wasn’t really a concern to me with this one. I just wanted something that tasted really, really great. And you know you can always count on Martha for that! It was a pleasant surprise to me when I found out that not only does it taste great, but it’s quick and easy too! Needless to say, I will never buy another jar of barbecue sauce again!

Ingredients:

1 tablespoon olive oil
1 small onion, finely chopped 
4 cloves garlic, minced
1 tablespoon mustard powder 
1 teaspoon red pepper flakes
3 tablespoon light brown sugar 
2 cups ketchup 
1/3 cup Worcestershire sauce  
1/3 cup cider vinegar 
1 tablespoon molasses 
1/4 teaspoon ground black pepper 

Directions:

1.) Place oil into a small saucepan and heat over medium heat.

2.) When oil is hot, add the onion and the garlic. Cook until onions are translucent, about 5 minutes.

3.) Once onions are ready, add mustard powder and red pepper flakes. Cook for another 30 seconds.

4.) Add the rest of the ingredients: sugar, ketchup, molasses, worcestershire sauce, vinegar, and pepper.

5.) Turn heat down to low and cook for 10-15 minutes or until the sauce has thickened.

6.) Remove from heat and allow to cool. Place in an airtight container to keep in the fridge. It will keep for at least a month!

7.) Serve and enjoy!

Mom’s Chili

This is one of those meals that got me excited when I was young and noticed Mom cooking it. It’s hearty and it makes the house smell terrific. More importantly than anything, it’s delicious! Mom always told me that the secret to this chili is in the stewing beef and she might not be wrong. Everyone that I’ve ever served this chili to loves the addition of the stewing beef. And now I add even more to keep Brent, the meatatarian, happy! I personally though, think that the real secret to this yummy chili is in the onion rounds. It’s just not Mom’s chili unless you have a honkin piece of onion hanging off your spoon! And they get so soft and delicious because they’re in the pot for so long, there’s no beatin it!

When you’re finished, you’re going to have a massively sized pot of chili – no matter how much you eat for dinner! Divide it up into portions that you like and toss them in the freezer. The chili will stay for months and months! When I take it out, I like to turn it out into a pot and slowly reheat it but you can throw it in the microwave too!

Ingredients:

2 pounds stewing beef 
2 pounds ground beef 
4 cans kidney beans, drained and rinsed 
4 cans diced tomatoes 
1 can tomato sauce 
1 large onion, cut into thick rounds 
1/4 cup paprika 
1/4 cup chili powder 

Directions:

1.) Brown the stewing beef and the ground beef in a frying pan.

2.) Meanwhile, combine all the other ingredients in a very large stock pot.

3.) After the meat has finished cooking, add it to the chili pot and stir to make sure that everything is mixed together.

4.) Cook on very low heat for at least 2 hours.

5.) Serve and enjoy!

Sweet N’ Sour Chicken

Originally published on October 11, 2009

I love pairing this recipe with chicken fried rice when I’m in the mood for some good Chinese food. And my kids love it too, which always make any recipe score big with me. And super easy to make! But,  you can make it even easier.

My best friend makes this recipe but she browns small pieces of her chicken first. Meanwhile, she has the sauce simmering away and reducing on the stovetop. When the chicken is done, she tosses them into the pan with her sauce and lets it cook a little while longer. I’ve never tried it so if any of you do, you’ll have to let me know if you love it as much as she does – and which version you like better!

Ingredients:

8 bone-in chicken pieces (legs, thighs, or breasts)  
2 eggs, beaten 
1/4 cup all-purpose flour  
2 tablespoons canola oil  

For the Sauce
3 tablespoons soy sauce  
3 tablespoons water 
1/2 cup brown sugar  
1/2 cup honey  
1/2 cup white vinegar 

Directions:

1.) Preheat oven to 350 degrees Fahrenheit.

2.) Heat oil in a pan over medium-high heat. Dredge the chicken legs, one by one, through the egg and then through the flour.

3.) Place all the chicken legs in the pan and brown on all sides. It should take about 15 minutes.

4.) Meanwhile, mix all the remaining ingredients together to form a sauce.

5.) When the chicken is ready, place into a casserole dish and pour the sauce evenly over the chicken. Bake for about 30 minutes, turning throughout.

6.) Serve and enjoy!

Mom’s Lasagna

Originally published on October 25, 2009

This really was the first thing I ever learned to cook. I still remember watching my mom make it in one of the first kitchens I remember. And lasagna night always meant that supper was going to be good! When I became much older, I asked my mom to teach me how to make it and of course, she did. She told me that two things were important: not to cook the lasagna noodles first even if the package said so because it’s a waste of time; and that you could use ricotta cheese if you wanted but it was more expensive and tasted the same.

Since then, I’ve had many different lasagnas that all use ricotta cheese. And I have to say, I actually prefer the cottage cheese. There’s just something about it that makes the lasagna even gooier and tastier! And she was right about the noodles too! I’ve tried cooking them before just to see if it would make any difference and not only did it not make a difference, but I find dry noodles much easier to work with.

But what I love most about this recipe? It comes from my mom and always takes me back to that time when I would sit on the kitchen stool and watch her pile it together piece by piece!

Ingredients:

1/2 package of lasagna noodles  
2 pounds of ground beef 
1 onion, diced  
3 cloves garlic, minced 
2 large tubs of cottage cheese  
2 cans of spaghetti sauce 
2 cups of shredded mozzarella cheese 

Directions:

1.) Spray a 9″ x 13″ casserole dish with non-stick cooking spray. Preheat oven to 350 degrees Fahrenheit.

2.) In a large frying pan, brown the ground beef with the onion and the garlic mixed in. Once it has browned, drain.

3.) Spread a thin layer of spaghetti sauce in the bottom of the casserole dish. Spread out one layer of lasagna noodles on top of the sauce. Onto the noodles, spread out a thin (or thick if you’d like!) layer of the browned ground beef. Over the beef, spread a layer of cottage cheese. Top with one more layer of noodles and spread another thin layer of spaghetti sauce over the noodles. Repeat until you reach the top of the casserole dish, ending with a layer of lasagna noodles.

4.) Spread a thin layer of spaghetti sauce over the top layer of noodles. Over this sauce, spread out the shredded mozzarella cheese.

5.) Bake in the oven for 50 – 60 minutes or until the top is golden brown and bubbly.

6.) Serve and enjoy!

Pita Chips

Originally published on October 28, 2009

I made these for Maddie’s 2nd birthday party. Everyone loved them so much, I was afraid that I was going to run out – and I used almost 2 full packages of pitas! They are simply delish! You need to make sure though that when you’re cooking them, you don’t overcook them! I hate it when people say that because it’s such an obvious thing but with these chips, you do have to check them all the time. Just a minute too long in the oven and the entire batch will be ruined! (That’s why I used almost 2 packages of pitas and not 2 whole packages.) I used white pitas but I’m sure whole wheat pitas would be perfect too, and healthier! Use them to serve with hummus, salsa, or your favourite dip!

Ingredients:

2 pita bread, pocket style 
1 egg white  
1 tablespoon olive oil 
Salt 
1 tablespoon Emeril’s Essence

Directions:

1.) Preheat oven to 350 degrees Fahrenheit.

2.) With kitchen shears, cut pitas around the outside so that you are left with 2 rounds for each pita.

3.) Whisk together the egg white and olive oil and brush onto the insides of each round.

4.) Sprinkle Emeril’s Essence onto the egg white and olive oil mixture of each pita round.

5.) Stack the rounds on top of each other and cut vertically. Now you’ll be left with half-moons of pita rounds. With them still stacked, cut the half moons in half. Then cut these each in half so you are left with 8 small triangles for each pita round.

6.) Spread in a single layer on a baking sheet, seasoned side up, and bake for about 15 minutes until they are no longer soft and just beginning to brown.

7.) Serve and enjoy!

Parmesan-Crusted Asparagus

Originally published on October 30, 2009

I made these for Maddie’s second birthday party and honestly, I knew they would be good but I didn’t realize just how heavenly they would be! I hate it when ingredients get lost in a recipe but you can truly taste each and every thing that’s put into these spears! The mayonnaise, the lemon juice, yum! It’s all so very, very good! And who doesn’t love roasted vegetables? Especially when that vegetable is asparagus? Party guests raved about them and even though no one from my immediate family touched them, I may just make these a regular at suppertime!

Ingredients:

3/4 cup mayonnaise 
2 tablespoons Dijon mustard 
2 teaspoons fresh lemon juice 
1 teaspoon Kosher salt 
1 1/2 cups panko 
3/4 cup freshly grated Parmesan cheese
2 large bunches of asparagus  
2 tablespoons olive oil 

Directions:

1.) Preheat oven to 450 degrees Fahrenheit. Coat a large baking sheet with non-stick cooking spray.

2.) In a large bowl, whisk mayonnaise, Dijon mustard, lemon juice, and salt.

3.) On a large plate, combine panko and Parmesan.

4.) Stalk by stalk, dip asparagus in mayonnaise mixture followed by the panko mixture. Place crusted asparagus on the prepared baking sheet and sprinkle the stalks with olive oil.

5.) At this point you can place the tray in the refrigerator for a few hours before baking. To cook, bake 14-16 minutes turning the asparagus halfway through cooking. Sprink with coarse salt before serving.

6.) Serve and enjoy!

Simple Stuffing

Originally published on November 3, 2009

I had only made turkey stuffing once before making it this time for Thanksgiving. And that first time I made it, it was a total flop. Needless to say, I was holding my breath every step of the way with this one.

But, when I pulled it out of the oven and taste tested it, it was fantastic! I didn’t think it would be so good because it was simple to pull together, and things that are easy to cook just can’t taste any good, right? I did dry out the bread crumbs and cook the vegetables the day before which made it a bit easier. Next time I will make sure to tear up the bread into much smaller pieces. I will also cover the dish with buttered foil before baking, as so many people have suggested to me since then.

Ingredients:

2 loaves Italian bread, torn into bite-sized pieces 
4 tablespoons butter, room temperature, plus more for baking dish 
4 celery stalks, thinly sliced  
4 shallots, minced  
2 garlic cloves, minced  
Coarse salt and ground pepper  
1/2 cup dry white wine 
1/2 cup fresh parsley leaves, chopped OR 1/4 cup dried parsley flakes
3 large eggs, lightly beaten 
2 cups chicken broth

Directions:

1.) Preheat oven to 400 degrees Fahrenheit. Arrange bread in a single layer on two rimmed baking sheets. Bake until crisp but not browned, about 10 minutes, rotating sheets halfway through.

2.) In a large saucepan, melt butter over medium heat. Add celery, shallots, and garlic; season with salt and pepper. Cook, stirring occasionally, until vegetables are softened, about 5 to 7 minutes. Add wine until evaporated, 3 to 5 minutes. Transfer to a large bowl. At this point, you can keep the dried bread out and the vegetables in the fridge after cooking to pull the dish together easily the next day.

3.) To vegetables in bowl, add bread, parsley, and eggs. Season with 1 1/2 teaspoon salt, and 1/4 teaspoon pepper and stir to combine. Mix in half of the broth. Continue adding broth just until the bread is moistened but not wet. There should be just enough liquid in the bowl as there is bread to soak it up, with none of the broth sitting in the bottom of the bowl.

4.) Just before roasting turkey, stuff the cavity with 4 cups of stuffing. Spoon remaining stuffing into a casserole dish. Cover with buttered aluminum foil and refrigerate. When turkey is taken out of oven to rest, place covered dish in oven, and bake until it is warmed through, 25 to 30 minutes. Uncover and bake another 10 minutes until crisp and golden.

5.) Serve and enjoy!

Beef Barley Soup

Originally published on November 15, 2009

This recipe is so good and while I didn’t use an actual recipe for it, I can’t say that I came up with it all by myself. It’s beef barley soup for cryin out loud! I hardly invented it! But it’s not too hard to figure out and you can actually add just about anything that you want to it. I’ve even seen recipes for beef barley soup that include green peppers, which is something so strange to me and also something that I probably would never put in beef barley soup. But, nevertheless, it’s tasty, it’s easy, and the cleanup is simple. Plus, it’ll just fill you with that warm scrumptious goodness on a cold winter’s night. What more could you want?

Ingredients:

2 pounds stewing beef 
2 tablespoons canola oil  
2 cups chopped carrots (about 2 large carrots) 
1 stalk celery 
1 large onion 
1 can diced tomatoes 
1/2 cup frozen corn
1/2 cup frozen green bean 
2/3 cup barley 
1 tablespoon dried parsley flakes 
2 teaspoons salt 
1 teaspoon dried basil 
4 cups beef broth

Directions:

1.) In a frying pan, heat oil and brown beef.

2.) Place carrots, celery, onion, corn, and green beans in crock pot. When beef is finished browning, add meat on top.

3.) Combine tomatoes, barley, parsley, salt, and basil. Pour over meat and then add beef broth.

4.) Cover and cook on low for 6 – 8 hours or high for 4 – 6 hours.

5.) Serve and enjoy!

Cheesy, Cheesy, Cheesy Broccoli Souffle

Originally published on November 16, 2009

I was really worried when I decided that I was going to tackle a souffle. Especially when I heard that you can’t make any noise or bang around in the kitchen while the souffle is cooking because it will fall and become a big egg mess in the oven. Thankfully, I learned that it’s not actually the noise or the stability level that makes a souffle turn out. It’s not having an even and consistent heat so, while stomping around the kitchen won’t affect this souffle, opening and closing the oven door will ruin this dish. That, and not having peaks that are quite right when mixing the egg whites. That was actually the part that I was most worried about but that turned out okay too. Just keep mixing until the peaks form, you’ll know when they’re “stiff.”

So, even though it worked out, does it taste good? You betcha! My girls didn’t like it that much but hey, seeing as how they’re both under the age of 4, you can’t really blame them for not being all over the souffle. And Brent, well, I didn’t even try it on him. But it certainly is good for those adults who like eggs, broccoli, cheese, and all good things!

Ingredients:

1 tablespoon freshly grated Parmesan cheese 
1 1/2 cups broccoli florets (1 large head of broccoli)
1/4 cup butter 
1/4 cup flour 
1 1/2 cups whole milk  
1 teaspoon kosher salt 
1/2 teaspoon Dijon mustard  
1 cup shredded cheddar cheese 
6 large egg yolks  
6 large egg whites 
1/2 teaspoon cream of tartar

Directions:

1.) Preheat oven to 325 degrees Fahrenheit. Coat the bottom (not the sides) of a 2-quart souffle dish with non-stick cooking spray. Sprinkle Parmesan cheese on the bottom of the dish and shake to coat. Set aside.

2.) Bring a large pot of water to boil over high heat and add broccoli, turn to low and cook 2-3 minutes until tender but not mushy. Drain well and chop florets into smaller pieces. Set aside.

3.) In a medium saucepan, melt the butter over medium heat. Add flour, whisking constantly until smooth, 1 minutes. Slowly pour in milk and continue whisking constantly until smooth, 1 minute. Slowly pour in milk and continue whisking constantly to prevent lumps from forming. Add salt and Dijon mustard, continuing to stir until mixture thickens, about 2 minutes. Remove from heat and stir in cheese and broccoli.

4.) In a small bowl, lightly whisk egg yolks. While constantly whisking, add a small amount of warm cheese mixture to the yolks. Once combined, add the rest of the yolks to the remaining cheese mixture, whisking briskly to mix. Transfer to a large bowl and set aside to cool slightly.

5.) Using an electric mixer, beat the egg whites and cream of tartar on high speed until stiff peaks form. Lightly fold half of the egg whites into the cheese sauce. Gently fold in the remaining egg whites taking care not to over-mix. Carefully pour batter into prepared souffle dish. Bake 50 – 55 minutes until puffy and golden brown.

6.) Serve and enjoy!

Cabbage Rolls

Originally published on December 3, 2009

Cabbage rolls do take quite a bit of work but it’s always well worth it! I’m the only one who likes them in my family so when I make them, I freeze most of the tray in smaller portions and have them ready for whenever I want them. Instead of freezing the cabbage to loosen the leaves, you can also drop it in rolling boiling water for about 60 seconds and then give it enough time to cool so you can pull the leaves off. I’ve done it both ways and usually use the freezer method only because I find it easiest.

Ingredients:

1 pound ground beef  
2 cups cooked rice  
1/2 cup bread crumbs  
1 medium onion, chopped  
6 cloves garlic, minced  
1 head green cabbage 
1 can diced tomatoes, drained  

Directions:

1.) The night before, make sure your head of cabbage is in the freezer, whole and in tact. The next morning, take out the cabbage and allow it to thaw. Once it has thawed, peel off the leaves and cut of the hard stem at the bottom of each leaf.

2.) Preheat the oven to 350 degrees Fahrenheit.

3.) Mix all ingredients except for the cabbage and the diced tomatoes in a large bowl.

4.) Take one of the separated cabbage leaves and hold it in your hand so that you can see the inside of the leaf. Place into the leaf a small amount of meat mixture. Fold one side of the cabbage roll over and then tuck the end over the folded piece. Fold the other side in over the tucked in edge piece and fold the other end over so that the entire cabbage leaf has enclosed over the meat mixture.

5.) Lay the finished cabbage roll in a 9″ x 13″ casserole dish and continue on with the rest of the cabbage leaves, filling them with the meat mixture and laying them in the prepared pan. Make sure you lay the cabbage rolls down in the pan seam-side down to ensure that they don’t pop open while cooking.

6.) Spoon the tomatoes evenly over the cabbage rolls.

7.) Bake in the preheated oven for approximately 90 – 105 minutes. Allow to cool for 5 minutes after removing them from the oven.

8.) Serve and enjoy!