Tabitha Brown’s (Almost) Vegan Deviled Eggs

Vegan Deviled Eggs

Originally posted on March 24, 2021

‘Good things come from bad things.’ That was a quote I heard during 2020 and I have thought of it often since. Jann Arden said it during the first episode of “The Jann Arden Podcast” recorded after the lockdown went into effect in 2020. If you haven’t downloaded, streamed, or otherwise found a way to listen to this Canadian gem’s podcast, go do so now. You can thank me later.

But yes, good things do come from bad things. I loved cooking before there was such a thing as a pandemic, and I knew a lot about it. During the pandemic, though, I had a little more time to explore and to learn about things  didn’t know much about before. I stumbled upon Tabitha Brown, a vegan (Jann would approve) and I fell in love. This woman has crazy energy, a super inspiring story, and a way to make you look at food in a way you may have not thought of before.

To be clear, I am not a vegan. I love meat. My family loves meat. But, I also always love a new approach to food, no matter what that is. So, I followed Tabitha for months, just to see what she would do with food next. Recently, she posted a video for Vegan Deviled Eggs and I knew I had to try it. I love deviled eggs. I love mushrooms. I love everything about it. I even ordered black salt from Amazon to try the recipe. It really does taste like eggs, just like Tab says! I did make some modifications to the recipe, only out of necessity. Again, I’m not vegan and so I don’t keep vegan mayo on hand. I used regular mayo. I also didn’t have garlic powder (because I forgot it during the last trip to the store) so I used some finely chopped roasted garlic I had in the fridge. Also, she calls for sweet relish in her recipe and I will never have that in my fridge. I just chopped two small gherkins into the mix and called it a day.

Below I give you her full vegan recipe, and the separate one that I made with modifications. Mine was phenomenal. I bet Tab’s is even better. If you haven’t checked out Tabitha Brown or Jann Arden‘s podcast yet, now is a good time to see what they’re about. You will not be sorry.

Tabitha Brown’s ingredients:

5 cups mushrooms
1 jar pickle juice (for marinade)
2 cups garbanzo beans (chickpeas)
4 tablespoons yellow mustard
1/2 cup vegan mayonnaise
1/8 cup sweet relish
2 tablespoons dried dill
2 tablespoons garlic powder
1 teaspoon black salt
1/2 tablespoon sea salt
1/2 tablespoon black pepper
Smoked paprika

Kate’s ingredients:

7 – 14 small to medium mushroom caps
1 jar pickle juice (for marinade)
1 can chickpeas, rinsed and drained
1 cup water
4 tablespoons yellow mustard
1/2 cup mayonnaise
2 small gherkins, chopped finely
2 tablespoons fresh dill
2 cloves roasted garlic, chopped finely
1 teaspoon black salt
A pinch of sea salt
1/2 tablespoon black pepper
Smoked paprika

The biggest difference in the instruction between Tab’s recipe and mine is that I add a little water to the chickpeas when pureeing. Otherwise, the instructions are:

1.) Wash mushroom caps thoroughly and place in marinade for one to five days.

2.) Place chickpeas in a food processor and add water, only if using my variation. Blend until smooth.

3.) Place blended chickpeas in a bowl and add mustard, mayo, gherkins or relish, and other spices and herbs, except smoked paprika.

4.) Drain mushroom caps on paper towels and dab to ensure they are as dry as possible.

5.) Turn each mushroom cap upside down and top with creamy chickpea mixture. Sprinkle with smoked paprika.

6.) Serve and enjoy!

Salted Caramel Cake

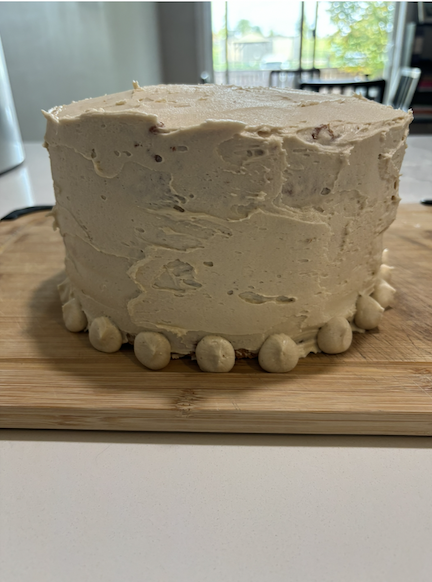
As beautiful as this cake is on the outside, it’s even more beautiful inside. I’m still kicking myself that I didn’t snap a pic of it. This cake was made for Maddie’s 16th birthday and to be honest, I was pretty intimidated at the thought of making it. But, if you break it down like I did and view it as just really three parts – the cake, the icing, and caramel sauce, it actually comes together fairly easily.

Ingredients:

For the cake:

1 1/2 cups salted butter, softened
2 cups sugar
4 large eggs, room temperature
3 cup cake flour, spooned into measuring cup and leveled
2 teaspoons baking powder
1/2 teaspoon baking soda
1/2 teaspoon salt
1 1/4 cups whole milk
1/4 cup vegetable or canola oil
1 tablespoon vanilla extract

For the salted caramel sauce:

1/2 cup salted butter
2 cups dark brown sugar
1 cup whole milk
1/2 teaspoon salt
1 teaspoon vanilla extract
2 tablespoons light corn syrup

For the frosting:

Directions:

1.) Preheat the oven to 350 degrees with rack in the center of the oven. Spray anti-stick baking spray on bottom and sides of three 8″ x 2″ round cake pans. Cut a piece of parchment to fit into each pan and press into the bottom.

2.) Add the flour, baking powder, baking soda, and salt to a medium-sized bowl and whisk together.

3.) Add the buttermilk, vanilla, and oil in a separate bowl. Stir and set aside.

4.) In the bowl of a stand mixer, add the butter and mix slightly just until smooth. Add the sugar and mix on medium speed until it is fluffy and light in color, about 5 minutes.

5.) Add the eggs one at a time to the butter and sugar mixture. Do not add another egg until the one before is completely incorporated.

6.) Add one-third of the dry ingredients to the stand mixer and mix until it is incorporated. Add half of the liquid ingredients and mix until incorporated. Continue in this manner, adding half of the remaining dry ingredients before adding the rest of the liquid ingredients. Add in the last of the dry ingredients and mix just until everything is incorporated.

7.) Using a scale, weigh the entire batch of batter. Then measure out the batter into three equal batches, pouring each one into a separate prepared cake pan.

8.) Place on center rack in oven and bake for 30 – 35 minutes until a cake tester or toothpick inserted into the center comes out clean.

9.) When cakes are finished baking, remove from oven. Run a knife along the sides of the cake to separate it from the pan. Allow to cool in the pans for half an hour. Then, turn out onto a wire rack and cool completely.

10.) To make the caramel sauce, place the butter in a heavy-bottomed pan over medium heat. When melted, add the milk. dark brown sugar, light corn syrup, vanilla, and salt.

11.) Stir slowly so the mixture does not come up the side of the pan. After the mixture starts boiling, lower the heat. Cover and simmer for about 5 minutes.

12.) When the mixture has thickened slightly, pour into a heat-proof container. Allow to cool completely before removing 1/2 cup and setting aside to use later.

13.) To make the buttercream, add 1/2 cup of butter to a mixing bowl and mix just until smooth. Keeping the mixer on low, add half of the powdered sugar and mix until it is fully incorporated. Add 1 1/2 cups of the caramel sauce and mix until it is incorporated. Then add remaining powdered sugar and beat on medium speed until frosting is light and creamy. This should take about 5 minutes.

14.) Start assembling the cake by placing one cake layer on the surface you will serve the cake on (currently, I just use a wood cutting board). Place the buttercream frosting into a resealable bag and push towards one end while twisting the top to form a piping bag. Snip the corner.

15.) Pipe a border around the edge of the bottom layer of cake. Pour approximately 1/4 cup of caramel sauce on top of the first cake layer.

16.) Pipe dots of buttercream onto the caramel sauce and then gently spread to disturb as little of the sauce as possible. Repeat with the next layer by laying it on top, creating a border, spreading caramel sauce, and piping frosting on top of sauce.

17.) Once all three layers have been placed, turn the cake looking for gaps in the frosting and fill them in. Then, spread a thin layer (the crumb layer) over the top and sides. Place the cake in the fridge for half an hour to allow everything to firm up.

18.) Then, being very generous with the frosting, place a big dollop on top. Spread a thick layer around before continuing with the sides. Continue to scoop frosting (I use an off-set spatula for this), place it where needed on the cake, and spread, until you have as much frosting as you like.

19.) If desired, pipe small ‘buttons’ along the bottom of the cake.

20.) Serve and enjoy!