Originally published on May 16, 2017
Can you believe I have not posted a dessert recipe on this site in 4 months? Okay, there were some Easter goodies last month, but no actual dessert. So, I thought it was time to remedy that and post something sweet and delicious!
To be honest however, that wasn’t the reason for making this Butterscotch Pie. In 45 days we’ll be moving and I’m trying to empty my cupboards as much as possible before we do. Having some butterscotch chips on hand, I thought they’d work perfectly in the pie. So I diligently gathered all the ingredients only to find out that, when making butterscotch pie, you don’t use chips. You actually make the butterscotch, which is kind of fun, but didn’t fulfill the reason for the pie in the first place. I guess that means I have to come up with another way to use the chips, which isn’t necessarily a bad thing.
Ingredients for the pie filling:
- 2 1/4 cups milk
- 1 cup heavy cream
- 6 tablespoons unsalted butter
- 1 1/4 cups brown sugar, packed
- 3 egg yolks
- 1/4 cup cornstarch
- 1/4 teaspoon salt
- 2 tablespoons Scotch whisky
- 1 1/2 teaspoons vanilla extract
Ingredients for the meringue topping:
- 2 egg whites
- Pinch salt
- 1/2 cup powdered sugar
- 1 pie crust, blind-baked
Directions:
1.) Start by preparing the pie filling. In a large saucepan, combine the milk and cream, and bring to a simmer over medium heat. Immediately turn off the heat and set aside.
2.) In a large, heavy skillet melt the butter over medium-high heat. Stir in the brown sugar, raise the heat to medium-high and cook for about 5 minutes, stirring constantly to caramelize the mixture.
3.) Whisking constantly, gradually add the butter/brown sugar mixture to the hot cream/milk mixture. The caramelized mixture may seem as though it’s seizing as first. Just keep whisking, making sure the whisk stays in the hot mixture. It will loosen up and incorporate after a few minutes.
4.) Put the egg yolks in a medium bowl. Whisk in about 1/2 cup of the hot milk mixture. Whisk in the cornstarch and salt until dissolved. Whisk the cornstarch mixture back into the hot milk mixture in the saucepan. Add the scotch and whisk in.
5.) Whisking constantly, cook over medium-high heat until thick and just boiling. Turn off the heat and whisk in the vanilla. Pour into the pre-baked pie shell and chill, uncovered, at least 2 hours or overnight.
6.) Close to baking time, make the meringue topping. Whip egg whites and salt in the bowl of a stand mixer until soft peaks form. Continue beating and gradually add powdered sugar until stiff peaks form.
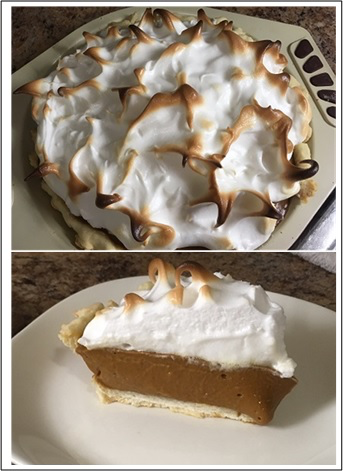
7.) Preheat oven to 400 degrees Fahrenheit. Spread meringue on top of the cooled pie and bake for 5 minutes, until the meringue is lightly browned. Remove from oven and let chill for about 10 minutes before placing in the fridge and chilling completely until ready to serve.
8.) Serve and enjoy!