Originally published September 5, 2017
Those who know me well know that if I’m pressed to give an opinion about the one perfect food in this world, my answer would be eggs. Every. Single. Time. It used to be due to the fact that there’s just so much that can be done with eggs. You can whip them, you can use them to bind other food, or you can simply cook it to your liking and enjoy an egg in its own beautiful simplicity. My love for this perfect food then graduated to finding things to stuff them in – namely, bell peppers and avocados. But what if you stuffed an egg inside an egg? It’s something I would have never thought of if I hadn’t been lucky enough to get a glance of this concoction of Cloud Eggs on Instagram.
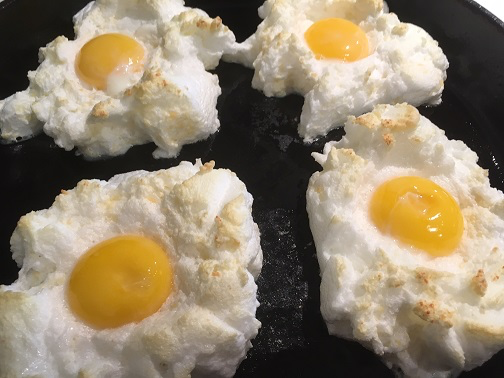
I immediately wondered what it was and how to make it; and the answer was so simple. It’s one beautiful egg, with the white and the yolk prepared somewhat separately. And it’s one of the biggest trends with millennials these days. All you do is separate the eggs, being verycareful not to break the yolks, which is even harder to do before they’ve been cooked. The whites get a quick whip and an even quicker bake in a very hot oven and when done, you’ve got an egg on your plate that resembles the sun peaking out from the clouds. I’m not one that compares the food on my plate to art but using this method, I just couldn’t help it. So move over avocado toast, an egg is about to take the throne!
Ingredients:
- 2 – 4 eggs (or however many you want to make!)
- 2 – 4 tablespoons of Parmesan cheese (you want about a tablespoon of cheese for each egg)
- A small pinch of salt for each egg
Directions:
1.) Preheat the oven to 450 degrees Fahrenheit. Cover a baking sheet with parchment paper (or use a naturally non-stick cast iron pan like I did and forget about the parchment).
2.) While being extremely careful, separate the egg whites from the yolks. The whites can be placed into a large bowl or the bowl of an electric mixer fitted with the wire whisk attachment. Be very careful to place the yolks in individual ramekins or small bowls. It’s important not to break the yolks; they won’t sit in the egg whites and just simply won’t look as nice.
3.) Turn the mixer on low at first and when frothy, add the salt. Turn the mixer to a higher setting and really whip those egg whites. You’re looking for stiff peaks here.
4.)Sprinkle the Parmesan cheese over the surface of the egg whites. Working gently but quickly so you don’t deflate the whites, fold the cheese in.
5.) Equally divide the egg whites onto the prepared baking sheets. Start by simply mounding them and then, using a small spoon, carve out an indent by moving the spoon down and to the sides in a gentle motion.
6.) Place the whites into the preheated oven for 3 minutes.
7.) Remove the egg whites from the oven. Very carefully pour one egg yolk into the space you’ve carved out for it in the egg white. When all egg yolks have been returned to their whites, place the entire thing back in the oven for another 3 minutes.
8.) Serve and enjoy!