Jen’s Greek Pasta Salad

Originally published on August 31, 2016

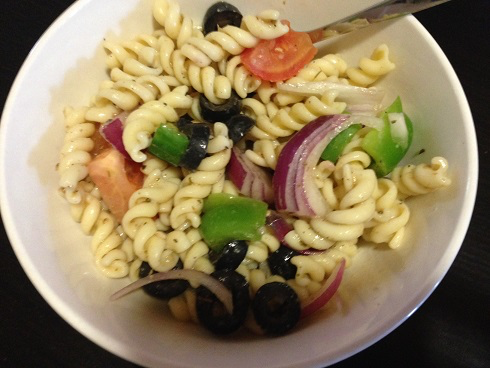
I have no explanation as to why it took me so long to get this recipe up on the site. One of my very good friends, Jen, gave it to me when my babies were still babies, and she actually gave me the recipe after giving me a massively sized bowl of it – apparently no one in her house ate it at the time. And ya know what? No one in my house eats Jen’s Greek Pasta Salad either, and that’s just fine with me, because it means I can eat it straight out of the bowl.

Ingredients:

For the salad:

1/2 bag dried fusilli, macaroni, penne, or other short pasta
1 green pepper, chopped in large dice
1 red onion, sliced 
1 cup cucumber, chopped in large dice
1 tomato, chopped in large dice
1/2 cup canned black olive, drained and rinsed
1/2 cup Feta cheese
Salt

For the Greek salad dressing:

2 fresh garlic cloves
1/2 teaspoon salt
1 1/2 teaspoons Dijon mustard
1/2 cup quality extra-virgin olive oil
2 tablespoons fresh lemon juice
1/2 teaspoon sugar
5 tablespoons red wine vinegar
1 tablespoon dried oregano
1 tablespoon dried basil
Freshly ground black pepper

Directions:

1.) Place a large pot of heavily salted water over high heat and bring to a rapid boil. Add dried pasta, stir, and cook for about 7 minutes until pasta is al dente. Drain, and rinse with boiling water to stop the cooking process and cool down the pasta.

2.) While pasta is cooking, prepare the dressing. Mince the two garlic cloves on a cutting board and sprinkle with the salt. Slide the blade of the knife back and forth over the garlic, mashing it and turning it into a paste.

3.) Place the olive oil, Dijon mustard, lemon juice, sugar, red wine vinegar, oregano, basil, garlic, and black pepper into a blender. Blend until all ingredients are incorporated. Taste, and adjust seasoning if necessary.

4.) Place the pasta and other salad ingredients into a large bowl. Pour as much dressing as you’d like onto the salad and toss to combine well.

5.) Place the salad into the fridge for one hour to meld flavours and chill all ingredients. Toss again just before serving.

6.) Serve and enjoy!

Grandma’s Casserole

Originally published on September 6, 2016

This summer was not the best for us. It was all going fine with sun and sand and everything else, and then my grandma fell. She’s 94 and broke her hip, so it was off to Niagara for us where it was a bunch of hospital visits and other stuff to go along with it. So needless to say, Gram has been on my mind.

During one of my hospital visits, Grandma and I got talking about a casserole she made us when we were kids. It’s very simple, with just pasta, hot dogs, and some eggs, but man – was it good! I don’t remember a time when I would see this on my plate and not have the entire thing gone in 60 seconds. It was so good as a matter of fact, that after we talked, I couldn’t stop thinking about it. That pasta, those hot dogs, and those eggs that nestled into all the nooks and crannies like suction cups, just waiting to be cajoled out. Mmm, delicious!

This version does modernize my grandma’s a bit, mostly just with fresh herbs, and I don’t remember if she actually put bread crumbs on it. But just like when I think of her meatloaf, when I think of Grandma’s CasseroleI think bread crumbs.

Ingredients:

  • 1/2 package macaroni, or other short pasta (about 5 cups)
  • 5 eggs
  • 4 hot dogs
  • 3 tablespoons fresh parsley, chopped
  • 3 tablespoons fresh chives, chopped
  • 1 cup bread crumbs
  • 1/4 cup butter
  • Salt
  • 1/2 cup freshly grated Parmesan cheese
  • Pepper

Directions:

1.) Preheat oven to 350 degrees Fahrenheit.

2.) Bring a large pot of heavily salted water to a boil. When boiling, add pasta, stir, and cook until just al dente. Drain, and set aside.

3.) While the pasta is cooking, cook the hot dogs as you usually would, either on a grill or in a pan. When finished cooking, slice them thinly and set aside.

4.) Melt the butter in a small saucepan on the stove. Remove from the heat, then add the bread crumbs and a pinch of salt and stir to fully combine.

5.) Add the pasta, hot dogs, parsley, chives, cheese, salt and pepper to a large bowl and stir to combine well. Pour into a 9″ x 13″ casserole dish and distribute evenly.

6.) Beat the eggs slightly and pour over the entire casserole. Sprinkle the bread crumbs evenly over top. Place the casserole into the preheated oven and bake for about 30 minutes, until the bread crumbs are golden brown and toasted. When removing from the oven, allow the casserole to rest for about 5 minutes before cutting into it.

7.) Serve and enjoy!

Grilled Maple Butter and Herb Chicken

Originally published on September 19, 2016

I’m crazy about maple syrup. It’s a relatively new thing, but in the past few years I haven’t been able to shake it. I try to put it on whatever I can get away with, and while at the CNE last month, I bought a jar of maple syrup in one of its finest forms – maple butter.

One of the first things I cooked when I got home was chicken. And it being one of the last gorgeous days of the year, it was going on the grill. Well, if I’m already going to put butter on my chicken, and I have maple butter in the fridge, it doesn’t take a huge leap to figure out that substitution. I chopped up some herbs, added it to a maple butter/olive oil combo and threw it on. It was as scrumptious as it sounds.

Ingredients:

  • 10 bone-in, skin-on chicken thighs 
  • 1/2 cup maple butter, melted 
  • 1/4 cup olive oil
  • 2 tablespoons fresh chives, chopped
  • 2 tablespoons flat-leaf parsley, chopped 
  • 1 tablespoons fresh thyme, chopped
  • Salt
  • White pepper

Directions:

1.) Melt maple butter over medium heat. Pour into a bowl and allow to cool slightly. Mix with olive oil, fresh herbs, salt, and white pepper. Brush butter mixture over each piece of chicken, reserving any remaining butter for basting.

2.) Preheat an outdoor grill with medium flame on both sides. When the entire grill is hot, turn the flame off one side. This side will receive indirect heat, and is the side the chicken will be cooked on.

3.) Place the chicken on the side with indirect heat, skin-side down, and close the lid. Cook for about 20 minutes, basting every 5 – 10 minutes. Turn the chicken over, baste again with the butter, and close the lid. Cook for another 20 – 25 minutes, basting every 5 – 10 minutes.

4.) When the chicken is done (juices no longer run pink), remove the chicken from the grill. Place on a large platter, cover with foil, and rest for about 10 minutes.

5.) Serve and enjoy!

Fire Roasted Tomatoes

Originally published on September 21, 2016

Tomatoes are one of my favourite foods. Whether you give them to me as a sauce, an appetizer, or just in a bowl, I’ll gladly eat them all. Roasting tomatoes over fire makes them even sweeter and juicier, and gives them a hint of smokiness that is perfect in the middle of summertime, or any time. And it also makes for a super quick and easy side dish!

Ingredients:

  • 1 pint cherry tomatoes, washed and patted dry 
  • 2 tablespoons olive oil, plus more for brushing
  • 2 tablespoons fresh basil, chopped 
  • Salt
  • Pepper

Directions:

1.) Skewer tomatoes, one at a time, onto steel or wooden skewers (remember wooden skewers need to be soaked first). Brush each tomato with a bit of olive oil.

2.) Preheat an outdoor grill over high heat. When piping hot, place the skewers of tomatoes onto the grill, directly over the flame. Grill each skewer for 5 – 7 minutes, turning the skewers regularly. Tomatoes are done when they are slightly charred and wilted, and just beginning to burst.

3.) Remove tomatoes from the skewers and place them into a large bowl. Add more olive oil, plus basil, salt and pepper. Toss to mix thoroughly.

4.) Serve and enjoy!

Jaime’s French Onion Pork Chops

Originally published on September 29, 2016

I’ve told you that my friends give me some good recipes, haven’t I? This one came to me from my good friend, Jaime, who’s just as crazy about food as I am, and is one of those people that takes pictures of their food and puts it up on Facebook. Just like I am!!!

When she posted these French Onion Pork Chops, my mouth started watering and I knew I had to make them. The recipe Jaime gave me wasn’t anything like I suspected it would be, but I did follow it to a tee and I suggest you do, too. It’s scrumptious and comforting, and everything a pork chop recipe should be.

  • 4 – 5 boneless pork chops 
  • Big chunk of butter (I think I used about 1/4 cup)
  • 4 – 5 medium-sized potatoes, sliced thinly as you would for scalloped potatoes
  • 1 large yellow onion, thinly sliced
  • 2 cloves garlic, minced
  • 1 package dry onion soup mix
  • 2 cups Monterey Jack cheese, shredded
  • 2 cups water

Directions:

1.) Melt butter in a frying pan set over medium-high heat. Place pork chops in and fry for about 3 minutes on each side, just until they get nicely seared. Remove from frying pan and place on a separate plate.

2.) Add the potato and onions slices to the same pan and toss, cooking for about 2 minutes. Add the garlic, stir, and cook for another 30 seconds.

3.) Spread the potatoes out evenly in the pan and place pork chops over top of them. Sprinkle soup mix over top of all contents in the pan and add water to the pan (I tried not to splash it over the pork chops so that the seasoning stayed on them).

4.) Turn heat to low and simmer until pork chops are completely cooked through, and potatoes are soft.

5.) Turn heat off and distribute the cheese evenly between the pork chops. Let sit until the cheese is melted (I placed a lid over my pan just to help speed along the melting process).

6.) Serve and enjoy!

Salted Caramel Popcorn

Originally published on October 6, 2016

Is there anything better than caramel? I mean, really, I’d argue that it’s even better than chocolate. After all, we don’t try to get our roasts and vegetables to chocolatize now, do we? No, we want them to caramelize, because only then do you get the buttery, sugary tastiness that only comes from caramel and almost-burnt sugar.

Making salted caramel popcorn is a bit of work, but it’s so worth it. And it’s really more time-consuming than it is manual labour, but at the end of it all you’ll be able to sit back and munch away on a huge bowl filled with salty/sweet snacks. Caramel popcorn balls also make for great teacher’s gifts; not to mention that Halloween is coming up, for those who need to bring party treats. If you want your popcorn to be more caramel-y than salty, just leave out the dusting of salt at the end, and reduce the salt in the caramel sauce to just half a teaspoon.

  • 10 – 12 cups popped popcorn 
  • 3/4 cup unsalted butter
  • 1 cup packed brown sugar
  • 1 teaspoon vanilla extract
  • 2 teaspoons coarse salt, divided
  • 1/4 teaspoon baking soda

Directions:

1.) Preheat the oven to 250 degrees Fahrenheit and line two baking sheets with parchment paper.

2.) Melt the butter in a medium-sized saucepan over medium heat. Mix in the sugar and stir until the sugar is slightly moistened. Increase the heat to medium-high and bring the mixture to a boil. Once boiling, boil for 3 – 4 minutes, stirring constantly and scraping the bottom of the pan to ensure the mixture does not burn.

3.) Remove the saucepan from the heat and add the vanilla, 1 teaspoon of salt, and baking soda. The mixture will likely bubbly violently at this point, just keep stirring carefully until a smooth, glossy sauce is formed.

4.) Place the popcorn into a large bowl and pour the caramel sauce over top. Using your hands (if the sauce is cool enough) or two large spoons, stir the popcorn to ensure it gets completely coated with the caramel sauce.

5.) Distribute the popcorn evenly between the two baking sheets. Place in the preheated oven and bake for about one hour, stirring every now and then to break up any clumps.

6.) Remove popcorn from oven and immediately sprinkle with remaining 1 teaspoon of salt. Stir to thoroughly combine. Let popcorn cool completely before serving or storing in an airtight container for up to one week.

7.) Serve and enjoy!

Harvard Beets

Originally published on October 17, 2016

Harvard beets are a funny thing. They’re kind of like pickled beets, but instead of being simmered in a pickling liquid and served cold, they’re quickly run through a warm gastrique and served hot. I spent some time trying to find out why these particular beets are known as Harvard beets, but my search was in vain. I still don’t know how this dish got its name, but I can only guess it’s because some Harvard genius served pickled beets warm one day and, rather than admit their mistake, simply gave them a new name. What I do know is that they’re damned good!

Ingredients:

  • 4 beets, scrubbed and trimmed
  • 3/4 cup white sugar
  • 1/2 cup white vinegar
  • 1/4 cup water 
  • 3 tablespoons olive oil
  • 1 tablespoon cornstarch
  • Salt, to taste

Directions:

1.) Preheat the oven to 400 degrees Fahrenheit.

2.) Toss the beets with the olive oil and a bit of salt. Individually wrap each beet with aluminum foil and, when the oven is hot, place inside and bake for 45 minutes to one hour, until the beets are fork-tender. When beets are finished, unwrap the foil and let cool for just a minute or so. When cool enough to handle, slip the skin off the beets. If you wait too long, as the beets cool, that skin will tighten up and cling to the flesh once again so it’s easiest if you do this as soon as you can.

2.) Once the beets are peeled, slice them about 1/4″ thick, if using large beets or, slice in half if using smaller beets.

3.) Place the water in a medium-sized saucepan and add to it the sugar, vinegar, cornstarch, and a pinch of salt. Whisk to mix and bring to a boil over medium-high heat. Reduce heat to medium and let simmer until the sauce is thickened.

4.) Add the sliced beets to the sauce in the pan and stir to mix through. Cook for another 5 minutes or so, just until the beets are heated through.

5.) Serve and enjoy!

Go Lo Yuk (Sweet and Sour Pork)

Originally published on October 20, 2016

I had no idea what yuk meant in Cantonese speak before doing this recipe, but I could only assume that it meant pork, or at least, sweet, or maybe even, sour. I mean, it can’t actually mean the same thing it means in English. Who would name a dish after that?! But, this is a sweet and sour pork recipe, so it only makes sense that  yuk would mean at least one of those things, right? Well, it doesn’t.

In Cantonese, yuk actually means “roast meat”, which is odd, since this meat is actually deep fried, like most other sweet and sour pork recipes.  After deep-frying, you can leave the meat as is to keep its crispy, crunchy texture, and serve the sauce on the side for dipping; but I like to throw the meat right into the sauce for that truly Chinese take-out element. Also, doing it that way lets me cook the pork in the morning and just warm it through in the sauce at dinnertime. And those make-ahead meals that can be pulled together right at dinnertime are some of my favourite kinds.

Ingredients:

For the sweet and sour pork batter:

  • 1 pound boneless pork loin, cut into 1″ pieces
  • 2 large eggs, beaten
  • 1/4 cup cornstarch
  • 1/4 cup all-purpose flour 
  • 1/4 cup water 

For the sauce:

  • 3 tablespoons water 
  • 2 tablespoons ketchup
  • 1 small can of pineapple pieces, with juice
  • 1 1/2 tablespoons rice vinegar
  • 1 tablespoon Worcestershire sauce
  • 1 tablespoon soy sauce
  • 2 tablespoons sugar
  • 1 tablespoon garlic, minced
  • 1 teaspoon fresh ginger, minced
  • 1 red bell pepper, cut in a large dice
  • 1 orange bell pepper, cut in a large dice
  • 2 cups vegetable oil, for frying, plus 1 tablespoon
  • Coarse salt, for sprinkling 

Directions:

1.) Prepare the batter.In a medium bowl, stir together the eggs, cornstarch, and flour. Add the water slowly, and add just enough that you get the batter to a consistency that will coat the pork. Add the pork and stir gently to coat. Let stand at room temperature for 10 minutes.

2.) Prepare the sauce. In a medium-sized saucepan, combine the water, ketchup, pineapple juice, rice vinegar, Worcestershire sauce, soy sauce, and sugar. Set over high heat and bring to a boil then, reduce the heat to medium-low and simmer until the sauce is reduced slightly, about 15 minutes. Set aside.

3.) Heat the oil in a large Dutch oven (or a wok) over medium-high heat until it reaches a temperature of 350 degrees Fahrenheit (or until bubbles form along a wooden spoon that’s held in place in the oil). Working in 2 or 3 batches, place some pork cubes into the hot oil and fry until golden brown on the outside and the pork is cooked through, about 4 to 5 minutes. Remove the pork using a slotted spoon and place on paper towels. Sprinkle lightly with coarse salt. Continue with the remaining pork.

4.) Heat the remaining 1 tablespoon of vegetable oil in a large wok or frying pan set over medium-high heat. When hot, add the bell peppers, sprinkle with salt, and stir-fry for about 5 minutes. Add the ginger and garlic and cook for another 20 seconds. Add the pineapple and the sauce and stir to coat the vegetables.

5.) Let the sauce simmer for 2 to 3 minutes to allow the pineapple to become tender. Return pork to the frying pan or wok with the sauce, and stir to coat. Leave in the pan for a few minutes, just so the pork can warm through.

Goat Cheese Stuffed Cherry Tomatoes

Originally published on October 27, 2016

These delicious little stuffed tomato nuggets were whipped up as a quick appetizer on an episode of Dinner Party Wars, a show that’s was aired on the Food Network until recently. Shocked that the hosts didn’t have anything for their guests to nibble on as soon as they walked through the door, Chef Corbin suggested that they take little tomatoes, stuff ‘em with goat cheese mixed with chopped herbs, and set them out for their guests to enjoy. After that, I couldn’t stop thinking about them! I had to try them for myself, and my girls and I gobbled up all two dozen of them in about an hour.

When scooping out the tomatoes, I suggest using the end of the smallest teaspoon you can find. This will help scrape the seeds out rather than scoop, which can break the skin of the tomato and cause it to break apart. And if your cherry tomatoes have little white walls inside them like mine did, the end of the spoon can also be used to just break that down slightly and scrape that out, too.

Ingredients:

  • 24 cherry tomatoes
  • 1 head of garlic
  • 1 cup goat cheese
  • 1 tablespoon fresh parsley, chopped
  • 1 tablespoon fresh thyme, chopped
  • 1 tablespoon chives, chopped
  • 1 tablespoon olive oil
  • Salt
  • Pepper 

Directions:

1.) Preheat the oven to 350 degrees Fahrenheit. Slice off just the top of the head of garlic and remove any loose papery skins (but no need to peel it completely). Sit the garlic in a small baking dish, drizzle with olive oil and season with salt and pepper. When oven is preheated, place the garlic in and roast for 30 – 45 minutes, until the garlic cloves are soft and slightly browned.

2.) When garlic is cool enough to handle, squeeze the roasted garlic cloves out into a small bowl. To the garlic add the goat cheese, herbs, and a touch of salt and pepper. Mix to incorporate all ingredients, taste, and then adjust seasoning if needed.

3.) Slice just the tops off the cherry tomatoes. Using a spoon, scoop out the seeds of each tomato and remove any fleshy walls. As you remove the seeds from the tomatoes, place the tomatoes upside down on a paper towel. Let sit and drain for 10 minutes.

4.) Sit cherry tomatoes upright and sprinkle a little bit of salt and pepper inside each. Using the same thin handle of the spoon, scoop a little bit of the cheese mixture into each, making sure that the stuffing sits slightly above the top of the tomato.

5.) Place stuffed tomatoes on parsley or other herbs (it will help keep them upright) and serve and enjoy!

Estonian Chicken

Originally published on November 1, 2016

I’ve talked a lot about my grandma on my blog, but I don’t know if I’ve ever mentioned that she’s Estonian. She fled from the country when she was in her late teens/early twenties, and she’s got one of the most interesting stories of anyone I’ve ever met. Scratch that. She’s got the most interesting story of anyone I’ve ever met.

When I think back on it, Grandma cooked pretty traditional Canadian/North American dishes while we were growing up. Split pea soup, meatloaf, and casseroles were all big favourites at Grandma’s, and I never really identified a lot of it as being traditionally Estonian. However, she does make this incredible pickled beet and potato salad that’s known affectionately as just “Red Salad” at my house. And with the addition of herring, as kids we all knew it was a dish that Grandma had brought with her from Estonia. It’s crazy good and coincidentally, you can also find it on the site.

But for now, we have this Estonian Chicken recipe. It comes from the Canadian newspaper The Globe and Mail, which is perfect because, I am also Canadian. The Globe calls it “Chicken from Tallinn,” which just happens to be the actual city that Grandma grew up in, but I did make some adjustments. Some of the things they called for – like Kalamata olives and pancetta just weren’t things that I grew up with, and I really did want to make something that I knew would be easily found on Grandma’s table back in the day. So this is my Estonian Chicken recipe, and I hope you like it as much as I did!

Ingredients:

  • 1 head garlic, with cloves separated
  • 2 pounds (about 8) boneless, skinless chicken thighs 
  • 1 teaspoon ground fennel
  • 1 teaspoon chili flakes
  • 1 tablespoon fresh rosemary, chopped
  • 3 tablespoons olive oil
  • 1 onion, chopped
  • 1/2 cup red wine
  • 1 can diced tomatoes, drained
  • 1 cup chicken stock
  • Zest of 1 lemon
  • 1 cup frozen peas
  • 2 tablespoons fresh parsley, chopped
  • Salt
  • Pepper

Directions:

1.) Preheat oven to 400 degrees Fahrenheit.

2.) Bring a small pot of water to a boil. Remove root ends from garlic and add cloves to the boiling water. Boil for 2 minutes. Drain, peel garlic cloves, and set aside.

3.) Cut chicken thighs in half. Sprinkle with fennel, chili flakes, rosemary, salt, and pepper.

4.) Heat oil in a large oven-proof skillet over high heat. Brown chicken in batches, about 2 minutes per side. Remove to a plate and set aside.

5.) Reduce skillet heat to medium-low. Add onions and garlic cloves and saute for 5 to 7 minutes, or until everything is soft.

6.) Add red wine, bring to a boil, and let simmer until it’s reduced by half. Add tomatoes and stock and simmer for 5 minutes.

7.) Add the lemon zest and season with salt and pepper. Remove from heat and stir in the peas. Return the chicken to the skillet.

8.) Transfer the skillet to the oven and cook for 10 – 15 minutes, until the chicken is entirely cooked through and no longer pink in the centre.

9.) Remove skillet from the oven and sprinkle the entire dish with chopped parsley.

10.) Serve and enjoy!