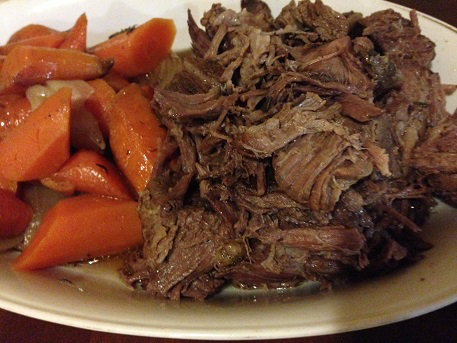
The Perfect Mashed Potatoes to Solve Your Lumpy, Gluey Problems

Originally published on November 10, 2014

I’ve been asked a few times how to get the perfect mashed potatoes. They seem like such simple things, but perhaps they’re the reason Julia Child once said that “Potatoes are the most neurotic vegetable; you never know what they’re going to do.” After all, a simple thing like boiling potatoes and mashing them up should result in pretty much the same taste and texture every time. So why do they sometimes turn lumpy, or gluey, or completely tasteless? Because in the simple world of mashed potatoes, there are a multitude of things that can go wrong. Here’s how to get them perfect every single time.

Ingredients:

3 pounds Yukon Gold potatoes, peeled, rinsed, and halved
1/4 cup butter
1/2 cup heavy cream
Lots of salt
White or black pepper

Directions:

1.) Place potatoes in a large pot and fill with water. You probably don’t need as much water as you think. The general rule of thumb is that you need a thumbs’ length of water above the potatoes. That will be plenty to boil the potatoes.

2.) Generously salt the water and place the pot of potatoes on a burner set to high heat. Cover with a lid and bring up to a boil. Then keep covered, lower heat to medium and gently boil the potatoes just until they can be easily pierced with a fork. Make sure that the fork can reach to the centre of the potato, but don’t over-boil them. Doing so might result in making the potatoes either gluey or runny. It will also rob them of some of their flavour.

3.) While potatoes are boiling, place butter and cream in a saucepan set over medium heat. Once warm, remove from heat. It doesn’t have to be piping hot, just warm enough that the mixture doesn’t cool down the potatoes when added to them.

4.) Once the potatoes are fork tender, turn the heat on the burner down to low and drain. When drained, add them back to the burner and stir for one minute. This will help evaporate any moisture that’s remaining in the potatoes, giving you a drier, fluffier product in the end.

5.) Turn heat off and add warmed butter and cream. Using a ricer (the best option,) or a hand masher, mash the potatoes just until they have completely broken apart. It’s okay if a few lumps remain but do not use a hand-held or stand mixer. This will definitely over-mix your potatoes and will make them extremely gluey.

6.) Once potatoes have been mashed, use a wooden spoon to stir so they can break down even more and you can get rid of some of most of the lumps. Season with salt and black or white pepper. I prefer white, only because I don’t like the specks black pepper puts in mashed potatoes. Some add even more spices here, with a touch of nutmeg being one of the most popular. Stir again just to incorporate seasoning before serving.

7.) Serve and enjoy!

Perogie Pasta Shells

Originally published on November 11, 2014

One of the best parts of being a foodie is  having foodie friends that have great ideas that I would never come up with. This is one of those creations, posted to Facebook by my good friend Jaime, who’s also one of the most faithful followers of this site. This dish is nothing short of something sent from heaven, and I’ve said a few times that if I had a menu, this would be on it. Just like traditional perogies, you can add any topping or filling to the mashed potatoes; I chose crispy sausage and caramelized onions.

Ingredients:

25 – 30 jumbo pasta shells
6 cups mashed potatoes 
3 Italian sausages 
2 onions, sliced
4 tablespoons olive oil, divided
2 tablespoons butter
2 tablespoons all-purpose flour
2 1/2 cups milk
2 cups Cheddar cheese, plus 1/2 cup
Salt 
Pepper

Directions:

1.) Preheat the oven to 400 degrees Fahrenheit. Add 1 cup of Cheddar cheese to the mashed potatoes and stir.

2.) Bring a large pot of water to a rolling boil. Salt heavily (enough so that the water tastes like the ocean) and drop pasta shells in. Cook for about 6 minutes, then drain. It’s important to leave them a little under-cooked, as they’ll be in the oven for a few minutes as well. You also don’t want to cook them so much that they fall apart when you drain them. After pasta shells are drained, place them side by side in a casserole dish.

3.) Bring a medium-sized pot of water to a rolling boil. Drop in the Italian sausages and lower heat to medium. Simmer the sausages for about 20 minutes, until they are cooked all the way through. Drain.

4.) Heat 2 tablespoons of olive oil in a skillet over medium heat. When hot add sausages and cook for several minutes on each side, until the sausages are browned and crispy. Remove sausages from the skillet and allow to cool for a few minutes before quartering and chopping in a small dice. Set aside.

5.) In another skillet, heat remaining 2 tablespoons of olive oil over medium and when hot add the onions. Toss the onions to coat them in the oil and cook, stirring occasionally, until the onions are very tender, carmalized, and sweet. Season with salt and pepper, and set aside.

6.) In a medium-sized saucepan, melt butter over medium heat. Add flour and whisk to fully incorporate. Cook for two minutes, to eliminate the taste of raw flour. Slowly add in the milk, whisking as you do to break up any lumps. Cook the mixture over medium heat for about 10 minutes, until it’s thickened. Remove from heat and add 2 cups of Cheddar cheese, about 1/2 cup at a time, stirring to melt and incorporate after every addition. Set aside.

7.) Assemble the shells. Stuff each with about 2 tablespoons of mashed potatoes and then spoon on a tablespoon or two of the cheese sauce. Top with sausage, then carmalized onions. Place the shells into the oven and bake for 15 or 20 minutes, until all ingredients are hot throughout.

8.) Serve and enjoy!

Picante Sauce

Originally published on November 14, 2014

Did you know that picante sauce, salsa, and pico de gallo are all the basic same ingredients, just done in a different way? Pico de gallo is the chunkiest of them all, with fresh tomatoes simply chopped up and tossed with some lime juice, onions, cilantro, and jalapenos. Salsa is all of that, just the teeniest bit smoother but leaving the sauce pretty chunky. Picante sauce on the other hand, takes all of those ingredients and blends ‘em up so that the resulting sauce is completely smooth and completely delicious. I roasted my veggies first for this one, just to do something a bit different with it and it totally paid off. As a side note, this recipe makes more than what you see here. Don’t be like me and knock the bowl over and you’ll have much more to enjoy!

Ingredients:

3 tomatoes, quartered
1 onion, quartered 
1 jalapeno pepper, whole
2 tablespoons olive oil
Salt
Juice of 1/2 lime
1/4 cup cilantro, chopped 

Directions:

1.) Preheat the oven to 425 degrees Fahrenheit. Place the tomatoes, onion, and jalapeno pepper on a baking sheet and drizzle the olive oil over top. Toss to coat all of the vegetables in the oil and sprinkle generously with salt.

2.) Place the baking sheet in the preheated oven and roast until the skins of the tomatoes and pepper are wrinkled and soft, and the vegetables are just beginning to brown. Remove from oven and let cool enough until you can handle them.

3.) Cut the top off the jalapeno pepper and place all of the vegetables into a blender. Puree until the mixture is completely smooth.

4.) Pour the mixture into the bowl and add the lime juice and the cilantro. Taste, and adjust seasoning if necessary.

5.) Serve and enjoy!

Slow Cooker Meatloaf

Originally published on November 18, 2014

Guess what? I got a new slow cooker two days ago! My last one, the one that was a wedding gift to my parents, sadly gave up the ghost over a year ago. It was sad for a couple different reasons, one of them being that I no longer had one of my favourite appliances – the slow cooker – to use. Two days ago, my mother-in-law stepped in to help by giving me a slow cooker that I can now fill with good stuff during the day, set, and know that my family is eating something delicious and homemade-by-mum when I’m at work. So what was the first thing I made in it? Meatloaf.

I had never made meatloaf in the slow cooker before, but it is now my preferred choice (and I’ve made it a ton of different ways!) It’s so tender and moist, and absolutely perfect. If you’re like me and you have reservations about cooking meatloaf in a slow cooker, get rid of them right now. Yes, the meatloaf will hold its shape. No, it will not be too “wet” or “mushy”; nor will it completely fall apart when you try to take it out. And finally, yes. This might be the only way you make meatloaf from now on, too.

Ingredients:

1 1/2 pounds ground beef
2 eggs, lightly beaten
2 tablespoons Worcestershire sauce, divided 
3/4 cup milk
3/4 cup breadcrumbs
1/2 onion, very finely minced
1 tablespoon garlic powder
1 teaspoon dried dill
1 teaspoon dried sage
1/4 cup ketchup 
2 tablespoons brown sugar
1 teaspoon Dijon mustard
1 teaspoon salt, plus 1/2 teaspoon

Directions:

1.) Place eggs, milk, breadcrumbs, onion, garlic powder, dill, sage, 1 teaspoon of salt, and 1 tablespoon of Worcestershire in a large bowl and mix thoroughly.

2.) Crumble ground beef over top and then mix thoroughly. One of the best things about this recipe is that you don’t have to worry about over-mixing too much because this meatloaf will not dry out. So be sure to incorporate all the ingredients together thoroughly.

3.) Shape mixture into a loaf and place in the slow cooker. Cover and cook on slow for 5 – 6 hours, or on high for 3 – 4 hours.

4.) Mix together the ketchup, brown sugar, 1 tablespoon of Worcestershire sauce, Dijon mustard, and 1/2 teaspoon of salt. Drizzle this mixture over the meatloaf and then brush to ensure the entire surface is covered. Leave uncovered, turn heat to high if the loaf was cooked on slow, and cook for another 30 – 45 minutes, until the glaze is set.

5.) Remove the meatloaf from the slow cooker and let rest for 5 minutes before slicing.

6.) Serve and enjoy!

How to Cook Rice in the Oven

Originally published on November 19, 2014

A lot of people have trouble cooking rice. My husband used to be one of them, until he nearly gave up cooking altogether and just let me take over. But the problems he had are the same that many people encounter when they try to cook a seemingly simple batch of rice. It burns onto the bottom of the pan, it’s underdone and crunchy, or overdone to the point where it’s mushy. A couple of years ago my mom told me how to cook rice in the oven and it’s been my go-to ever since on those days when I want to clear the stove-top for something else. It’s foolproof and perfect every single time.

Ingredients:

1 cup white rice
1 3/4 cups water
1 tablespoon butter
1 teaspoon salt

Directions:

1.) Preheat the oven to 375 degrees Fahrenheit and bring a full kettle of water up to a boil.

2.) While the water is boiling, place the rice in a casserole dish with the butter and the salt. When the water has boiled, measure out 1 3/4 cups and pour directly over the rice. Cover tightly with a lid or aluminum foil and place in the oven.

3.) Place in the oven and cook until all the liquid has been absorbed and the rice is light and fluffy, about 25 minutes.

4.) Remove from the oven and and fluff the rice with a fork. This “fluffing” step is important any time you cook rice, using any technique. It not only helps loosen the grains from each other, it also allows any trapped steam to escape, so that it will not over-cook the rice.

5.) Serve and enjoy!

Beef Dips

Originally published on November 22, 2014

Beef dips are pretty interesting. Another common name that they go by is “French dips,” but they’re not actually French at all. The name seems to come from the fact that the roll they’re served on is very often French bread or a baguette. The sandwich originated in Los Angeles, but even there you’ll find some debate between two restaurants, both established in 1908, and that both lay claim to being the inventors of this now iconic sandwich.

You can use just about any kind of beef (or even other meat) in your beef dip. I had leftover pot roast so that’s what I used, but you can also use roast beef, steak, or anything else you’ve got on hand. I was also forward-thinking when I made that pot roast, so I saved the drippings, but if you don’t have any, use beef broth instead. I don’t believe the traditional sandwich calls for mushrooms and onions, but I had some lying around and I just couldn’t resist.

Ingredients:

1 – 2 pounds of leftover pot roast
1 cup mushrooms, sliced
1 onion, halved and sliced
2 cups mozzarella cheese, shredded
2 cups beef drippings, or beef broth
2 tablespoons fresh thyme, chopped
1 baguette, sliced into 4 pieces, or 4 sub rolls
1/2 cup butter
3 cloves garlic, minced
1 tablespoon fresh parsley, chopped
2 tablespoons olive oil
Salt
Pepper

Directions:

1.) Preheat oven to 450 degrees Fahrenheit.

2.) Place two tablespoons of olive oil into a frying pan set over medium heat. When hot add the onion and mushrooms and toss to coat in the fat. Cook for 8 – 10 minutes, stirring occasionally, until the vegetables begin to carmalize and soften. Season with salt and pepper and set aside.

3.) Place the beef drippings or stock into a large saucepan. Add the thyme and season with salt and pepper. Bring to a boil, then lower heat to a simmer. Add the cooked beef, stir, and let simmer for another 5 – 10 minutes, until the beef is heated through.

4.) While the beef is warming, place the butter in a small bowl and add garlic and chopped parsley. Stir to combine all ingredients thoroughly. Use this to butter both sides of all 4 rolls and then heat a skillet or indoor grill to medium-high heat. Place the rolls, butter-side down, onto the grill or frying pan and toast for 2 – 3 minutes, just until the buns are toasted and crispy on one side.

5.) Place open rolls onto a baking sheet. Use a slotted spoon to remove the beef out of the pan and divide it among the four rolls, piling them high. Keep the au jus warm over medium heat.

6.) Top the beef with the onion and mushroom mixture, and sprinkle mozzarella cheese over top, dividing it evenly among the four sandwiches.

7.) Place the sandwiches into the oven and cook just until the cheese has melted completely, about 5 – 10 minutes. Meanwhile, pour some of the au just into small bowls or ramekins to serve alongside individual plates.

8.) Serve and enjoy!

Ravioli Lasagna

Originally published on December 1, 2014

When people start thinking about different ways they can make lasagna, often they limit themselves to thinking only about the filling of the actual lasagna. I know that’s usually where I start when I’m on the path to making a new and creative lasagna dish. But, don’t stop there. What about the actual noodles, or the actual pasta that you use? As I recently learned, when you swap out traditional lasagna noodles and use something like…..ravioli, the results are stupendous. And dare I say, this lasagna might just be better than the old way of doing things. It’s certainly easier.

Ingredients:

1/4 cup olive oil
1 onion, chopped
3 cloves of garlic, minced
1 can (28 oz.) crushed tomatoes
1 cup dry red wine
1 tablespoon fresh oregano, chopped 
1 teaspoon salt
1/2 teaspoon crushed red pepper
1 pound ground beef
1 cup mushrooms, sliced
1 jar (7 oz.) roasted red bell peppers, drained and coarsely chopped
1/2 cup fresh basil, chopped
2 packages (9 oz. each) large frozen cheese ravioli
2 cups mozzarella cheese, grated

Directions:

1.) In a large saucepan, heat 1 teaspoon of the olive oil over medium heat. Add onion and garlic, stir, and cook about 3 minutes, until onion is tender. Add tomatoes, red wine, oregano, salt, and crushed red pepper. Stir and bring to the boil, then reduce heat to medium-low. Simmer, uncovered, for about 10 minutes or until the sauce has reduced slightly.

2.) Meanwhile, in a large skillet, heat 1 tablespoon of olive oil over medium heat. Add beef and mushrooms and cook until mushrooms are tender and beef has browned. Add the roasted red peppers and the basil; set aside.

3.) Spoon 1/4 of the tomato sauce into the bottom of a 9″ x 13″ casserole or baking dish. Arrange one package of the ravioli on top, and spoon half of the beef/mushroom mixture over top. Spoon another 1/4 of the tomato sauce over the beef mixture and then top with half of the mozzarella cheese. Repeat the layers starting with another 1/4 of the sauce, then another package of ravioli, then the beef mixture, more sauce, and the cheese. If you’re making this dish ahead of time, you can wrap it up at this point with aluminum foil, and place it in the fridge for 4 – 12 hours. Be sure to let it sit at room temperature for 30 minutes before baking.

4.) If you’re making the casserole today, preheat the oven to 375 degrees Fahrenheit. Bake, covered, for 50 minutes then uncover and bake for 10 more minutes, or until the cheese is hot and bubbly. Let stand for 10 minutes before slicing and serving.

5.) Serve and enjoy!

Cajun Chicken

Originally published on December 3, 2014

When I started cooking at one of the first restaurants I worked at, Cajun Chicken was one of the things I remember cooking the most. It was a simple dish for the somewhat fancy-pants cafe, but it was always one of my favourites to make. Recently when I was staring down some chicken breasts that were in the fridge, I decided to go back to my kitchen roots and go Cajun with it. At the restaurant we used to slice it up thin and use it to top our Cajun Caesar Salad, but it would be great in pasta, on sandwiches, or just served with a delicious side. I think I’m even going to start making some just to keep in the fridge for those times when I need a delicious little something.

Ingredients:

4 boneless, skinless chicken breasts
3 tablespoons cumin 
3 tablespoons coriander
3 tablespoons paprika 
1 1/2 tablespoons cracked black pepper
1 tablespoon dried oregano
1 tablespoon garlic powder
1 tablespoon salt
2 tablespoons vegetable oil

Directions:

1.) In a bowl combine the cumin, coriander, paprika, black pepper, oregano, garlic powder, and salt. Mix to thoroughly incorporate all of the spices together.

2.) Rub the spice mix over the chicken breasts and let sit at room temperature for about 20 minutes.

3.) Heat 2 tablespoons of vegetable oil in a cat iron skillet over medium heat. When hot, add the chicken and cook for about 5 minutes per side, until it is nicely seared. Cover partially and cook for another 10 minutes, flipping once.

4.) Remove the chicken from the heat, cover with the skillet lid or aluminum foil, and let rest for 5 minutes before slicing or serving.

5.) Serve and enjoy!

Mexican Potatoes

Originally published on December 11, 2014

Ah, it’s that time of year again. The time of shopping, parties, decorating, and celebrations – and we still have work and families to take care of during all of it. Sometimes it amazes me that most of us seem to make it out of these holidays still in one piece. For the first time in a loooooooong time, I’ve had to divide my days between a job outside of the home and everything else that goes with the holiday season and man, it is tough. On one particularly busy day, Paige wandered into the kitchen where I stood, aimlessly looking into our fridge wondering what on earth I was going to make for dinner.

“Can we have tacos?” she asked. Bless her heart! There was a package of ground beef on the shelf, and she just gave me the perfect quick supper to make for us.

“Sure!” I replied.

“Oh,” she said, as she turned to walk away, “And can we have something other than Spanish rice to go with them?”

With that, I gave a small sigh. Spanish rice is my go-to side dish for tacos, and now I still have to think of something?

Luckily, I found some cooked, frozen home fries in my freezer, which actually sped up the cooking time for me, and I already had a pretty good idea of how I could “Mexicanize” them – and it would only take three ingredients. If you don’t have frozen home fries, just dice up some potatoes and toss them with some olive oil, salt and pepper. Put them in a 400 degree oven for about 40 minutes, and then continue on with the recipe. Be sure to make extras though, so you can freeze some of them and eliminate a step for yourself the next time you go to make these. Because you’ll come back to this recipe, I promise.

Ingredients:

4 cups cooked, frozen home fries (do make sure they’re home fries – cooked, cubed potatoes – and not hash browns) 
1 1/2 cups salsa 
1 – 2 cups Cheddar cheese, depending on how much you like 

Directions:

1.) Preheat oven to 400 degrees Fahrenheit and grease a square baking or casserole dish.

2.) Place home fries in a large bowl and add salsa. Mix to thoroughly combine and cover all potatoes in the salsa. Transfer potato/salsa mixture to the greased casserole dish and cover with aluminum foil.

3.) When oven is preheated, place potatoes in and cook for 15 – 20 minutes, just until the entire dish is hot throughout.

4.) Remove dish from the oven, remove the foil, and cover with the Cheddar cheese. Place back into the oven, uncovered, for another 20 minutes or so, until the cheese has melted and is bubbling.

5.) Serve and enjoy!

Dec

Breakfast Casserole with Potatoes, Eggs, and Pancetta

Originally published on December 13, 2014

I really don’t get the big deal surrounding pancetta. I’ve only had it in the chunky, already-diced variety that you can get at just about any grocery store these days, and maybe I would feel differently if I tried it thinly sliced instead. But really, what they say is true – pancetta really is just Italian bacon, and I’m not really a huge fan of bacon. That’s right, I said it. I don’t love bacon!!!!! However, I also don’t hate it, so if you don’t want to fork out big bucks for pancetta (or are like me and don’t get the big deal,) just use bacon in its place. Or, venture out and try sausage. Now that would be phenomenal. Because as indifferent as I am about bacon and pancetta, I love that other breakfast meat so much!

Ingredients:

4 cups potatoes (about 1 1/2 pounds,) thinly sliced (use a mandolin to get them perfectly even and thin)
1 tablespoon olive oil
1 cup pancetta, diced 
2 Vidalia onions, thinly sliced
6 eggs, lightly beaten
1/2 cup milk
1 cup Swiss cheese, shredded
1 sprig fresh rosemary leaves, chopped
1 teaspoon salt
Pepper 
A bit of butter for the baking dish 

Directions:

1.) In a large skillet, heat olive oil over medium-high heat. Add pancetta, cook until lightly browned, stirring regularly. When finished cooking, remove the pancetta from the skillet and set on a plate lined with paper towel. Turn heat under skillet to medium-low.

2.) Add onions to the skillet, stir to break up the pieces a bit, and cook for 20 – 30 minutes, until they are lightly browned and very tender. Remove from heat. Add the potatoes and pancetta to the skillet with the onions and gently stir everything together.

3.) Lightly butter a 9″ x 13″ casserole dish. Transfer the potato mixture into the greased casserole dish, spreading it out evenly as you do.

4.) In a medium-sized bowl, whisk the eggs and milk together. Add the Swiss cheese, rosemary, salt and pepper and beat until all ingredients are blended together. Pour this mixture over the potatoes in the casserole dish. If this is a make-ahead dish, at this point you can cover and place in the refrigerator for 4 – 24 hours. Or…

5.) Preheat your oven to 350 degrees Fahrenheit. Place casserole in oven, uncovered, for 45 – 50 minutes, until the dish is golden and a knife inserted into the centre comes out clean. Remove from oven and let rest for 15 minutes before serving.

6.) Serve and enjoy!