Originally published on July 3, 2014
The other day, my Internet went down. I considered it disaster until I went to go make my usual Sourdough Bread and realized that I couldn’t come to the site to get the recipe. Then it turned catastrophic. I was about to have a go at it and just try to make it from memory (after all, I’ve made it enough times, I’m sure it would have been fine,) but my eye then landed on the Better Homes and Gardens book All-Time Favorite Bread Recipes that was sitting on my shelf, the one my mother-in-law gave me. Figuring that it was the perfect time to try something new, I grabbed the book and started assembling my ingredients. And ya know what? The bread turned out nicer than any other bread I’ve ever made. From here on out, this is my go-to bread recipe. Hear that, World Wide Web? I don’t need you! (I’m just kidding, I didn’t mean it. Please don’t ever leave me again.)
Ingredients:
5 to 6 cups all-purpose flour
1 package active dry yeast (1 tablespoon)
2 1/4 cups milk
2 tablespoons sugar
1 tablespoon shortening
2 teaspoons salt
1 egg
Directions:
1.) In a large mixer bowl (you can use a food processor like I did if you don’t have a stand mixer,) combine 2 1/2 cups of flour and the yeast.
2.) In a saucepan, heat milk, sugar, shortening, and salt until it’s just above body temperature, about 115 degrees to 120 degrees Fahrenheit. My test is always just sticking my finger right in there. If I can hold it for a few seconds, but no longer than that, I know it’s done. Stir the mixture constantly and wait until the shortening has almost melted.
3.) Add the milk mixture to the flour and beat at low speed for 1 1/2 minutes, scraping the sides of the bowl. Then beat at high speed for 3 minutes.
4.) Stir in as much of the remaining flour as you can with a spoon. (You won’t be able to stir it all in, but reserve the flour you have left for the next step.)
5.) Empty the bowl onto a lightly floured surface and knead in enough of the remaining dough that you have a relatively stiff dough that is smooth and elastic. It should take about 6 – 8 minutes. Shape into a ball.
6.) Lightly grease a bowl with oil and then place the ball of dough inside, turning it once to thoroughly grease the entire surface. Cover, and allow to rise in a warm place until it doubles in size, about 1 1/4 hours.
7.) Lightly punch dough down and turn out onto a lightly floured surface.
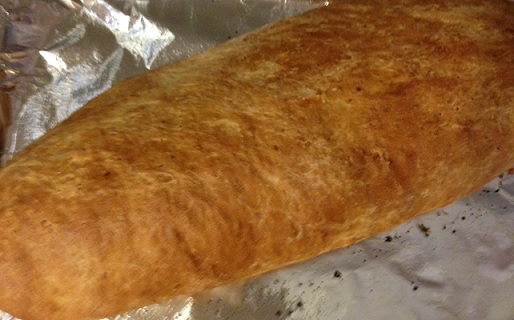
8.) Divide dough in half. Cover, and let rest for 10 minutes. Lightly grease two 8″ x 4″ x 2″ loaf pans (or shape them into baguettes and grease two baking trays like I did for the stuffed garlic bread. Place in pans or on trays. Cover, and let rise in a warm place 45 – 60 minutes, until they have again doubled in size.
9.) Beat egg lightly with a tablespoon of water. Brush over loaves.
10.) Preheat oven to 375 degrees Fahrenheit. When hot, add bread and bake for about 45 minutes, until they are browned and completely cooked through. You’ll be able to tell they are done when you can lightly tap on them and hear a hollow sound. If the bread starts to become too brown before it’s finished cooking, you can cover it loosely with aluminum foil.
11.) Remove pans from oven when they’re done baking, carefully remove the loaves, and transfer them to wire racks to cool.
12.) Serve and enjoy!