For me, this recipe demonstrated exactly why you should never say you don’t like something until you try it. Now don’t get me wrong. I have always loved deep fried pickles. I mean, what’s not to love about a crispy coating that covers that tart and crunchy pickle inside? But, I have always been adamant in saying that deep fried pickles need to come in spears, not in chips – even though I had never even tried them in chip form. I guess it was just one of those things – I just couldn’t picture it.
But then I did. Knowing I was going to make this recipe, and knowing I was going to use a batter instead of the breading that I was so accustomed to on deep fried pickles, I decided to switch it up even more. I went ahead and used the chips, and these are now my favourite way to enjoy this delicious appetizer! But only if they come with the sauce, too. That sauce is everything.
Ingredients:
For the deep fried pickles:
2 cups dill pickle slices
1/2 cup all-purpose flour
2 teaspoons Cajun seasoning
1/4 teaspoon cayenne pepper
Salt
1 cup water
For the sauce:
1/4 cup mayonnaise
1 tablespoon drained horseradish
2 teaspoons ketchup
1/2 teaspoon Cajun seasoning
Directions:
1.) Lay the pickle slices onto a paper towel and pat to dry.
2.) In a small bowl, combine the flour, Cajun seasoning, cayenne pepper, and salt. Whisk together to mix and then add the water, mixing the batter until smooth.
3.) Heat one inch of vegetable or peanut oil in a pot or skillet over medium-high heat, until the oil reaches 375 degrees Fahrenheit. When oil is hot, add half of the pickle slices to the batter and then, using tongs, remove them, letting the excess batter drip off. Add the pickles to the hot oil and fry for about 4 minutes, until batter is browned and crispy. Remove to a plate lined with paper towels and sprinkle with a touch more salt. Repeat with remaining pickle slices.
4.) While the pickle slices are cooking, combine all the sauce ingredients together and stir to mix thoroughly.
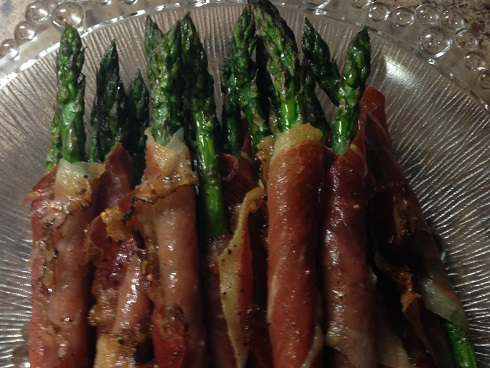
I love wrapping things in prosciutto, and when it comes to asparagus, there’s more than one way to do it.
Well actually, there’s only one way to wrap prosciutto around asparagus. It’s your basic “drop it on and roll it up” technique, but there’s more than one way to enjoy prosciutto-wrapped asparagus. You can leave both the asparagusand prosciutto raw, you can cook only the asparagusand leave the prosciutto raw, or you can even gather the asparagus into bundles and wrap a piece of prosciutto around the lot.The choice is yours. And in my kitchen, the choice is mine and I prefer both my asparagus and prosciuttoto at least be kissed by heat before serving. But don’t worry about keeping them hot until everyone’s ready. These are meant to be served at room temperature.
Ingredients:
1 bunch asparagus, ends trimmed
10 slices prosciutto, cut in half horizontally
1 – 2 tablespoons olive oil
Salt
Pepper
Directions:
1.) Preheat the oven to 425 degrees Fahrenheit and line a baking sheet with parchment paper.
2.) Place one asparagus onto half of a prosciuttoslice. I found it easiest to place the asparagus diagonally onto one corner of the prosciutto (so really just the middle of the asparagus is on the prosciutto). Hold the prosciutto tightly against the asparagus and then slowly roll the asparagus, holding the prosciutto tightly against the stalk as you do. As each asparagus is wrapped, place onto a baking sheet.
3.) After all of the asparagus has been wrapped, drizzle a bit of olive oil over everything. (I like to focus on the asparagus, as the prosciutto has enough fat in it to crisp up a little on its own). Sprinkle a bit of salt and pepper over everything. Again, I like to salt the asparagus a bit more, as the prosciutto is already a little salty.
4.) Place the asparagus into the preheated oven and bake for 10 minutes, or just until the asparagus is browned and the tops are slightly melted.
5.) Remove from oven and serve immediately, or allow to sit at room temperature.
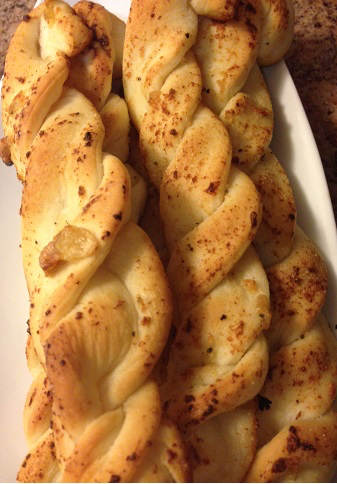
We make pizza a lot over here and last time, I had a whole other batch of pizza dough left over. Feeling ambitious, I decided to whip up some breadsticksto serve alongside the pizza.
As I was rolling them out, I had a vision. I’ve made “twisty breadsticks” before, but found that the dough didn’t quite stick together at the ends, and I ended up with some weird bread that was kind of wrapped around more bread. Yeah, it was weird. But as I was preparing these breadsticks, I thought, what if I left them a bit wider and just sliced them up the middle, stopping just before I cut all the way through the ends? The dough would hold together because it never would have been separated, and I could end up with beautiful twisty breadsticks. And, I did.
Ingredients:
For the roasted garlic:
1 head of garlic $0.33
1 tablespoon olive oil $0.11
1/4 cup butter, melted
Salt
For the pizza dough:
1 cup warm water (105 to 115 degrees Fahrenheit)
1 (1/4 oz.) envelope dry active yeast
1 teaspoon sugar
2 tablespoons extra-virgin olive oil, divided
3 cups all-purpose flour
1 teaspoon salt
Directions:
1.) In a large bowl, dissolve sugar in the warm water and add yeast and 1 tablespoon of olive oil. Stir to combine all ingredients, then let mixture sit for about 5 minutes, until foamy at the top.
2.) In another bowl, combine the flour and the salt.
3.) Add half of the flour mixture to the water and yeast mixture and mix by hand to fully combine. Stir until the dough comes together and is smooth. Continue adding the flour, 1/4 cup at a time, working the dough after each addition, until the dough is smooth but slightly sticky. (You may not need to use all of the flour.) Turn the dough out onto a lightly floured surface and knead until smooth but still slightly tacky, 3 to 5 minutes.
4.) Oil a large bowl with the remaining 1 tablespoon of olive oil. Turn the dough around in it so that it is covered, then cover with plastic wrap or a clean tea towel. Place in a warm place away from drafts, about 1 1/2 hours.
5.) While dough is rising, preheat the oven to 400 degrees Fahrenheit. Chop off the top of the head of garlic, place in a small casserole dish, and drizzle 1 tablespoon of olive oil over the top. Sprinkle with salt. When oven is hot, place garlic in and roast for 45 minutes to 1 hour, just until the garlic is soft and beginning to brown. When done, remove from oven and allow to cool.
6.) When dough is finished rising, gently punch it down and turn out onto a lightly floured surface. Roll out to about 1/4″ thickness and cut into strips about 1″ wide. Cut each of those strips lengthwise up the centre, stopping just short of the top end so you don’t cut all the way through it. Using the two strips you just created, twist the strips around each other (like you’re braiding it using only two pieces.) Pinch the bottom ends together to seal the dough together. Sprinkle with salt and place on a baking sheet and repeat with remaining strips of dough.
7.) Preheat oven to 450 degrees Fahrenheit.
8.) Squeeze the roasted garlic cloves from the head of garlic into the melted butter. Stir to fully incorporate. Brush the roasted garlic butter generously over each breadstick and place in the oven.
9.) Bake breadsticks for 10 – 12 minutes, until breadsticks are starting to turn golden brown and are cooked through.
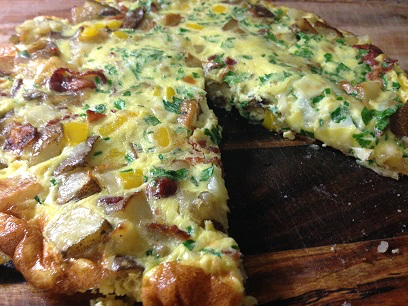
The girls and I love frittatas, me especially. If I don’t have anything for breakfast (or on weekends, for lunch), a frittata is the easiest thing to whip up. And they’re a great way to use up leftovers. For this one I used some home fries I had in the freezer from our last family breakfast, some bacon (most likely from the same breakfast) and a bell pepper. Add some parsley and a whole mess of eggs, and you’ve got yourself a delicious frittata. At least we did.
Ingredients:
1 tablespoon olive oil
1 onion, diced
1 bell pepper (any colour, mine was yellow), diced
1 clove garlic, minced
1 cup cooked frozen home fries
1/2 cup cooked bacon, chopped
6 eggs
1/4 cup heavy cream
1/2 cup Parmesan cheese, grated
3 tablespoons fresh parsley, chopped
Salt
Pepper
Directions:
1.) Preheat the broiler.
2.) Heat one tablespoon of olive oil in an oven-proof skillet over medium heat. When hot, add onion and bell pepper and toss to coat in oil. Saute for about 3 minutes, until the vegetables have softened.
3.) Add the garlic, the potatoes, and the bacon to the skillet. Cook until potatoes are completely thawed. Season lightly with salt and pepper.
4.) Beat the eggs, heavy cream, Parmesan cheese, and parsley together. Pour into the pan, lower heat slightly (to about medium-low) and let cook for about 5 minutes. This will cook the bottom of the frittata.
5.) Place the skillet under the broiler and broil for 2 – 3 minutes, just until the top is set and slightly browned.
6.) You can serve the frittata as it is, or remove it from the skillet first. To do this, run a rubber spatula around the edges and tuck underneath the bottom as far as you can. Jiggle slightly to loosen from pan and then slide onto a cutting board. Cut into wedges.
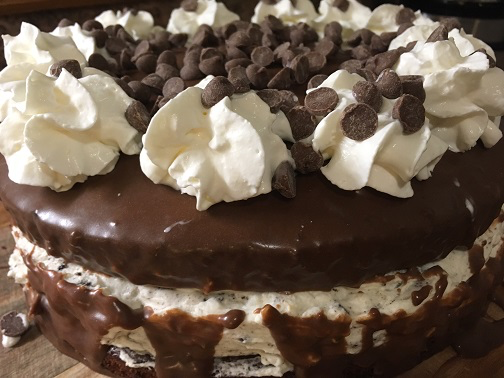
It was hubby’s birthday this week! And while that’s enough excitement in itself, it also meant that it was time again for Oreo cheesecake, something that has become a bit of a tradition in our house. This year though, I wanted to do something a bit different; something more than just the expected Oreo cheesecake. Something with a bit of a wow factor. So, I combined Brent’s two favourites – Oreo cheesecake and chocolate cake.
I could see it in my mind immediately, with a layer of cheesecake in between two beautiful layers of rich and delicious chocolate cake. How I was going to actually layer them though, I had no clue. First there was the difference in size between my springform pan and my cake pans. And an Oreo crust running through the middle of the cake might make it a bit weird. Clearly I had to go crustless, which meant I would also have to go no-bake when it came to the cheesecake.
I’ll be honest with you. I hate no-bake cheesecake. But I was hoping that the chocolate cake would offset that, and I was right. After the birthday song has been sung, the presents have been unwrapped, and the cake has had a chance to sit altogether, the cheesecake portion is more reminiscent of decadent icing than it is cheesecake. And that suited me just fine.
Ingredients:
For the chocolate cake:
2 cups white sugar
1 3/4 cups all-purpose flour
3/4 cup cocoa powder
1 1/2 teaspoons baking powder
1 1/2 teaspoons baking soda
1 teaspoon salt
2 eggs
1 cup milk
1/2 cup vegetable oil
2 teaspoons vanilla extract
1 cup boiling water
For the Oreo cheesecake:
1 8-ounce package cream cheese, softened
1/4 cup white sugar
1 teaspoon vanilla
1 10-ounce container Cool Whip, plus more for garnish
12 Oreos, roughly chopped
For the chocolate ganache:
1 cup heavy whipping cream
1 cup semisweet chocolate chips
Directions:
1.) Preheat oven to 350 degrees Fahrenheit and line the bottom of two round 9″ cake pans with parchment paper.
2.) Start by making the chocolate cake. In the bowl of a stand mixer combine the flour, cocoa powder, baking powder, baking soda, and salt. Mix on low for 1 minute just to combine. Add the eggs, milk, oil and vanilla. Turn speed to medium and mix for two minutes, scraping the sides of the bowl occasionally. Turn to lowest speed and slowly pour in boiling water. Continue mixing for 1 more minute, just until all ingredients are thoroughly combined, scraping sides if necessary.
3.) Pour the batter into the two round cake pans, dividing it as evenly as possible. Place in the preheated oven and bake for 30 – 35 minutes, until a toothpick inserted into the centre comes out clean.
4.) Let cake cool in the pans for 10 minutes before turning them onto a wire rack and letting them cool completely.
5.) While chocolate cakes are cooling, make the Oreo cheesecake. Place the cream cheese in the bowl of a stand mixer and beat on low just until it’s completely softened. Add the sugar and vanilla and continue to beat on low speed, just until all ingredients are combined. Stir in the chopped Oreo cookies, then fold in the Cool Whip.
6.) To make the ganache, fill a medium saucepan with a couple inches of water. Place a heat-proof bowl over top (I have a Pyrex glass bowl that works very well) and add chocolate chips. Bring water to a simmer and stir the chocolate chips, allowing the gentle heat to gradually melt them together. When all the chips have been melted, remove from the heat and slowly add the heavy whipping cream, whisking continuously. The chocolate may appear to seize at first, but keep adding the cream and whisking – it will all come together!
7.) When the chocolate cakes have completely cooled, you can begin assembling the cake. On one of the chocolate cake rounds, spread the Oreo cheesecake mixture completely on top in a thick even layer. Place the other chocolate cake round on top, gently pressing so the cake comes together at each layer.
8.) Holding the bowl with the chocolate ganache about 4 inches above the cake, pour it right onto the centre of the top layer of the cake. It will pool and spread out, dripping down the sides of the cake.
9.) Place the entire cake into the fridge. This will allow the Oreo cheesecake to further set, and it will cool the ganache and allow it to set. After about an hour in the fridge, you can remove the cake and do any further decorating you want. I went with basic swirls of whipped cream and a sprinkling of chocolate chips I had leftover from the ganache.
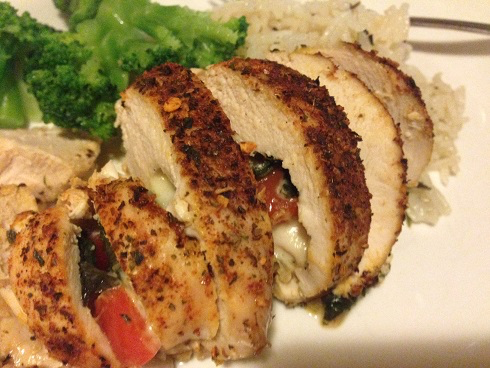
I’m going to be honest with you. I’m not a huge fan of chicken breasts. I know, I know, the white meat is preferred by many, and KFC will even charge you extra if you ask for a bucket of “all-white” meat. But chicken can already be somewhat boring and when you stack up a bunch of unimpressive bland chicken breasts against some really great chicken thighs that are fatty and packed full of flavour, there’s really no comparison for me. That is, until you stuff them.
Stuffed chicken breasts really can turn something fairly mundane into something very exciting – and you can stuff them with anything you’d like. I’ve done avocado, mushrooms, spinach – even pistachios! This version combines sweet bell peppers with spinach and mozzarella, and dusts the top of the chicken breasts with homemade taco seasoning.
Delicious! And so easy too.
Ingredients:
4 boneless, skinless chicken breasts
1/2 red bell pepper, diced
1/2 green bell pepper, diced
2 cups packed baby spinach
1/2 cup mozzarella cheese, shredded
2 tablespoons olive oil, divided
1 tablespoon chili powder
1 1/2 teaspoons cumin
1 teaspoon paprika
1 teaspoon garlic powder
1 teaspoon crushed red pepper flakes
1/2 teaspoon onion powder
1/2 teaspoon dried oregano
1/2 teaspoon black pepper, plus a pinch
1 teaspoon salt, plus a pinch
Directions:
1.) Preheat oven to 400 degrees Fahrenheit. Pat chicken breasts dry with paper towel and set aside.
2.) Heat one tablespoon of olive oil in a skillet set over medium heat. When hot add red and green pepper. Cook for 3 minutes, just until soft, then add spinach. Add a pinch of salt and black pepper, stir, and cook just until the spinach is wilted. Set aside.
3.) In a small bowl combine the chili powder, cumin, paprika, garlic powder, crushed red pepper flakes, onion power, oregano, 1/2 teaspoon black pepper, and 1 teaspoon salt. Mix together well.
4.) This is when you need to cut into the chicken. Many people decide to cut into the thick side of the breast, because that’s where the most meat is. However, I have found that when doing this, it’s harder to control the knife and it’s very easy to slice through the breast without actually creating a pocket. Because of this, I like to start my cut on the thinner side of the chicken. Your knife won’t cut through because you’re actually going into thicker meat, not thinner. Use a good paring knife, and confidently slice a pocket into the chicken breast. Start at one end of the thinner side, push the knife in gently, and then work your knife around the inside of the chicken breast, towards the back and then to the other side of the chicken breast.
5.) Stuff chicken breasts with 1/4 of the mozzarella cheese each. Then add the bell pepper and spinach mixture. Once each chicken breast is stuffed, place on a baking sheet.
6.) Using the remaining one tablespoon of olive oil, brush each chicken breast with it. Then generously sprinkle on the taco seasoning.
7.) Place the chicken breasts into the preheated oven and cook for 30 minutes, until the tops are browned and the chicken is hot throughout.
8.) Remove from chicken and allow to rest for 5 minutes before slicing or serving.
We had a birthday around these parts earlier this month! My older daughter turned 11. 11! How hard is that to believe? Well, probably not so much for you, but for us it just didn’t seem right. The whole time flying by, etc. etc. But I digress, because I’m actually not posting about how life is racing by before my very eyes. No. I wanted to talk to you about cake.
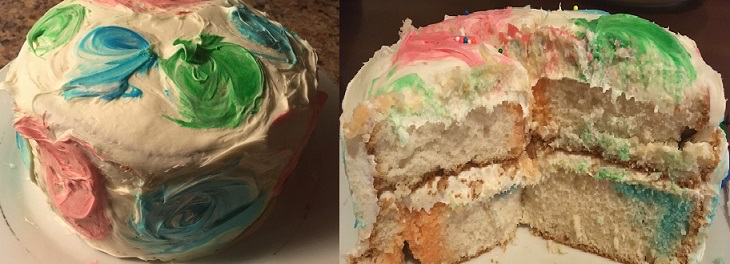
Birthday cake has been getting pretty crazy in this house. It all started one year ago, when I wanted to do a throwback Jelly Bean Cake that my grandma always made me as a kid. Then it continued on with a Cheesecake Stuffed into Chocolate Cake for my hubby. And when it was time once again for that same daughter to sit down to a special birthday cake, she came to me, complete with picture and all, telling me this was the cake she wanted this year. A Tie Dye Cake.
I wasn’t too worried about it at first. I mean, I handled that chocolate/cheesecake thing pretty well, and this one didn’t look much harder. But it is. That cake is so damned light that the first time I picked up a layer, it broke. Right in half. And I cursed. And then I started making another, smaller cake.
Smaller layers are important here; I ended up using a 6″ cake pan because the cake simply doesn’t have the ‘oomph’ needed to be picked up, placed down, and tinkered with, unless the cake is already quite small to begin with. So go small, and you shouldn’t run into any problems. The cake is super light, making it so, so yummy, and the decorating is a breeze. Especially if you cheat and by canned frosting, like I did.
Ingredients:
For the cake:
1 box white cake mix
1 1/4 cups water
1/3 cup canola oil
3 egg whites
1 teaspoon vanilla extract
1 tablespoon each flavored gelatin: lemon, orange, cherry, grape, lime, and blue raspberry
2 cups boiling water
For the decoration:
2 12-ounce cans whipped icing
Colored decoration icing: yellow, orange, red, purple, green, blue
Directions:
1.) Preheat oven to 350 degrees Fahrenheit and lightly spray 2 6-inch round cake pans with non-stick cooking spray (or lightly coat in oil).
2.) In a large mixing bowl, beat together cake mix, water, oil, egg whites and vanilla on low speed using an electric mixer for 30 seconds. Scrape down sides of bowl and beat on medium speed for 2 minutes.
3.) Divide batter evenly into the prepared pans and bake in the oven for 40 – 45 minutes, or until a toothpick inserted into the center comes out clean. Remove cake from oven and let sit in pans for 10 – 15 minute before turning over onto wire racks to cool completely. Trim off the tops of the cakes to make a level surface.
4.) Place 1 tablespoon of each flavour of gelatin in separate small bowls. Stir 1/3 cup boiling water into each and stir until dissolved. On the trimmed sides of the cake, splash the different gelatin all over the cakes. Cover cakes separately with plastic wrap and refrigerate for 3 to 4 hours.
5.) Remove cakes from fridge. Unwrap and place 1 cake on plate or cake stand and spread with white icing evenly on top. Place the second cake on top and finish icing the cake, top and sides, with white icing. Randomly place big dollops of the colored decorated icing all over the iced cake. Using a small rubber spatula, swirl the dollops together to create a tie-dye/rainbow effect on the cake.
6.) Serve and enjoy!
.
Smaller layers are important here; I ended up using a 6″ cake pan because the cake simply doesn’t have the ‘oomph’ needed to be picked up, placed down, and tinkered with, unless the cake is already quite small to begin with. So go small, and you shouldn’t run into any problems. The cake is super light, making it so, so yummy, and the decorating is a breeze. Especially if you cheat and by canned frosting, like I did.
Ingredients:
For the cake:
1 box white cake mix
1 1/4 cups water
1/3 cup canola oil
3 egg whites
1 teaspoon vanilla extract
1 tablespoon each flavored gelatin: lemon, orange, cherry, grape, lime, and blue raspberry
2 cups boiling water
For the decoration:
2 12-ounce cans whipped icing
Colored decoration icing: yellow, orange, red, purple, green, blue
Directions:
1.) Preheat oven to 350 degrees Fahrenheit and lightly spray 2 6-inch round cake pans with non-stick cooking spray (or lightly coat in oil).
2.) In a large mixing bowl, beat together cake mix, water, oil, egg whites and vanilla on low speed using an electric mixer for 30 seconds. Scrape down sides of bowl and beat on medium speed for 2 minutes.
3.) Divide batter evenly into the prepared pans and bake in the oven for 40 – 45 minutes, or until a toothpick inserted into the center comes out clean. Remove cake from oven and let sit in pans for 10 – 15 minute before turning over onto wire racks to cool completely. Trim off the tops of the cakes to make a level surface.
4.) Place 1 tablespoon of each flavour of gelatin in separate small bowls. Stir 1/3 cup boiling water into each and stir until dissolved. On the trimmed sides of the cake, splash the different gelatin all over the cakes. Cover cakes separately with plastic wrap and refrigerate for 3 to 4 hours.
5.) Remove cakes from fridge. Unwrap and place 1 cake on plate or cake stand and spread with white icing evenly on top. Place the second cake on top and finish icing the cake, top and sides, with white icing. Randomly place big dollops of the colored decorated icing all over the iced cake. Using a small rubber spatula, swirl the dollops together to create a tie-dye/rainbow effect on the cake.
The Super Bowl was this past weekend, and we had major celebrations around our house! With just the four of us, there was plenty of food to go around (and some that’s still in our fridge), and we all got pumped (for our different reasons) to cheer on the Atlanta Falcons. The Falcons lost of course, in the most devastating of ways, but the adults had these delicious margaritas to calm our woes.
Let me talk to you for a minute about margaritas. Over the years, and we don’t remember how, they’ve kind of become mine and Brent’s drink. So I’ve made quite a few of them over the years, but have never really been able to get that “slushy” consistency. Either I’ve been scared the blocks of ice were going to chip the blade of my blender, or they just never really broke down at all. Other times I just gave up altogether and simply poured the contents over ice. But I no longer have to live that way anymore.
The trick, my friends, is to crush the ice before you blend it. And how do you crush ice if you don’t have an industrial ice crusher in your kitchen? In the funnest of ways. You put it in a large resealable bag, twist the air out of it, and then smash it onto your floor or counter. I mean smash it. Quite hard, but not so hard that it breaks the bag, as I did before ice went flying all over my kitchen. But boy, it sure was fun.
Ingredients:
2 cups crushed ice
2 ounces tequila
1 ounce Triple Sec
Zest and juice of 1 lime
1 teaspoon sugar
Lime slices, for garnish
Directions:
1.) Place all ingredients, except for the lime slices, into a blender. Pulse until the ice is fully broken up, all ingredients have been incorporated, and the mix is a slushy consistency. Pour into margarita glasses and garnish with a slice of lime.
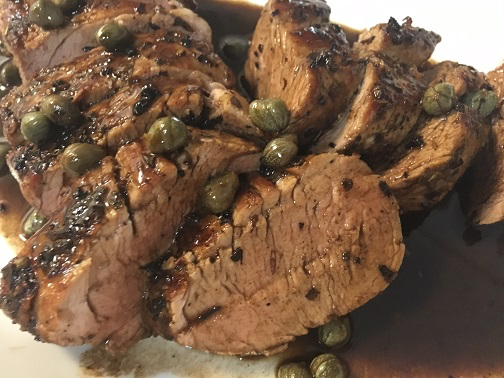
With very little prep and a short cook time, this Balsamic Pork Tenderloin puts a meal on your table that looks gourmet, and tastes great to boot! I would also like to point out that I love capers. I’m actually kind of obsessed with them right now and try to throw them into just about everything.
Ingredients:
2 pork tenderloins, about 1 1/2 pounds each
4 cloves garlic, minced
2 tablespoons olive oil, divided
1/2 cup white wine
1/2 cup balsamic vinegar
2 tablespoons butter
2 tablespoons capers
1 teaspoon kosher salt
1/2 teaspoon freshly ground black pepper
1.) Preheat the oven to 450 degrees Fahrenheit.
2.) Combine the garlic, one tablespoon of olive oil, salt, and pepper in a bowl. Press this mixture into the pork tenderloins.
3.)In a large oven-proof skillet, heat the remaining tablespoon of olive oil over medium heat. Add the tenderloin and cook for about 5 minutes on each side. Place in the oven and roast for about 12 minutes.
4.) Remove skillet from the oven and set pork tenderloins aside. Tent with foil to keep warm. Set the skillet over high heat and add the wine and vinegar, scraping up the browned bits from the bottom of the pan. Bring the mixture to a boil, lower heat to a simmer, and reduce by about half. Turn the heat off and whisk in half the butter, then the other half. Stir in the capers.
5.) Cut the pork tenderloins into 1″ slices and pour the sauce over top.
The people in my house love bread. Me? Sure I like it. Ya know, sandwiches are one of my favourite things, and for those, you need bread (that’s right I said sandwiches, not wraps.) But I can certainly go a meal without it, while the others would prefer not to. Luckily for them, while snacking on bread might not be my favourite, baking it certainly is. And man, I have a recipe that will wow you.
It’s Overnight Bread, and it’s just as easy as it sounds. There’s no kneading at all, and all you have to do is mix the ingredients before you go to bed, and then walk into your kitchen the next morning to find beautifully risen homemade bread. After that, it’s just a matter of shaping and baking. Yep, it’s that easy.
Once it’s done and ready to be cooked, you can even pop it in the slow cooker on high for a couple of hours if you’d like. I’ve done it both ways, and I prefer the way it comes out in the oven better. But we all have days when we don’t want to focus on making bread (even if we love to do it), and this is one way in which you really don’t need to think about this bread recipe at all.
Ingredients:
3 cups all-purpose flour
1 package (about 1 tablespoon) dry active yeast
1 1/2 cups warm (not hot) water
1 egg, lightly beaten
1 teaspoon salt
Directions:
1.) Add the flour, yeast, and water together in a large bowl and mix. It will be very stringy at this point and will not be able to be shaped into a ball or loaf; that’s okay.
2.) Cover the bowl with a damp tea towel and leave to rise for 8 – 13 hours, or overnight.
3.) When ready to bake, dust hands and a work surface with flour. Dump the dough out onto the floured work surface and divide into two. Shape each piece of dough into a loaf. Cover with the towel again and let rise for another hour.
4.) When ready to bake, preheat oven to 425 degrees Fahrenheit. Place each loaf of breadon a separate baking sheet lined with parchment paper. Mix the beaten egg with a tablespoon of water and then using a pastry brush, brush the egg wash over top of each loaf. Sprinkle each with about half a teaspoon of salt.
5.) Place the bread in the preheated oven and bake for 10 – 12 minutes, until it’s browned and sounds slightly hollow when tapped.