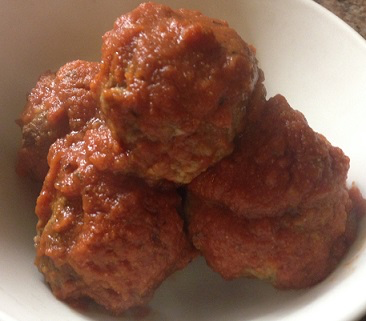
If you don’t know anything about her, you might think the most notable thing about Anne Burrell is her smart mouth and her blonde punk hairstyle. You’d never guess that she graduated from the Culinary Institute of America and then from the Italian Culinary Institute for Foreigners before she went on to cook in some of the fanciest restaurants in New York. You’d never guess this about Burrell because she’s so relatable, so down-to-earth. And so is her food, as she demonstrates with these meatballs.
Extra-virgin olive oil
1 large onion, cut into 1/4″ dice
Salt
2 cloves garlic, smashed and chopped
Pinch crushed red pepper
1/2 pound ground beef
1/2 pound ground veal
1/2 pound ground pork
2 large eggs
1 cup grated Parmesan
1/4 cup Italian parsley, finely chopped
1 cup breadcrumbs
1/2 cup water
Directions:
1.) Coat a large saute pan with olive oil. Add the onions and bring to a medium-high heat. Season the onions generously with salt and cook 5 to 7 minutes. The onions should be very soft and aromatic, but have no colour. Add the garlic and the crushed red pepper and saute for another 1 to 2 minutes. Turn off the heat and allow to cool.
2.) In a large bowl combine the meats, eggs, Parmesan, parsley, and the bread crumbs. Squish the mixture with your hands to thoroughly combine. Add the onion mixture and season generously with salt before squishing and mixing some more. Add the water and do one final good mix.
3.) Preheat the oven to 350 degrees Fahrenheit. Shape the meat into meatballs the size of your choice.
4.) Coat a large saute pan with olive oil and bring to a medium-high heat. Brown the meatballson all sides. Place them on a cookie sheet and bake them in a preheated oven for about 15 minutes or until the meatballsare cooked all the way through.
5.) Serve, with marinara sauce or on their own, and enjoy!
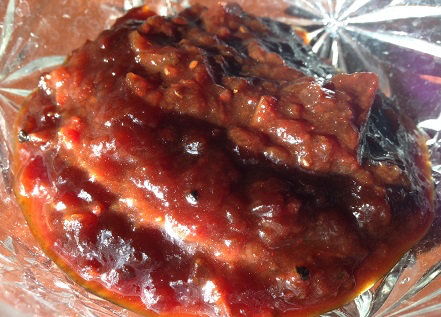
I would’ve never thought to put tomatoes and jam together until tomato jam showed up on one of our feature menus at work. And to be honest, even then I was a little hesitant to try it. Once I did though, I could not believe how good it was – or why I hadn’t thought of it before. The natural sweetness of the tomatoes works beautifully in the jam, but a slow simmer and the addition of other ingredients makes it very “jammy” and not at all like tomato paste (which I have to admit, is what I first envisioned.)
When I asked my co-worker who made the recipe how to make it she said, “Grab a potful of tomatoes, lots of brown sugar, and simmer on very low heat for two days while stirring occasionally.” I had some questions. I mean, two days? Does that include overnight? (Apparently it does.) I just didn’t see it working. What if you had to leave your house? Everyone knows you can’t leave the stove on and just walk out the door. So instead of taking the chance, I’ve played around with tomatoes and sugar a little bit and have come up with a tomato jam that is delicious, and perfectly safe to make!
Ingredients:
2 pounds tomatoes (Romas are best, but any tomato will work)
1 cup sugar
Juice from 2 limes
1 tablespoon fresh ginger, minced
1/4 teaspoon ground cloves
1 teaspoon salt
1 tablespoon red pepper flakes
Directions:
1.) Combine all ingredients in a heavy medium saucepan. Bring to a boil over medium heat, stirring often.
2.) Reduce heat and simmer, stirring occasionally until mixture has consistency of thick jam, about 1 hour and 15 minutes. Taste and adjust seasoning. Cool completely before refrigerating. Chilled jamwill keep for at least two weeks.
3.) Serve on sandwiches, scone, or wherever you want delicious jam, and enjoy!
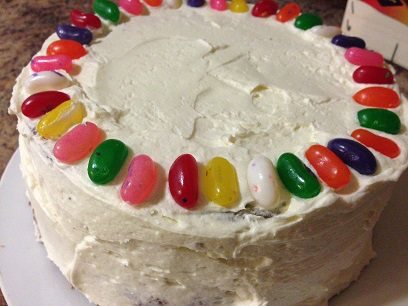
Jelly bean cake was one of my favourites as a kid. My grandma made them for birthdays and while they’re so simple in concept, they really are something that’s truly special to me. Feeling nostalgic when Paige turned 10 last month, I decided to forego buying a cake and make her one myself (something I promised her I’d never do after a certain birthday cake disaster.) I knew I had to make the jelly bean cake.
The cake is easy – two layers joined by rich and creamy frosting (or jam, if you want to stay authentically true to grandma), decorated by frosting and of course, jelly beans. But I never appreciated just how much time they can actually take – especially when you’re making a different kind of cake for each layer. This is also a spin off the original jelly bean cake that grandma used to make, but what the birthday girls wants, the birthday girl gets. It ended up looking pretty cool, and let’s face it. All you really need to make a jelly bean cake are some very colourful jelly beans.
Ingredients:
For the white cake:
1/4 cup butter, softened
1/4 cup vegetable shortening
1 1/2 cups granulated sugar
2 eggs, room temperature
1 egg yolk, room temperature
1 1/2 cups all-purpose flour
1 teaspoon baking powder
1/8 teaspoon salt
1/4 cup whole milk, room temperature
1/4 cup buttermilk, room temperature
1 teaspoon vanilla extract
For the chocolate cake:
1 cup all-purpose flour
1 cup sugar
1/2 cup cocoa powder
1 teaspoon baking powder
1 teaspoon baking soda
1/2 teaspoon salt
1/2 teaspoon espresso powder
1/2 cup milk
1/4 cup vegetable oil
1 egg
1 teaspoon vanilla extract
1/2 cup boiling water
For the frosting:
1 cup butter, softened
3 – 4 cups icing sugar, sifted
2 teaspoons vanilla extract
2 – 3 tablespoons heavy cream
Pinch of salt
For the decoration:
30 – 40 jelly beans
Directions:
1.) Start by making the white cake. Preheat oven to 350 degrees Fahrenheit and coat a 9″ round cake pan with non-stick baking spray or butter and flour.
2.) With an electric mixer, cream together the butter and shortening until light and fluffy. Slowly add sugar, 1/4 cup at a time, making sure to fully incorporate each addition before adding another. Add eggs and egg yolk one at a time, also making sure each egg is fully incorporated before adding another.
3.) Sift together the flour, baking powder, and salt. Pour milks and vanilla extract into a measuring cup and whisk together with a fork. Add to butter and shortening mixture, alternating with milk mixture, beginning and ending with the dry ingredients.
4.) Gently stir all ingredients until well combined. Stop mixer and scrape down the sides and bottom of the bowl, making sure all ingredients are mixed well.
5.) Pour the cake batter into the cake pan, making sure that its’ even at the surface. Place in the preheated oven and bake for 25 – 30 minutes, until a toothpick inserted into the centre comes out clean. Remove and allow to cool slightly in cake pans for about 5 minutes before inverting and removing cake from pan, allowing it to cool completely on a wire rack.
6.) Next, make the chocolate cake. Keep the oven preheated at 350 degrees Fahrenheit and prepare another 9″ round cake pan by spraying with non-stick spray or by buttering and flouring.
7.) Add flour, sugar, cocoa, baking powder, baking soda, salt, and espresso powder to a large bowl or the bowl of a stand mixer. Whisk through to combine or, using your paddle attachment, stir through flour mixture until it’s well-combined.
8.) Add milk, vegetable oil, eggs, and vanilla to flour mixture and mix together on medium speed until it’s well combined. Reduce speed and carefully add boiling water to the cake batter. Beat on high speed for about 1 minute to add air to the batter.
9.) Pour the cake batter into the cake pan, making sure the surface is even. Place in the preheated oven and bake for 35 – 40 minutes, until a toothpick inserted into the centre comes out clean.
10.) Remove from the oven and allow to cool slightly in the cake pan for 5 minutes before removing from the cake pan and allowing to cool completely on a wire rack.
11.) Make the frosting. Place softened butter into the bowl of a stand mixer that has been fitted with the paddle attachment. Mix on medium setting and cream the butter until it is smooth and has lightened in colour, about 3 minutes.
12.) Add icing sugar, 1/2 cup at a time. After each cup has been incorporated, turn the mixer onto its highest speed for about 10 seconds to lighten the frosting.
13.) Add vanilla and a pinch of salt and combine until everything is fully incorporated.
14.) Add heavy cream, until the frosting has reached desired consistency. If frosting is too thick, add a touch more cream; if it’s too loose, add a bit more icing sugar.
15.) When cakes have completely cooled, start frosting. Level both of the cakesby cutting off any pointed or rounded tops, making sure the cake is completely level. Then, spread a layer of frosting across the top of one cake. Place the non-frosted cake on top of the frosted cake to make one layered cake.
16.) Place the cake on the plate you’ll serve it one and begin frosting. Start by coating the entire cake in a very thin layer of frosting. This is known as the “crumb layer” and will coat any crumbs on the sides and top of the cake so that they do not end up in the finishing frosting layer.
17.) Start really frosting the cake. Mound a large pile of frosting in the centre of the top of the cake. With a slanted spatula, or frosting spatula, push the frosting down and out towards the edges of the cake. It’s perfectly okay if the frosting slips over the edge and starts to travel down the sides of the cake. Move that frosting around the sides of the cake. Pick up more frosting with the slanted spatula and move around the sides of the cake until an even layer of frosting, at your desired thickness, has been applied. Then just use your slanted spatula to move around the cake, including on top, completely smoothing out the frosting and ensuring that it’s even.
18.) Place the jelly beans around the top edge of the cake.
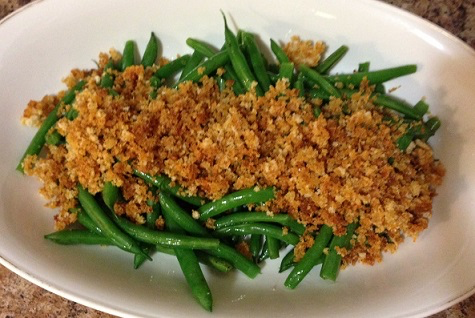
There are a surprising amount of ways to dress up plain old green beans, and adding spiced breadcrumbs might be one of the most unexpected. The crumbs bring a nice crunch to the already crispy beans, and also bring a new layer of flavour to the spices. Don’t worry about packing carbs onto your veggies, though. This recipe does away with the butter that I typically mound onto my green beans, but if you use a good olive oil you won’t even notice.
1 pound green beans, trimmed
1 cup bread crumbs
3 tablespoons olive oil, divided
1/4 teaspoon cayenne
Salt
Pepper
Directions:
1.) Preheat oven to 350 degrees Fahrenheit.
2.) In a medium-sized bowl combine breadcrumbs, 2 tablespoons olive oil, paprika, and cayenne pepper. Season with salt and pepper and toss to combine.
3.) Pour breadcrumbs onto a baking sheet and bake until they are golden, about 5 minutes.
4.) While the breadcrumbs are baking, place a steamer basket into a saucepan with 2 inches of water. Place the green beans into the basket, cover, and bring the water up to a boil. Let the beans steam for about 3 minutes, just until they are crisp-tender.
5.) Transfer beans to a bowl and toss with the remaining 1 tablespoon of olive oil.
6.) Lay green beans out on a plate or platter and spread breadcrumbs evenly along the centre of them.
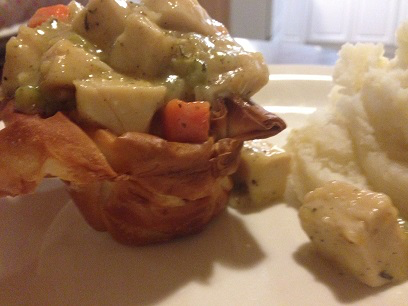
Pot pie of any kind isn’t really exciting. Just ask my kids. We eat it so often around here that it’s definitely not one of those dishes that has them running to the table. Making it a few nights ago, I once again wondered how I could jazz it up a bit, but felt as though I had run out of things to do with it. Cutting the top crust out into cute shapes, done. Using phyllo pastry instead of pie dough, done. But what if I took that same phyllo and instead of putting it on top, left it on the bottom of the pie? Turns out, not only did I get the cutest chicken pot pie possible, but we also had a tasty chip-like crust to eat at the end of it all.
Ingredients:
6 sheets of phyllo dough
1/2 cup butter, melted, plus more for greasing
3 cups roasted chicken, cubed
1 large carrot, diced
2 stalks celery, diced
1 onion, diced
2 cloves garlic, sliced
2 tablespoons butter
2 tablespoons flour
4 cups chicken stock
2 tablespoons olive oil
2 tablespoons dried oregano
2 tablespoons dried thyme
1 egg, beaten lightly with 1 tablespoon of water
Salt
Pepper
Directions:
1.) Preheat oven to 400 degrees Fahrenheit and generously grease a 12-cup muffin tin with butter.
2.) Heat 2 tablespoons olive oil in a large skillet over medium heat. When hot, add the diced carrot, celery, onion, and garlic. Stir to coat everything in oil and then saute just until vegetables begin to soften, about 5 minutes. Add the roasted chicken, the oregano, and the thyme. Stir to combine everything.
3.) Add the 2 tablespoons of butter to the skillet and allow to melt. Sprinkle the flour over top and then mix so that everything becomes lightly coated in flour. Allow to cook for 2 minutes.
4.) Slowly whisk in the chicken stock, making sure there are no lumps as you pour in the stock. Bring the entire mixture up to a simmer. Taste, add salt and pepper, and taste again. Adjust seasoning if necessary and turn heat to very low.
5.) Lay out one sheet of phyllo dough, keeping those you’re not using covered to prevent them from drying out. Brush the entire sheet with butter and sprinkle (very lightly) with salt. Lay another sheet on top, brush with butter, and lightly sprinkle with salt. Repeat until all six sheets have been layered on top of one another, and all have been brushed with butter.
6.) The next step is to cut the phyllo dough so that you end up with squares that will fit into the muffin tins. You’ll need 12 squares in total, and there’s a very easy way to do it. Start by cutting the phyllo in half right down the centre. Now you’re left with two big squares of layered phyllo. Cut those two squares right down the centre, and now you’re left with 4 narrow strips. Move your knife to the side of the phyllo dough, and once again, cut straight down the middle. Now you can see squares starting to form. Move to one side of that cut, and cut straight down the middle of the remaining dough on that side. Then move to the other side, and cut straight down the middle of that as well. Now you have 12 squares of phyllo dough!
7.) Gather one square of layered phyllo dough and place it into the muffin tin. Push it down gently to the bottom of the tin and up the sides. Repeat with each remaining phyllo square. (My squares were really big so I had to use every other well, using two muffin tin pans in total so the squares didn’t overlap each other.)
8.) Place the phyllo cups into the oven and bake for 10 minutes until the phyllo is golden brown and crispy along the edges.
9.) Remove phyllo squares from the oven and place on individual plates, or one large platter. Fill with the chicken pot pie filling.
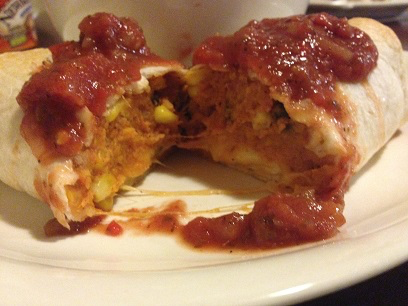
Today I bring you yet another very popular dish from the restaurant. I only ate at my place of employment once before they started paying me to go there, and this was the dish that I first noticed on the menu. No, I didn’t order it (only because we have the best Reubens) but I did think that it was a very interesting dish, and it certainly is unique! Since that time nearly two years ago, I’ve made countless Sweet Potato Burritos, and have even ordered a few myself when I’ve gone on lunch. I have to say, not only are they interesting, they’re a delicious southwestern treat! Chock full of protein from the black beans, you’ll also get a full dose of fibre from the sweet potatoes. And, if you need a meal for Meatless Monday, I can’t think of a tastier way one to have!
2.) Place the chopped sweet potatoes in a large pot filled with heavily salted water. Turn heat to high, bring water to a boil, then lower heat and simmer until potatoes are tender enough to mash.
3.) While sweet potatoes are cooking, combine the onion, corn, black beans, chili powder, cumin, mustard, cayenne, and a bit of salt and pepper.
4.) When sweet potatoes are finished cooking, drain and mash them, but don’t add anything like butter or milk to them. While sweet potatoes are still hot, add them to the black bean mixture and mix well. Taste, and adjust seasoning if needed.
5.) Lay out tortillas on a work surface. Place about a cup of the sweet potato mixture in the centre of each tortilla and top with about 1/4 cup of cheese.
6.) Roll up the tortillas over the sweet potato mixture. Do this by folding one of the long ends over the mixture and tucking it in underneath, so the tortilla is tightly rolled. Then roll up the other two ends over the sweet potato mixture. Roll the rest of the tortilla until it’s tightly rolled.
7.) Brush each of the tortillas with olive oil and place in preheated oven. Bake for about 20 minutes, or until the tortillas are golden brown on top.
8.) Serve, with salsa and sour cream if desired, and enjoy!
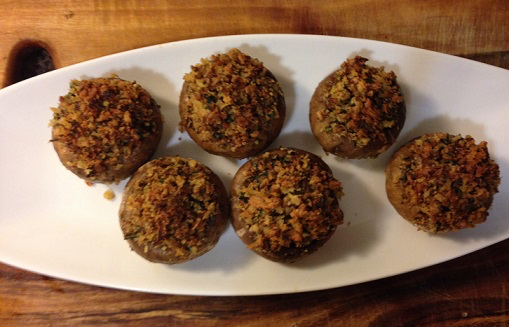
Ah, stuffed mushrooms. They’ve always been one of my very favourite appetizers, which is why I’m surprised it took me so long to make them myself. While doing so, I also inadvertently introduced Madison to one of her new favourite appetizers, so I recommend that, for preparation’s sake, you make a lot of them. I made 12, plenty you would think for the only two people in the house that like mushrooms, and I got two of them.
Ingredients:
6 cloves garlic, minced
1 tablespoon, plus 1 teaspoon olive oil
12 stuffer mushrooms
1 teaspoon butter
1 cup bread crumbs
1/2 cup Parmesan cheese
2 tablespoons fresh parsley, chopped
1 tablespoon fresh rosemary, chopped
Salt
Pepper
Directions:
1.) Preheat oven to 375 degrees Fahrenheit and line a baking sheet with parchment paper.
2.) Remove the stems from the mushroom caps. You can do this by gently pushing the stem to one side. You will hear a small break or snap. Then gently push on the other sides and twist the stem to remove it. When all mushroom stems are removed, chop the stems finely.
3.) Melt the butter with 1 teaspoon of olive oil in a skillet set over medium-high heat. Add garlic and the mushroom stems and saute for about 3 minutes. Add breadcrumbs and stir until crumbs are lightly toasted, about 5 minutes. Remove from the heat, mix in parsley and rosemary, and season with salt and pepper.
4.) Brush the mushroomcaps with 1 tablespoon of oil. Place the mushroom caps rounded side down on the prepared baking sheet and lightly salt the inside of the caps. Spoon the filling into the mushroom caps, mounding them slightly in the centre.
5.) Place mushrooms in the oven and bake for about 20 minutes, until the mushrooms are slightly tender and the filling is just beginning to brown.
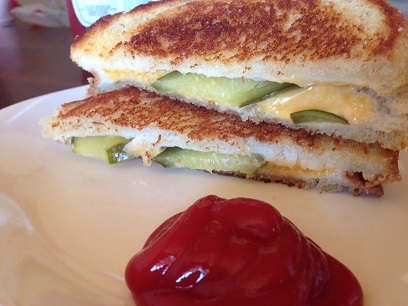
I love copycat recipes but this one is really interesting, and perfectly appropriate for National Grilled Cheese Sandwich Month.
While at work one day, my BFF (best friends ’til fired) told me about this particular type of grilled cheese sandwichthat tastes exactly like a McDonald’s cheeseburger. The thing is, the copycat sandwich doesn’t have any meat at all, just good old processed cheese and pickles that are sliced very thinly. I do think you need to dunk it in a little bit of ketchup to get that exact McDonald’s taste, and I also think you could boost it even more by chopping onions very, very finely – that’s always been one of my favourite parts of McDonald’s burgers.
As for the part about how concerning it might be that you can create a replica of a McDonald’s cheeseburger without using any meat, well, we just won’t talk about that.
Ingredients:
2 slices white bread
1 1/2 tablespoons butter
1 slice processed Cheddar cheese
1 pickle, thinly sliced
Directions:
1.) Preheat a frying pan over medium heat and generously butter the bread.
2.) When pan is hot, place one piece of bread butter-side down and place Cheddar cheese and pickles on top. Top with second piece of bread, making sure to place it butter-side up.
3.) Cook grilled cheese sandwich for a few minutes, until one side is crispy and golden brown. Then flip and cook for another few minutes until the other side is also crispy and golden.
4.) Remove grilled cheese sandwich from heat and let rest on a cutting board for just one minute before slicing in half.
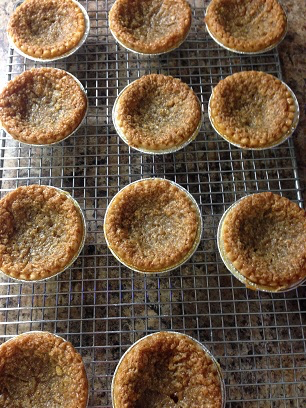
It’s time for the Festival of Maples here in Perth, Ontario! Today our little town becomes frantic with maple syrup vendors and people who want the sugary stuff in any form it comes in. I too, will be playing a part, while I’m at the restaurant trying to get our maple features out to the masses as quickly as possible. Before I do though, I just had to share a bit of the maple syrup goodness with you, and these maple syrup tarts fit the bill.
Made mostly of brown sugar and maple syrup it would be easy to think that these tarts would be cloyingly sweet, but they’re a lot like butter tarts with the distinctive taste of maple syrup that lingers just long enough for you to reflect again on how much you love it. And while you can go to all trouble of making pastry dough from scratch, for these I just pulled some tart shells out of the freezer and had half the battle fought for me already.
Ingredients:
12 frozen tart shells
1 1/2 cups packed light brown sugar
2 large eggs, room temperature
1/2 cup heavy cream
1/3 cup pure maple syrup
2 teaspoons butter, melted
Pinch of salt
Directions:
1.) Preheat oven to 350 degrees Fahrenheit. Separate frozen shells and place them on a baking sheet.
2.) Whisk together the brown sugar and eggs until creamy. Add cream, maple syrup, and butter, and whisk until smooth.
3.) Ladle the maple syrup mixture into the tart shells, filling them almost right to the top of the shells.
4.) Bake tartsin the lower third of the oven until pastry is golden and filling is puffed and looks dry, but still trembles slightly.
5.) Remove tartsfrom the oven and let them cool on the baking sheet for a few minutes before transferring tarts to a wire rack to cool completely. Allow to cool to room temperature before serving.
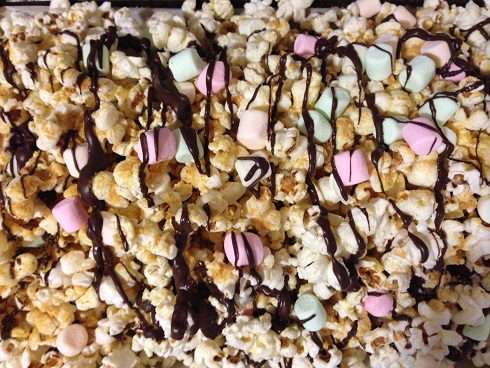
Last weekend my house was invaded by little girls. My own two had a sleepover and it was a bash to end all bashes! We tie-dyed t-shirts, decorated a cake (which inadvertently turned out to have a tie-dye look of its own), and made S’mores Popcorn. It’s just what it sounds like, popcorn topped with all the deliciousness of S’mores. I warn you, if you’re over the age of 12, you might find the sugary sweetness of this snack a bit much. But, if the kids need a snack to nosh on during their movie and you want to up the ante, this is just the thing.
8 cups of popped popcorn, lightly buttered but generously salted
2 cups mini marshmallows
1 cup chocolate chips
1/2 cup honey graham cracker crumbs
Directions:
1.) Over a double boiler, or a heat-proof bowl set over a simmering pan, melt chocolate chips, stirring constantly and making sure the hot water does not touch the bottom of the bowl. When all of the chocolate is melted, remove from heat and allow to cool just slightly.
2.) Meanwhile, lay half of the popcorn onto a baking sheet covered in parchment. Sprinkle on half of the graham cracker crumbs and half of the marshmallows. When the chocolate has cooled slightly, drizzle half of it over the popcorn mixture.
3.) Repeat the layers, starting with the popcorn, then the graham cracker crumbs and marshmallows, and drizzle everything with the remaining chocolate.