Grilled Pork Tenderloin in a Pepsi Barbecue Sauce

Originally published on October 17, 2015

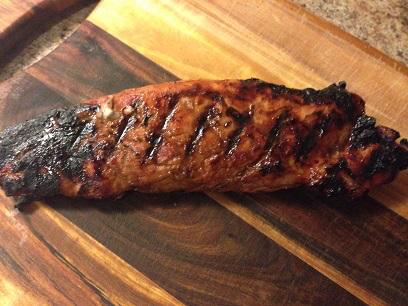
It snowed today. Not a lot, just enough to remind us that the warm weather is truly over for good. Around here we might not need to batten down the hatches, but we do need to pull our barbecue up so that the snowblower can churn up a nice path for us to walk on. Sadly, that means that around this time of year, we know that our barbecue nights are limited and so we have to make them count. This grilled pork tenderloin is one of my favourite ways to do it, and it’s the sauce that makes it. And by the way, that sauce is also the marinade. And it’s so good, I urge you to use it in place of your regular barbecue sauce from here on out.

Ingredients:

1 pork tenderloin, about 3 or 4 pounds
1 cup ketchup
1 cup Pepsi
1/4 cup Worcestershire sauce, plus 2 tablespoons
1/4 cup brown sugar
1/4 cup grape jelly
1 clove garlic, minced
2 tablespoons Sriracha sauce
1 teaspoon garlic powder
1 teaspoon black pepper
1/2 teaspoon hot sauce 
Salt

Directions:

1.) Start by making the barbecue sauce, as you’ll need it for the marinade. Place the ketchup, 1/4 cup Worcestershire sauce, garlic powder, Pepsi, brown sugar and hot sauce in a saucepan. Season it with salt and stir. Bring the mixture to a boil over medium-high heat, then turn heat to low and simmer for 10 to 15 minutes, until thickened. Remove from heat and allow to cool.

2.) Make the marinade. In a large bowl place 1/2 cup of barbecue sauce, grape jelly, Sriracha sauce, 2 tablespoons of Worcestershire sauce, minced garlic, black pepper and a pinch of salt.

3.) Place the pork tenderloin in a large resealable bag and pour marinade over top. Remove excess air from the bag, seal, and place in the refrigerator for at least an hour but up to overnight. Wrap the remaining barbecue sauce and also place in fridge to serve alongside the pork.

4.) Heat both burners of a gas grill to medium-high heat before turning one of the burners off. Place the pork tenderloin over this indirect heat side and close lid. Cook for 20 minutes to half an hour, turning regularly, until the internal temperature in the centre is 145 degrees Fahrenheit for a medium cook.

5.) Remove pork tenderloin from the grill, cover, and let rest for 5 minutes before slicing.

6.) Serve and enjoy!

Parmesan Risotto

Originally published on October 18, 2015

Risotto is just one of those things. It’s fussy, it’s finicky, and you probably won’t get it right the first time. But after just a couple attempts at this dish, you’ll become a risotto master and will be churning out this delicious, creamy rice dish.

If you want to get risotto just right, remember that it’s all in the stir. Yes, you do have to stir pretty regularly for the 20 minutes to half an hour this dish will take to cook, but you also don’t want to stir it too much. Doing so will result in gluey, clumpy risotto while not stirring it enough won’t give the rice a chance to slowly shed its starch and create the creamy base for the dish. The trick to getting it just right is to add the liquid, stir fairly rigorously until much of the liquid has evaporated, and then letting the liquid sit for a minute or two to become absorbed by the rice. Then you can add the next addition of liquid and repeat the process.

Ingredients:

6 to 8 cups chicken stock
3 tablespoons olive oil
2 shallots, finely chopped
1 cup Arborio rice
1/2 cup dry white wine
4 to 6 tablespoons unsalted butter
1/2 cup grated Parmesan cheese, plus more for garnish
1/4 cup chopped flat-leaf parsley or other fresh herb (I used chives as that’s what I had on hand)
Salt
Pepper

Directions:

1.) Heat chicken stock in a saucepan set over medium heat. Keep at a low simmer.

2.) In a heavy-bottomed saucepan set over medium heat, heat olive oil. Add shallots, stir and cook until shallots are translucent, about 2 minutes. Add rice, stir to coat in the oil, and then cook for 3 to 4 minutes. You’ll know the rice is toasted because it will start to pop and make sounds like glass beads.

3.) Add the wine to the pan, stir, and allow to cook until the wine has been entirely absorbed by the rice.

4.) Add 3/4 of a cup of stock to the pan. Stir for a minute or two and then slow the stirring until the liquid has nearly been absorbed by the rice. Then you can continue to add another 3/4 cup of stock and repeat the process. The risotto will be done, and you can stop adding liquid, once it is mostly translucent, but still opaque in the centre. The rice should still be firm to the bite, but not at all crunchy. As the rice nears finishing time, add smaller amounts of liquid so that you don’t overcook the rice. If you do, the rice will be mushy and the risotto will be watery.

5.) Remove the risotto from the heat. Stir in the butter, Parmesan cheese, and fresh herb and season with salt and pepper.

6.) Shave more Parmesan over the entire dish, serve, and enjoy!

Chicken Marsala

Originally published on November 3, 2015

I’ve always wanted to make Chicken Marsala at home, but never remember to buy Marsala wine, a key component in the dish that was named after it. On a recent trip to the liquor store, a bottle caught my eye and I started chatting with the clerk about it. Here are some things I learned during that conversation, and after I brought my first bottle of Marsala home:

  • Like Champagne or Burgundy, Marsala is named after the city in Sicily where it’s made.
  • Marsala is either very, very sweet or very, very dry. It’s for this reason the clerk told me that it’s not usually suitable for drinking on its own. I always opt for dry and after bringing it home, I found that  it works just fine when drank on its own. Be careful with it though because….
  • Marsala is a fortified wine. This means that unlike other wines, hard alcohol is added to Marsala. Originally this was done to preserve the wine for long sea voyages. Today this fortification is considered one of the major characteristics of the wine and so it’s remained.
  • Marsala should be stored in the fridge. The alcohol added to the wine helps preserve it even when open and left in your liquor cabinet. However, to ensure you don’t lose any of the flavor profile, it’s best when kept in the fridge. Wherever you store it, Marsala will last for several months, even after you’ve opened the bottle.
  • There are three components you need to make Chicken Marsala – chicken, Marsala wine, and mushrooms. Anything beyond that – butter, cream, vegetables – is up to you, but you must include those three ingredients to have proper Chicken Marsala. You’ll find them in the following recipe.

Ingredients

  • 1/2 cup all-purpose flour  
  • 6 boneless, skinless chicken thighs, pounded to an even thickness  
  • 2 tablespoons olive oil
  • 4 tablespoons butter
  • 3 cups cremini mushrooms, quartered
  • 3/4 cup Marsala wine, sweet or dry
  • 1 cup chicken stock 
  • 1/4 cup fresh parsley, chopped
  • Salt
  • Freshly ground black pepper

Directions:

1.) In a shallow bowl or plate combine the flour, about a teaspoon of salt, and 1/2 teaspoon freshly ground black pepper. Dredge the chicken thighs in the flour, remove, and shake to remove excess flour.

2.) Heat oil in a large skillet over medium-high heat until very hot. Add 1 tablespoon of the butter, wait until it melts and just starts to foam, and then add the chicken thighs. Cook for about four minutes, flip, and cook other side for another four minutes until thighs are golden brown. Transfer to a plate and set aside.

3.) Add 1 tablespoon of the remaining butter to the pan and add the mushrooms. Cook, stirring frequently, until mushrooms just begin to carmalize and release their liquid. Add the Marsala wine and bring to a boil, scraping with a wooden spoon as you do to release any brown bits from the bottom of the pan. Continue boiling until the mixture has reduced by half.

4.) Add the chicken stock and cook for 3 minutes, until the sauce has thickened slightly.

5.) Lower the heat to medium and return the chicken thighs to the pan. Continue to cook until the thighs are cooked through and the sauce has thickened, about 10 to 12 more minutes.

6.) Swirl in the remaining 2 tablespoons of butter and season with salt and pepper to taste. Off the heat, stir in the chopped parsley.

7.) Serve and enjoy!

Copycat KD Macaroni and Cheese Spirals

Originally published on November 9, 2015

The girls ate this up as quickly as they do the boxed version, and they regularly balk at homemade macaroni and cheese. When I started making it, I didn’t intend to create a Copycat KD Macaroni and Cheese Spirals, but as I ate it, I became more convinced that I had. And I bet if you used elbow pasta in place of egg noodles, you’d have a copycat version of the original thing.

1/2 package egg noodles
2 1/2 cups milk
2 cups shredded Cheddar cheese
2 tablespoons butter
2 tablespoons all-purpose flour
Salt 
Pepper

Directions:

1.) Bring a large pot of generously salted water to a boil. When at a rapid boil, add egg noodles and cook for about 7 minutes, stirring regularly. When finished cooking and still al dente, drain.

2.) Meanwhile, melt butter in a saucepan set over medium heat. When melted and starting to foam, add flour and whisk vigorously to form a roux. Continue cooking for three minutes, whisking continuously, until the roux becomes golden brown.

3.) Slowly add the milk in, starting with small amounts and whisking them into the roux before adding more. Continue whisking as you add the milk to prevent lumps from forming. Once all the milk has been added, turn the heat to low and cook the mixture for about 10 minutes, until it’s thickened.

4.) Remove from heat and slowly add in the Cheddar cheese, whisking the cheese to fully incorporate it before adding more. Continue doing so until all the cheese has been added, then season with salt and pepper to taste.

5.) Place drained egg noodles in a large bowl or back into their pot and pour some cheese sauce over top. Stir to thoroughly combine and coat noodles in the sauce.

6.) Serve and enjoy!

Crispy Chicken Thai Wraps

Originally published on December 3, 2015

Crispy chicken Thai wraps are a sandwich we have on the menu at work, and they’re one of our most popular items. When making it at home, it’s a great way to use up leftover chicken fingers and makes for a delicious and quick supper. I’ve kept it exactly the same, with the exception that I made the Thai sauce from scratch and at work, it’s one of the few bottled sauces we use. I might suggest making it from scratch just like our other sauces – it’s so simple and cheap!

For the wraps:

  • 4 flour tortillas
  • 8 chicken fingers
  • 2 cups lettuce, shredded
  • 1 tomato, diced
  • 2 cups Cheddar cheese

For the Thai sauce:

  • 1 cup water, plus 2 teaspoons
  • 1 cup rice vinegar
  • 1 cup sugar
  • 2 teaspoons fresh ginger, minced
  • 1 teaspoon garlic, minced
  • 2 teaspoons dried red chili flakes
  • 2 teaspoons ketchup
  • 2 teaspoons cornstarch

Directions:

1.) Start by making the Thai sauce. Pour 1 cup of water and vinegar into a medium-sized saucepan set over high heat. Bring to a boil then stir in sugar, ginger, garlic, red chili flakes, and ketchup. Reduce heat to medium-high and simmer for 5 minutes. Meanwhile, combine 2 teaspoons of water and cornstarch in a small bowl and mix to break up all lumps. Pour into the sauce, whisk, and remove from heat. Allow to cool slightly.

2.) Preheat oven to 400 degrees Fahrenheit. When hot, place chicken fingers on a baking sheet and bake for about 20 minutes, just until they are piping hot throughout. When done, remove fingers from the oven and slice each lengthwise to get a total of 4 or 5 strips per finger.

3.) Place the tortillas on a cutting board or work surface. Down the center of each, place about 1/2 cup of lettuce, some diced tomatoes, and about 1/2 cup of Cheddar cheese. Top with chicken fingers and then drizzle 2 or 3 tablespoons of the Thai sauce over top.

4.) Fold the wraps by first folding the ends over the ingredients in the center. Then, fold the side closest to you over the folded ends of the tortilla and then tuck underneath the chicken and other ingredients. Continue holding the wrap tightly as you roll up the rest of the tortilla.

5.) Spray a cast iron skillet with non-stick cooking spray and set it over high heat. When very hot, place the wraps, seam-side down, onto the skillet. This will seal the seam and prevent the items from spilling out. Grill for just a minute or two, to toast and warm the tortilla, and then repeat with remaining sides. When finished, remove wraps from the grill and cut in half on the diagonal.

6.) Serve and enjoy!

Brown Butter Butternut Squash

Originally published on December 7, 2015

When it came to roasting butternut squash, I used to just chop it up, toss it with some oil and whatever herbs I had on hand, and let it go in the oven. The other day though while grocery shopping, I found some butternut squash all peeled, chopped up, and ready for me to just take home and cook – no prep needed! Did you know that this existed? Did you know that you no longer have to go through the agony of peeling squash and then dropping all your weight on the knife just to chop the darned thing? It’s true – you don’t have to do it anymore! And if you also opt to choose the easier life of buying pre-peeled and pre-chopped squash, you might just also find a beautiful recipe on the back of the package just like I did!

Ingredients:

  • 1 package peeled, chopped butternut squash
  • 2 tablespoons olive oil
  • 2 tablespoons butter
  • 2 tablespoons brown butter
  • Salt
  • Freshly ground black pepper

Directions:

1.) Preheat oven to 400 degrees Fahrenheit and line a baking sheet with parchment paper.

2.) Place butternut squash into a large bowl and toss with olive oil, salt, and pepper. When fully mixed, pour the butternut squash onto the baking sheet, making sure that all cubes are in a single layer.

3.) Place the squash into the oven and bake for 15 minutes.

4.) Remove the butternut squash from the oven. Dot with the butter and brown butter and place back in the oven. Bake for another 10 minutes.

5.) Serve and enjoy!

Turtle Cheesecake

Originally published on December 24, 2015

Traditions are big this time of year and in this house, along with Christmas traditions, we also have birthday traditions. Brent’s birthday is on the 16th and, Turtles being his favourite chocolate, he gets loads of them. We also have the tradition of the cake I make him, and it’s always top secret until the unveiling after dinner. This year I figured it made sense to combine the two and make him a Turtle cheesecake.

This cheesecake is so smooth, so decadent, and so, so filling. You’ll definitely need to save room for this one, and even then you only need a small slice.

Ingredients:

For the crust:

24 Oreo cookies, finely crushed
6 tablespoons butter, melted

For the pecan caramel sauce:

1 cup packed brown sugar  
1 cup chopped pecans  
1/2 cup heavy cream  
4 tablespoons butter  
1 tablespoon vanilla extract  
Pinch of salt  

For the cheesecake filling:

3 packages cream cheese, softened
3/4 cup white sugar  
1 tablespoon vanilla
3 eggs  
2 ounces semi-sweet chocolate


Directions:

1.) Preheat oven to 325 degrees Fahrenheit.

2.) Start by making the Oreo cookie crust. Mix crumbs and butter together, then press onto the bottom and 2 inches up the side of a 9″ springform pan. I find it’s easiest to spread the crumbs onto the bottom of the pan, then start pressing them in the centre, moving your way out and up.

3.) Next, make the caramel sauce. Combine the brown sugar, heavy cream, butter and salt in a saucepan over medium-low heat. Cook while whisking gently for 5 to 7 minutes, until it thickens. Add the vanilla and cook another minute. Remove the sauce from the heat and stir in the chopped pecans.

4.) Pour half of the caramel sauce into the prepared crust and place in the fridge while you make the filling. Refrigerate the remaining caramel sauce for later.

5.) Beat cream cheese, sugar, and vanilla in the bowl of a stand mixer with the paddle attachment. Add eggs, one at a time, mixing on low speed after each just until blended. Pour over caramel layer in crust.

6.) Place the cheesecake in the oven and bake for 1 hour and 10 minutes, until centre is nearly set. Remove cheesecake from the oven and run a knife along the rim of the pan to loosen the cake. Cool before removing rim and then refrigerate for 4 hours.

7.) Warm the remaining caramel sauce in a microwave or in a double boiler. Pour over cheesecake just before serving.

8.) In a double broiler, melt the chocolate. Very carefully lift the bowl out (it will be hot, so use oven mitts or a tea towel) and use a spoon to drizzle the chocolate over the caramel sauce.

9.) Run a sharp knife under hot water to make it easier to slice. Then, serve and enjoy!

Hamburger Buns

Originally published on January 4, 2016

Just like any time you bake fresh bread, homemade hamburger buns are so much better than the store-bought kind. Mine came out a bit more like slider buns than they did hamburger buns, but luckily we were having beef on a bun, so size really didn’t matter. And while the sesame seeds aren’t completely necessary, I do think they give the buns an added touch.

Ingredients:

  • 2 tablespoons granulated sugar
  • 1 cup warm water
  • 1 package dry active yeast
  • 1 cup milk
  • 2 tablespoons butter
  • 1 1/2 teaspoons salt
  • 5 cups all-purpose flour
  • 1 egg yolk
  • 2 tablespoons sesame seeds

Directions:

1.) In large bowl, dissolve 1 teaspoon of the sugar in warm water. Sprinkle yeast over top; let stand until frothy, about 10 minutes.

2.) Meanwhile, in saucepan, heat milk, remaining sugar, butter and salt over low heat just until butter is melted. Transfer mixture to the bowl of a stand mixer fitted with a dough hook attachment. Let cool until the mixture is lukewarm, then add yeast mixture to it.

3.) Add 4 cups of the flour, 1 cup at a time, to the bowl of the stand mixer while running it at medium speed. Remove the bowl from the mixer and, using a wooden spoon, mix in the remaining flour until a stiff dough has formed.

4.) Turn the dough out onto a lightly floured surface. Knead, adding more flour if necessary, until the dough is smooth and elastic, about 10 minutes. Place in a greased bowl, turning to grease all over. Cover with plastic wrap and let rise in a warm area until doubled in size, about 1 1/2 hours.

5.) Punch the dough down and turn out onto a lightly floured surface. Roll into a log and divide into 16 pieces. Shape each into a ball by stretching the dough on top down towards the bottom, and then pinching and sealing. When finished rolling hamburger buns, place them 2 inches apart on a baking sheet and flatten slightly. Cover and let rise again until it’s doubled in size, about 1 hour.

6.) Whisk egg yolk with 1 tablespoon of water and brush gently over the tops before sprinkling with sesame seeds.

7.) Preheat oven to 400 degrees Fahrenheit and then bake the hamburger buns for 20 to 25 minutes, until the buns are golden on top and sound hollow when tapped. Transfer to a wire rack and let cool.

8.) Serve and enjoy!

Best Ever Cinnamon Rolls

Originally published on January 14, 2016

For the past few years, cinnamon rolls have been our traditional Christmas breakfast. Well, except for last year when they completely flopped, sending my mom out in a frantic panic on Christmas Eve to find something suitable for the next morning. That’s why this year, I needed a new recipe. This one has cinnamon baked right into the dough, and they’re so soft when they come out of the oven (and for hours after), that they practically melt in your mouth. We prefer pecans over raisins, but fill yours with whatever filling you like best and they’ll be delicious. These really are the best cinnamon rolls. Ever.

But the taste might not even be the greatest thing about these cinnamon rolls. The fact that you can prepare them the day before and then let  them rise in your fridge overnight makes them a quick breakfast any day of the year.

Ingredients:

For the cinnamon rolls:

  • 3 1/2 cups all-purpose flour, plus more for rolling
  • 1 package rapid-rise yeast
  • 1/3 cup sugar
  • 2 large eggs, room temperature, beaten
  • 1 cup milk
  • 4 tablespoons butter, plus more for greasing pan
  • 2 teaspoons ground cinnamon
  • 1 teaspoon kosher salt

For the filling:

  • 1 1/4 cup packed brown sugar
  • 2 tablespoons ground cinnamon
  • 1/2 teaspoon ground nutmeg
  • 1/8 teaspoon kosher salt
  • 6 tablespoons butter, room temperature
  • 1 cup pecans, chopped and lightly toasted

For the glaze:

  • 1 cup powdered sugar
  • 1 1/2 tablespoons milk
  • 1/4 teaspoon vanilla extract
  • Pinch salt

Directions:

1.) Start by making the dough. Place flour, yeast and sugar in the bowl of a stand mixer fitted with the paddle attachment. Mix on low speed until well combined. Add eggs and mix on low to combine.

2.) In a small saucepan, heat milk, butter, and cinnamon over medium-low heat until butter is melted and mixture is warm, but not hot. (I stick my very clean finger into the mixture and when I can only hold it there for a couple of seconds, I know it’s ready.)

3.) Add warm milk mixture and salt to stand mixer. Beat on low speed for 2 to 3 minutes, occasionally scraping down the sides of the bowl. Beat on medium speed for 2 to 3 minutes, until the dough comes together. It will be very sticky.

4.) Place dough onto lightly floured surface and just bring it together. Do not knead at this point, you just want to bring it into a ball.

5.) Place a teaspoon of olive oil into the bottom of a large bowl. Place the dough in and turn to coat in oil. Cover with a tea towel and let rise in a warm place for about 2 hours.

6.) While dough is rising, butter two 9-inch cake pans, then fit with parchment, and butter the parchment. In a bowl, combine the cinnamon, brown sugar, nutmeg and salt for the filling and set aside.

7.) After the dough has risen, punch it down lightly and transfer it to a lightly floured surface. Roll out into a rectangle, approximately 16″ x 12″. Spread the butter over the dough, leaving a 1/2 border on the longer sides. Sprinkle the filling mixture even over the butter, then sprinkle pecans over top.

8.) Starting at the long edge closest to you, roll dough up to the other longer edge, pinching it gently underneath as you do. Once you’ve rolled the cinnamon rolls into a log or loaf, cut the dough crosswise into 6 even pieces. I do this by first cutting it in half so that I have two pieces. I then cut those two pieces into half so that I have four pieces, and so on until I have 16 pieces. This will help you create even pieces.

9.) Divide the rolls between the cake pans, arranging them cut-side up. It’s okay if the rolls are touching, but don’t cram too many into one, as they will still rise in the fridge.

10.) Cover rolls with plastic wrap or a clean tea towel and place them into the fridge for an overnight rise.

11.) In the morning, remove rolls from the fridge and allow them to stand at room temperature for about 30 minutes.

12.) Preheat oven to 375 degrees Fahrenheit. Once oven is hot, bake rolls until the tops are golden, about 25 minutes.

13.) While rolls are baking, prepare the glaze. In a medium-sized bowl, whisk together the powdered sugar, milk, vanilla and salt.

14.) When rolls come out of oven, allow them to cool for 10 minutes. Then drizzle glaze over top while cinnamon rolls are still warm.

Perfectly Pan-Roasted Chicken

Originally published on January 15, 2016

Whether you’re using them as a main course, or you just need juicy chicken for tacos or a salad, there’s more than one way to cook a good bird. Pan-roasting is a quicker way to cook chicken, and I find that because you have so much more control over it, it doesn’t dry out as easily. Any cut works for pan-roasted chicken, and taking or leaving the skin is also up to you. When everything is working right in my world I keep a couple of pan-roasted chicken breasts in my fridge for quick suppers and sandwiches.

Ingredients:

  • 4 boneless, skinless chicken breasts
  • 2 tablespoons butter
  • 2 tablespoons olive oil
  • 1 tablespoon dried thyme
  • Salt
  • Pepper

Directions:

1.) Pat chicken as dry as you can with paper towel and generously sprinkle with salt and pepper.

2.) Melt the butter and the oil together in a cast-iron skillet set over medium heat. When hot, add the chicken, skin-side down. Yes, I realize this is a skinless chicken recipe, but the side where the skin is found should be placed down in the pan first. Cook chicken on this side for about 10 minutes.

3.) Flip the chicken breasts over. The skin should be crispy and golden. Continue cooking skin-side up until the chicken is cooked through, about 15 – 20 minutes. Some like to place a lid over the chicken at this point to help the chicken cook more quickly, but this can wreck all your hard work and can make the skin soggy and rubbery.

4.) Once the chicken has reached an internal temperature of 160 degrees Fahrenheit and juices no longer run pink, remove chicken from pan and let rest for 5 minutes.

5.) Serve and enjoy!