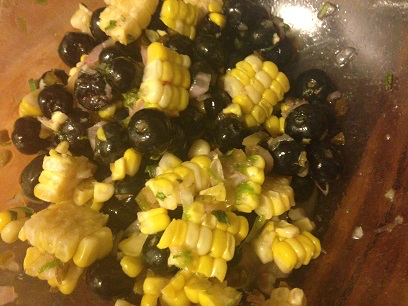
After visiting one of the local farmer’s trucks that hang around our town, blueberries and cornlooked so beautiful sitting together in my fridge, I wondered if they’d taste just as nicely together. Turns out, I’m not the first one to be struck by the thought of combining blueberries and corn in a salad, but others seem to muck it up by adding way too many things. Cucumbers, red onion, and honey-lime dressing are just a few of the ideas I’ve heard of since, but I kept mine a little simpler. And even with the suggestions I received, I think I’d make it this exact same way the next time around.
Ingredients:
1 cup blueberries, washed and picked over to remove stems 1 cup fresh corn kernels, cut off the cob in chunky pieces 1 shallot, minced 2 tablespoons pickled jalapenos, minced 2 tablespoons fresh parsley, chopped 2 tablespoons olive oil 1 tablespoon white wine vinegar Salt Pepper
Directions:
1.) Place everything (including a pinch of salt and pepper) into a bowl. Mix together to combine all ingredients. Taste, and adjust seasoning if necessary.
Chicken paprikashis a Hungarian dish that, as its name implies, uses a lot of paprika – a spice that I’m particularly fond of. When I first started cooking, I was convinced it was added to dishes for its bright colour only; and was so adamant about it that I even once debated the issue with my best friend for longer than necessary. But, I can admit when I’m wrong (usually), and I was that time.
Paprika is a spice that has a very unique flavour, and I love that this dish celebrates that. While hot and smoky paprika is all the rage these days, sweet paprika is the traditional spice used in chicken paprikash, and it just happens to be my favourite.
Ingredients:
1 whole chicken, cut into 6 – 8 pieces 2 tablespoons sweet paprika 1 red pepper, julienned 2 tomatoes, peeled, cored, seeded, and chopped 1 large yellow onion, minced 1 1/2 cups chicken broth 3/4 cup sour cream 1/2 cup all-purpose flour, plus 2 tablespoons 1/4 cup canola oil 2 tablespoons flat-leaf parsley, finely chopped Salt and pepper, to taste
Directions:
1.) Season chicken with salt and pepper. Dredge chicken in 1/2 cup flour, shaking off excess as you do.
2.) Heat oil in a Dutch oven or very large frying pan over medium-high heat. Cook chicken, turning once, until brown, 8 – 10 minutes. Set aside.
3.) Add paprika and half the peppers, along with the tomatoes and onion to pot. Cook, stirring until onions are soft, about 5 minutes.
4.) Add chicken and broth and bring to a boil. Reduce heat to medium-low and simmer, covered, turning chicken once, until fully cooked and juices run clear, about 12 – 15 minutes.
5.) In a small bowl, whisk together 2 tablespoons flour and sour cream. Stir sour cream mixture into sauce in pot and remove from heat.
6.) Transfer chicken to a serving platter and spoon sauce over top. Sprinkle with chopped parsley.
Wanna know how good this is? It’s won awards. Well okay, one award. And it wasn’t really an award, not like a James Beard award or anything. But it is a winner and it did score me a gift certificate at work during our poutine contest. At the beginning of July, all four of us cooks created our very own poutine. We put them on the feature menu and whoever sold the most come July 31 won. Not only was that person me, but with 47 sold and the runner up sitting at 32, I crushed it. Now you can too, and win the prize for the most compliments at dinner. And, if you wanted to fashion yourself some kind of gold star for it, I think that would be perfectly appropriate.
1.) Start cooking French fries, however you have decided to make them, from scratch or store bought.
2.) Place bacon in a frying pan and fry over medium heat until crispy, turning regularly. When bacon is done, transfer to a plate lined with paper towel and place paper towel over top to blot grease. Then cut into large chunks.
3.) Melt butter in a medium-sized saucepan over medium heat. Once melted, add all-purpose flour and whisk thoroughly until all lumps are removed. Cook for five minutes while the roux is bubbling. This will give the gravy a darker colour and will also cook out the raw flour. Slowly add the beef stock to the roux, whisking as you do to avoid lumps from forming. Once the stock has been added, reduce heat to medium-low and continue cooking, uncovered. You need to keep the gravy piping hot so it will melt the cheese.
4.) Place olive oil in a large frying pan set over medium-high heat. When hot, add the beef, Worcestershire sauce, garlic powder, onion powder, paprika, parsley, and salt and pepper to taste. Stir to thoroughly combine all ingredients and continue to cook until beef is completely browned. Taste, and adjust seasoning if necessary.
5.) To plate, set a large handful of French fries on a plate or in a bowl. Spoon about 1 cup of beef over top of beef and some of the bacon over top. Top with cheese curds and then generously spoon gravy over top.
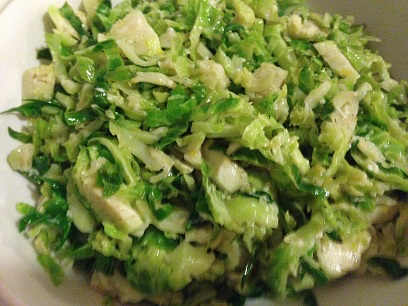
I love Brussels sprouts. They have to be fresh, not frozen, and they need to be cooked perfectly. Unlike many, I don’t think that always means cooking them in bacon grease and then sprinkling those crunchy bits of bacon throughout the sprouts. While I have made Brussels sprouts with bacon, this is a lighter and healthier side and still extremely tasty. And with the season of warm salads just around the corner, the timing couldn’t be better.
Ingredients:
2 tablespoons olive oil, divided 1/2 pound Brussels sprouts, trimmed 3 tablespoons fresh lemon juice 1/4 cup grated Parmesan cheese Salt Pepper
Directions:
1.) Cut Brussels sprouts in half and thinly slice to shred them. You can also do this in a food processor with the shredding attachment.
2.) Heat one tablespoon of olive oil over medium-high heat. Add Brussels sprouts, season with salt and pepper, and toss. Cook for 3 minutes, tossing often, until the sprouts are bright green and slightly wilted.
3.) Transfer the Brussels sprouts to a large bowl. Add lemon juice, remaining tablespoon of olive oil, and Parmesan cheese. Toss well, taste, and adjust seasoning with salt and pepper if needed.
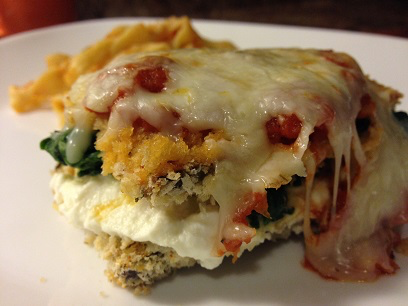
I had one of the best meals of my life this summer. While visiting in Niagara, my mom wanted to take everyone out to celebrate my birthday. We went to Johnny Rocco’s, a gorgeous Italian restaurant in Niagara Falls that I fell in love with the moment I stepped inside. We sat close to the open concept kitchen, which was perfect for me as I could watch the many chef jackets run around and prepare different dishes. I didn’t see them make the eggplant parm, but I’ve tried to recreate it as best I could here. One of the things that I was really striving for was to get that eggplant crispy, crispy, crispy, as it was one of my favourite things about Johnny Rocco’s version. In the end it wasn’t at all soggy, but still not as crunchy as I would like. Next time I think I’ll deep-fry it to get that crunch I’m looking for.
(As a side note, mom was so excited about this eggplant parm, she knew she was having it before we even got there. And once I told her I was making it in my own kitchen, I had to freeze some to bring home with me on my next visit.)
Ingredients:
1/2 cup all-purpose flour
2 eggs
1/2 cup water
1 cup panko bread crumbs
1/2 cup cornmeal
1 tablespoon dried Italian seasoning
1 tablespoon garlic powder
1/2 cup grated Parmesan cheese, divided
2 medium-sized eggplants, or 1 large eggplant
1/2 cup mozzarella cheese, shredded
2 pounds of spinach
1 tablespoon olive oil
1 1/2 cups ricotta cheese
2 cups spaghetti sauce
Salt
Pepper
Directions:
1.) Preheat oven to 400 degrees Fahrenheit and line two baking sheets with parchment paper.
2.) Heat olive oil in a frying pan set over medium-high heat. When hot add the spinach and season with salt and pepper. Cook just until wilted, about 3 – 5 minutes, stirring and turning often. When finished, transfer to a bowl and set aside.
3.) Slice the eggplant very thinly. You can slice it in rounds, or you can slice it in long rectangular slices and then slice it in half. Either way you want the eggplant to only be about 1/4″ thick.
4.) Set up a breading station using 3 baking dishes. In the first add the flour and season with salt and pepper. In the second dish whisk the egg with 1/2 cup of water. In the third dish combine the panko, cornmeal, dried Italian seasoning, garlic powder, and 1/4 cup of Parmesan cheese. Season with salt and pepper to taste.
5.) One by one dredge the eggplant in flour and then shake off excess. Completely drown them in the egg wash, and then place them in the panko mixture. Really press the panko mixture into the eggplant so that it holds.
6.) Arrange the eggplant on the prepared baking sheets. Place in oven and bake for about 20 to 25 minutes, turning halfway through, until the eggplant is nice and crispy. When done, remove from oven.
7.) Onto half of the eggplant slices, spoon a tablespoon or two of spaghetti sauce. On top of that place about 2 tablespoons of spinach and top with a tablespoon or two of ricotta cheese, covering the spinach. Place another, undressed, eggplant slice over top of each slice covered with spinach and ricotta cheese. Add two tablespoons of spaghetti sauce on top of each stack and sprinkle with 2 tablespoons of mozzarella cheese.
8.) Turn broiler on. When hot place baking sheet inside and broil eggplant for about 2 minutes, just until the cheese is melted and starting to brown.
9.) Serve, with pasta tossed in your favourite sauce, and enjoy!
So here’s the thing. As a parent, I have visions of me and my grown girls in the kitchen, preparing a big family feast together and chop-chop-chopping while we giggle away. And I’d like to think that one day, they’ll bring me breakfast in bed on Mother’s Day. But before any of that can happen, I have to teach them. I have to show them how to cook. And truthfully, I just don’t want to. Or at least, I didn’t think I did.
See, the kitchen was my place. It was where I could go and know that, for at least half an hour, time was mine. I could forget about all the other stuff that had to be done, and get lost in risotto or put all my focus into making that perfect pasta dough. How exactly was I supposed to do that when I was explaining every move, or waiting for tiny little hands to level out a cup of flour? It couldn’t be done. And if I allowed it to happen, the kitchen would turn into just another place where chores were done.
But the time had come. My girls are getting older and, it was probably time to start teaching them at least a few kitchen basics. I mean, I’ve cooked for a good portion of my life. If they can’t at least make themselves a proper meal when it comes time for them to leave home, I’ve basically failed as a mother, right? So, I bought The Usborne First Cookbook while on our family trip to the annual town fair. We put a plan in place that every Thursday, we’d get into the kitchen and they’d cook while I instructed. They were excited. I could see the beginning of the end.
That Thursday will turn into many more Thursdays – I can’t remember the last time I had so much fun making dinner. So maybe pizza isn’t the most sophisticated dish to make. And yes, maybe I did have my doubts about the simply-too-simple sauce in the book. But I can’t tell you how much fun it was to watch their noses scrunch up when they smelled the yeast as it started to bloom. And watching their eyes widen in amazement after the dough rose was a feeling that I had almost forgotten existed. See, when you get kids in the kitchen, you not only get to teach them a life skill everyone should have, you get to relive the joy of cooking that brought you to the kitchen in the first place. And you get to take the time to once again discover that sometimes simple is best – that sauce was gorgeous.
And as it turns out, 7 and 9 year-olds can giggle just as well as their future 20-something selves.
1/2 cup water 1 teaspoon sugar 1 teaspoon quick-rise yeast 1 3/4 cups white bread flour 1/2 teaspoon salt 1 16-ounce can diced tomatoes 1 tablespoon tomato paste 1 1/4 cups grated mozzarella cheese 1 teaspoon dried oregano Additional toppings such as pepperoni, bacon, green peppers, mushrooms, etc. (optional)
Directions:
1.) Following the directions on the package of yeast, add the water, yeast, and sugar to a container.
2.) Sift the flour and salt into a bowl, then mix in the yeast. Mix in just enough water to make a soft bowl of dough that leaves the bowl clean.
3.) Dust flour over a clean work surface. Put the dough onto the floured surface and knead it for about 5 minutes. When the dough is smooth and stretchy, put it into a greased bowl.
4.) Cover the bowl with plastic wrap. Put it in a warm place for about an hour to rise.
5.) When the dough has doubled in size, take it out of the bowl and knead it for five more minutes.
6.) Preheat the oven to 400 degrees Fahrenheit and grease two pizza trays.
7.) Break the dough into two balls and put one into each pan. Press them with your fingers until they fill the pan, then pinch the edge to make crusts.
8.) Place a sieve over a large bowl and drain the tomatoes. Push the tomatoes through the sieve with a wooden spoon. Stir in the tomato paste and a pinch of salt and pepper.
9.) Spread the tomato sauce over the pizzas, but don’t spread it on the crusts. Sprinkle the cheese and seasoning over the sauce.
10.) Bake the pizzas on the middle shelf of the oven for 20 minutes, until the crusts are crisp and brown.
11.) Carefully lift out the pizza. Cut them into wedges or slices.
The girls and I had so much fun making pizza one night that it wasn’t long before they were back in the kitchen, aprons on and ready to help. Actually this strawberry tart supposed to be made the same night as the pizza but we had too much fun and ran out of time.
It was worth the wait, sweet but not too sweet, and a nice light dessert that finished off our meal once we actually got around to making it. The thing I love the most about this kids’ cookbook we’ve been using is that everything is so simple. Who would’ve thought that just brushing a little bit of strawberry jam onto the inside of pie crust could turn it into something so magnificent?
1 1/2 cups all-purpose flour
1 pound strawberries
6 tablespoons butter
6 tablespoons sugar
3 egg yolks, beaten
6 ounces strawberry jelly
A pinch of salt
Directions:
1.) Sift the flour into a bowl and rub it in with the butter, sugar and salt, to make a crumbly mixture.
2.) Add the egg yolks and mix them in well with a knife. Squeeze the mixture with your hands, to make a smooth ball of dough. The dough should be soft but not sticky. To make it easier to roll, and to give the butter a chance to firm up again, put it in the refrigerator for 30 minutes.
3.) Preheat the oven to 400 degrees Fahrenheit.
4.) Roll out the dough until it is fairly thin. Cut out one large circle, about 9″ in diameter, if making one large tart. If making individual strawberry tarts, cut out small circles with a round cutter. Once dough has been cut, press into a large tart pan or individual tins.
5.) Prick the pastry cases with a fork, then line them with parchment paper. Lay dried beans or pie weights on top of the paper, to keep the pastry from puffing up.
6.) Bake the pastry for 15 minutes, then take out the paper and beans. Bake the cases for five more minutes, until they are light brown, then cool them on a wire rack.
7.) Wash the strawberries, cut them in half, and remove their stalks.
8.) Melt the strawberry jelly in a small pan over low heat, to make a glaze. (To loosen the glaze a bit, I had to add a bit of water while melting.) Remove from heat.
9.) When the pastry is cool, brush the insides with a thick coat of strawberryglaze. Arrange the strawberriesin the pastry shell and brush them with more strawberryglaze. Allow to cool completely so the glaze can set.
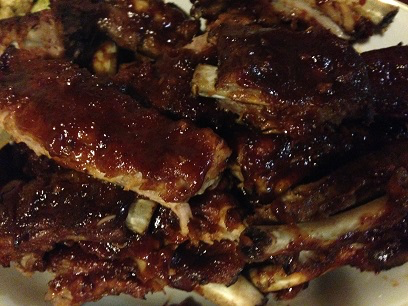
That familiar October chill is officially in the air and while I still take a few trips out to the barbecue every now and then, they’re certainly fewer and farther between. Plus, during this time when I don’t really want to turn the furnace on just yet, letting the oven do the work of warming up the house can be nice.
Cooking ribs in the oven isn’t that much different than cooking them on the grill, but you need to remember the foil. Lots and lots of foil.
Ingredients:
2 racks of pork ribs, side or back cut 2 tablespoons cumin 2 tablespoons paprika 2 tablespoons garlic powder 2 tablespoons onion powder 2 tablespoons chili powder 2 tablespoons brown sugar 1 tablespoon salt 1 teaspoon cayenne pepper 1 teaspoon white pepper 2 cups barbecue sauce
Directions:
1.) Preheat the oven to 325 degrees Fahrenheit and remove the silver skin from the ribs.
2.) Combine everything together but the ribs and the barbecue sauce. Sprinkle generously over both sides of each rack of ribs and massage into the meat.
3.) Lay out one large piece of aluminum foil. Place the ribs in the centre and fold the foil over them to cover as best you can. Then, using another very large piece of foil, cover the remaining portion of the ribs that are still showing. Fold the foil under and around the ribs, completely sealing the ribs in a foil packet. Repeat with remaining rack of ribs.
4.) Place the ribs onto a baking sheet and cook in the oven for 2 – 3 hours, until they are tender and just starting to fall off the bone.
5.) Carefully remove the ribs from the oven and remove aluminum foil. Discard both the foil and the juices.
6.) Preheat the broiler and place ribs on a baking sheet. Brush barbecue sauce generously over the ribs and place under the broiler for 3 – 4 minutes, just until the sauce is heated through, bubbling, and just starting to caramelize.
7.) Remove ribs from the oven and let rest for at least five minutes. If desired, cut into individual ribs.
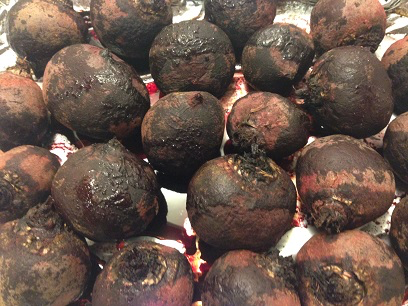
Beetsmight not be the sexiest vegetable in the garden, but I love ‘em. They have a sweet flavour that becomes so intense when you roast them, and they’re so versatile. My mom knows how I feel about this veggie that turns everything it touches purple, which is why on her last visit, she hauled up 20 pounds of them – all for me!!! Hey, thanks mom!
Now, as much as I love the beet, there’s no way I could ever eat that many before they started to turn on me. So, I had to freeze them. And of course, I couldn’t just throw those two huge bags into my freezer and hope for the best – even the most earnest prayers wouldn’t keep those beets nice for me. No, before freezing, roasting was in order. The good news is, it’s super simple.
(My side note on buying beets – wait until this time of the year. My mom said she got each 10 pound bag for just 2 bucks! Now that’s beets on a budget!)
1 10-pound bag of beets
6 tablespoons vegetable oil
Salt
Pepper
Directions:
1.) Preheat the oven to 400 degrees Fahrenheit. Scrub the beetsand trim them.
2.) Place the beetsin a large bowl and toss them with the vegetable oil, salt and pepper. Some like to add aromatics such as rosemary, and add them if you like. I never know what I’ll end up doing with my beetsonce they’re frozen so I like to keep them as plain as possible, adding flavours when I actually go to cook with them.
3.) Before you roast beets, you have to cover them in aluminum foil so that they retain their moisture during cooking, and that aluminum foil needs to seal them pretty well. To do this, you can individually wrap every beet, but that can take a lot of time, and a lot of foil, when you have 10 pounds of beetslike I did. If you’d rather, lay a piece of foil on the bottom and up the sides of a casserole dish. Place the beets on top of the foil and then fold the foil over as many of the beetsthat you can. Then lay another piece of foil on top and crimp the sides of each piece of foil together to form a large packet.
4.) Place the beetsinto the oven and bake for about an hour, until they are fork-tender.
5.) Remove beets from oven and carefully remove aluminum foil. Let cool until you are able to handle them. Then, you can use a paring knife to remove the skin, but they should also slip right off pretty easily. You can also use gloves, if you don’t wish to turn your hands purple after just one beet.
6.) Once the beets are peeled, you can freeze them whole, cut them into chunks or slices before freezing, or eat as a delicious side dish!
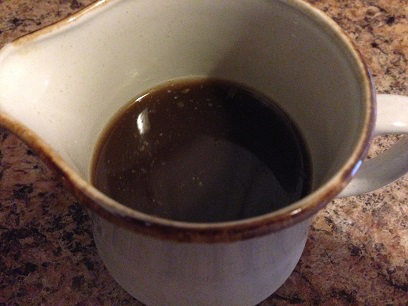
A soy sauce substitute can be great if you want to know exactly what’s gone into your food, or if you’re looking for a gluten-free option. The night that I made this though, it wasn’t for any of those reasons. I just ran out of soy sauce. And it turns out, a soy sauce substitute can be great for that, too.
2 cups of beef broth
2 teaspoons cider vinegar
1 teaspoon molasses
1/8 teaspoon ground ginger
1 dash of black pepper
1 dash garlic powder
1 dash onion powder
Directions:
1.) Combine all ingredients into a small saucepan and whisk to fully combine. Bring to a boil and then lower heat to medium. Continue simmering until the sauce has been reduced by half.
2.) Store in an airtight container in the fridge for up to a week or, serve and enjoy!