Chinese five spice is a spiceblend created in China that tries to encapsulate the five tastes: spicy, sweet, sour, bitter, and salty. This blend is then used for a number of different dishes including stews, fish, chicken, and pork. Households in China typically make their own blends, making each one distinct and making each dish unique to that home. I suggest that you do the same and take a pass on the pre-mixed blends that you’ll find in supermarkets and just make your own. It’ll taste fresher, more unique to your household, and you’ll know exactly what went into it. This recipe will give you about a cup of the blend. Store it in an airtight container at room temperature and it’ll keep for several months.
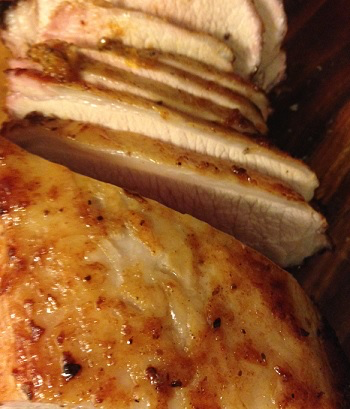
Last week we pulled out the barbecue, cleaned it inside and out and fired it up for the first time this season. And what’s the first thing we cooked on it? Pork roast, naturally. During the coming summer months, don’t deprive yourself of roasts just because you don’t want to heat up your house by turning the oven on. And don’t think you always have to make slow cooker roasts either. Using indirect heat on the barbecue, you can get some of the most succulent, juiciest roasts that also have that smoky flavour that can make them some of the best roasts you’ve ever had. That’s certainly what I found out when making this BBQ Asian Pork Roast.
Ingredients:
1 boneless pork loin roast, about 4 pounds Zest and juice of 4 mandarin oranges 2 tablespoons brown sugar 1 tablespoon soy sauce 1 tablespoon olive oil 3 cloves garlic, minced 1 tablespoon fresh ginger, minced 1 tablespoon Chinese five spice powder 1 teaspoon chile paste 1 teaspoon sesame oil
Directions:
1.) In a bowl combine the mandarin zest and juice, brown sugar, soy sauce, olive oil, garlic, ginger, Chinese five spice powder, chile paste, and sesame oil.
2.) Place the pork roast in a glass casserole dish and pour the marinade over top. Turn to coat, then cover and refrigerate for 2 – 24 hours.
3.) Turn both sides of a gas grill to low heat, grease the rack with olive oil, and close the lid to let the grill preheat. When ready, turn off one side of the burner. On this side, place the pork roast. Brush with the reserved marinade and continue to brush and baste every 10 minutes for the first 30 minutes of cooking time.
4.) Continue cooking the pork roast for another hour and 10 minutes, until the roast is about 145 degrees in the centre for a medium roast. If you like a hotter temperature, cook the roast until desired doneness.
5.) When finished cooking, remove the roast from the grill, cover and let rest for 10 minutes before slicing.
There is little that is more Canadian than maple syrup. The real stuff, that is. I’m lucky enough to live in the “Maple Syrup Capital of Ontario” and even luckier to know someone that makes their own, which is what I used when making these Maple Marinated Chicken Kabobs. This past weekend saw the annual “Festival of the Maples” event and this Canadian gold was running freely just about everywhere; as was all the information you could ever want about the stuff. Here are the facts about maple syrup I found most interesting:
The First Nations people in North America were the first to make maple syrup, long before the Europeans brought some over. Legend has it that the discovery of maple syrup came after a bucket had been left under a tree on a Chief’s property one evening. Overnight sap collected in the bucket and, when the Chief’s wife saw it the next day, she thought it was water and used it to boil meat in for supper. The sap turned to syrup and the flavour delighted the Chief so much, maple syrup production begun and hasn’t stopped since.
The First Nations people also made maple sugar due to the fact that it lasted much longer and was easier to carry when traveling.
Maple syrup production farms are called “sugarhouses” or “sugarbushes” today. This too, is part of the original sap production that started in North America. When the Native people made maple sugar rather than maple syrup, they did so in an outdoor building that didn’t require refrigeration. These buildings were called “sugarhouses” and the name has stuck.
Maple syrup and maple sugar are the only two foods that are produced from sap.
Maple syrupis the first agricultural crop of the calendar year – which means we can start to get excited for all the others that are soon to come!
Maple syrup is sold in four different colours. In Canada those are: Extra Light (AA), Light (A), Medium (B), Amber, and Dark. The darker the colour, the more flavourful the syrup, although the sugar content remains the same among all types. Early on in the season when the trees first start producing the sap that can be turned to syrup, the maple syrup will be lighter in colour and it will darken as the season continues.
Maple syrup season is relatively short, lasting only about four to eight weeks. While maple trees will produce sap during the off-season, it’s not sap suitable to be turned into syrup.
You cannot freeze maple syrup.
Producing maple syrup is extremely labour-intensive. Maple trees need to be about 30 to 40 years of age to produce the syrup, and one tree will only produce about 5 to 15 gallons of sap per season. Given that it takes about 40 gallons of sap to make 1 gallon of maple syrup, it could take up to 8 trees to produce 1 gallon in just one season. That means farms need a lot of trees, and each of those need to be tapped before the sap can be collected, then filtered, then boiled. If you want to produce maple syrup, you better be pretty serious about it.
The “International Maple Syrup Institute” was founded in 1975 and they continually work “to promote and protect pure maple syrup and other maple syrup products”. Their meetings are typically held outdoors and include a very big griddle on which many pancakes are made before being doused with maple syrup.
But maple syrup is good for more than just pancakes. It can also be used in many recipes, including the one below.
2 boneless skinless chicken breasts, cut into 1″ cubes 1 green pepper, seeds and ribs removed and cut into chunks 1 red pepper, seeds and ribs removed and cut into chunks 1 onion, peeled and cut into chunks 3 tablespoons real maple syrup 2 cloves garlic, minced 1 tablespoon fresh ginger, grated 1 teaspoon white vinegar 1/4 cup soy sauce 1/4 cup white wine 1/4 cup water 2 tablespoons olive oil Ground black pepper, to taste
Directions:
1.) Soak bamboo skewers in water for at least 2 hours, or save yourself the trouble and use stainless steel skewers that won’t burn up on the grill.
2.) About an hour before cooking time, start making the skewers. Skewer first the chicken, then a couple of pepper pieces, then the onion. Repeat with the remaining chicken, pepper, and onion pieces until all the skewers are full and place skewers in a 9″ x 13″ casserole dish.
3.) Place the soy sauce, white wine, water, maple syrup, white vinegar, ginger, and garlic cloves in a small saucepan. Bring to a boil then lower heat and simmer for 10 minutes before setting aside to cool slightly. Pour this mixture over the chicken skewers and place the casserole dish in the fridge for half an hour.
4.) When ready to start cooking, heat an outdoor grill to medium heat. Remove skewers from fridge and drizzle olive oil over top of each. When grill is hot, place chicken skewers on and cook for about 5 minutes on each side. Throughout cooking time, brush on remaining marinade, turn the skewers, and keep lid closed as much as possible.
5.) Turn grill off, remove skewers, and let rest for about 5 minutes.
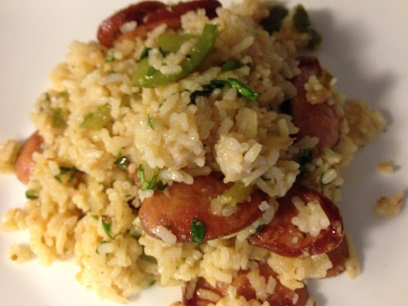
Dirty rice is a Creole dish that along with green bell peppers, onions, and celery, also traditionally includes chicken livers. Being fresh out of organ meat but having plenty of Italian sausage in my fridge, I decided to go this route instead. This was also the first foray into dirty rice for me and the girls, so I wanted to make sure the experience was a good one for all of us and I thought they might turn their little noses up to liver. This version was very good, and I might just try to hunt down some chicken livers so I can throw them into the pot next time. It’s also those chicken livers that are said to turn the rice from white to a dirty colour, hence the name.
Ingredients:
2 cups long grain white rice 4 cups chicken stock 2 tablespoons butter, plus 1 tablespoon 1 tablespoon vegetable oil 1 pound Italian sausage, sliced 1 clove garlic, minced 1 large onion, chopped 1 stalk celery, chopped 1 green bell pepper, chopped 1/2 teaspoon cayenne pepper 1/4 cup fresh parsley, chopped Salt Pepper
Directions:
1.) Place rice in a saucepan with the chicken stock. Add 1 tablespoon of butter and a generous pinch of salt. Cover and place over high heat, bring to a boil, then turn heat to low and let cook until all the stock has been absorbed. Then remove lid and fluff with a fork.
2.) While the riceis cooking, melt 2 tablespoons of butter with 1 tablespoon of vegetable oil over medium heat. When melted and hot, add the onion, celery, and green pepper. Stir to coat everything in the fat, season with a pinch of salt, and cook for about 5 minutes, until the vegetables are soft. Add the smoked sausage and stir. Cook for another 10 minutes or so, until the sausage begins to crisp. Add the garlic, cayenne pepper before stirring and cooking for another minute or two.
3.) Add the rice and stir to fully mix all ingredients. Cook everything together for about 5 minutes to marry the flavours.
4.) Remove from heat and stir in parsley. Taste, and adjust seasoning if necessary.
TheBreakfast Club was one of my favourite movies growing up. After my sister and I watched it for the thousandth and then the millionth time, we would actually recreate scenes in our living room, pretending to be Molly Ringwald and Ally Sheedy. This Breakfast Club is a bit different than both the film and our Oscar-worthy recreations, but feel free to recite lines from the movie while you’re assembling this breakfast sandwich. I know I couldn’t help singing “(Don’t You) Forget About Me“.
Ingredients:
3 pieces of rye bread
1 tablespoon of butter
2 eggs
3 slices of bacon
2 thin slices of Cheddar cheese
3 thin slices of tomato
Salt
Pepper
Directions:
1.) Toast the three slices of rye bread and butter.
2.) Place 3 pieces of bacon in a frying pan set over medium heat and fry until crispy. Then move to paper towels to drain.
3.) Place the frying pan back over medium heat and carefully add them to the pan, leaving whole. You’re going to cook the eggs to over-hard so cook for about 4 minutes on one side, until the bottoms are fully set and the top of the white is just beginning to set. Carefully flip and cook for another 2 to 3 minutes, until the yolks are fully cooked. Sprinkle with salt and pepper and remove from heat.
4.) Assemble the breakfast club. On one piece of rye, butter-side up, place the tomato slices, lightly seasoning them with salt and pepper. Place another piece of rye on top of the tomatoes and then add the cheese, the eggs, and the bacon. Top with the last piece of rye bread, butter-side down.
5.) Cut the sandwich in half, then serve and enjoy!
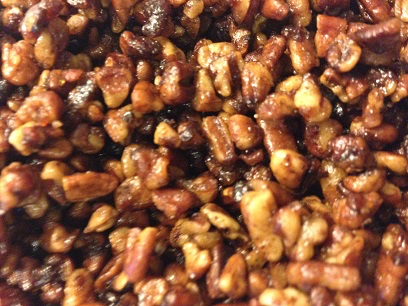
If candying nuts is something you’ve never done, it’s something I strongly suggest you try. All it takes is three ingredients.
You can use whatever nuts you like best, and then use them to garnish salads, add a little extra sweetness to banana bread, or just put out as a bowl of munchies when entertaining. The only thing that can go wrong here is that the nutsburn, because it can happen extremely quickly. So keep an eye on the pan and make sure you take it off the heat as soon as all of that sugar is melted.
1.) Melt the butter in a frying pan set over medium heat. When fully melted, add the pecans and toss to completely coat in the butter.Stir just until everything in the pan becomes hot.
2.) Add the sugar and stir to distribute throughout the pan. Melt and then stir quickly to make sure the pecans are fully coated in the sugar and butter mixture. Then remove from heat immediately.
3.) Place a piece of parchment paper on a baking sheet and spread the pecans out in a single layer to cool and let the mixture set.
I’ve never been a girly-girl easily grossed out by stuff, especially food stuff. So sticking my hand into a huge bowl of raw meat has never been a big deal. But I will tell you that ground chicken is not like other grounds meats. Unlike beef, and even turkey, ground chicken is not for the faint of heart. It kind of smooshes together and becomes a big glob of raw grossness. It sticks to your hands and kind of plops down into the pot, like little blobs of slimy pink play-dough. It’s not pleasant.
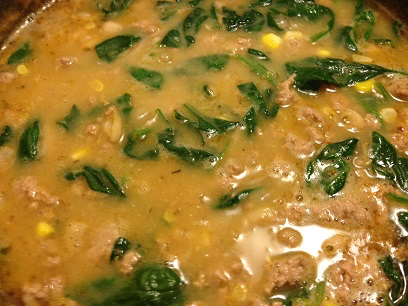
That being said, once it’s in the pot and starts cooking, it does separate and doesn’t have any of that off-putting aroma that some say ground turkey has when it cooks. And when you add all the other ingredients to the pot to make this fantastic chicken chili, well there’s really nothing quite like it. I had never thought that chili was something you could change all that much. But when you use a different kind of meat, stock instead of stewed tomatoes, and add a couple handfuls of fresh greens, you might just end up with my new favourite chili.
Ingredients:
2 tablespoons olive oil 1 large onion, chopped 4 cloves garlic, minced 2 pounds ground chicken 1 teaspoon salt 2 tablespoons ground cumin 1 tablespoon fennel seeds 1 tablespoon dried oregano 2 teaspoons chili powder 3 tablespoons flour 2 cans (15 oz.) white kidney beans, rinsed and drained 1 bunch baby spinach 2 ears of fresh corn, shucked with kernels removed 4 cups chicken stock 1/4 teaspoon crushed red pepper flakes 1/2 cup grated Parmesan cheese, for garnish 1/4 cup chopped flat-leaf parsley, for garnish
Directions:
1.) Heat olive oil over medium-high heat in a large heavy-bottomed saucepan or Dutch oven. Add the onion and cook until translucent, about 5 minutes. Add the garlic and cook for 30 seconds.
2.) Add the ground chicken, 1 teaspoon of salt, cumin, fennel seeds, oregano, and chilipowder. Cook, stirring frequently to break up the chicken, until the chicken is cooked through, about 8 minutes.
3.) Stir the flour into the chicken mixture. Add the beans, corn, and chicken stock. Bring the mixture up to a boil, scraping the bottom of the pan as you do to release brown bits. When boiling turn heat to medium-low and simmer for 30 minutes.
4.) Add the spinach and the red pepper flakes, stir, and continue simmering for another 20 minutes or so, until all the flavours have blended and the spinach has wilted. Taste, and adjust seasoning if necessary.
5.) Ladle the chili into serving bowls and sprinkle each serving with some Parmesan cheese and chopped parsley.
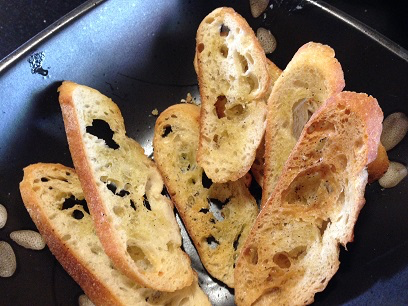
There’s a reason that we use the term “sliced bread” when we’re talking about how good something is. Nothing really beats soft and airy bread that melts in your mouth – and if you can get a loaf that has just come from a bakery and still has that fresh out of the oven smell, even better. But truthfully, bread doesn’t have to be soft and light to be good. In fact, you can slather it with some oil and seasoning, dry it out in the oven, and you might just find it’s much tastier than it was before it went in. That’s what this crostini recipe is all about – simple, beautiful bread that’s tasty, tasty. And while I urge you to swipe a piece or two as it comes out of the oven, leave some for the amazing dip and spread you can use to top them with.
Ingredients:
1 baguette, very thinly sliced 1/4 cup – 1/2 cup olive oil Salt Pepper
Directions:
1.) Preheat oven to 350 degrees Fahrenheit and line two baking sheets with parchment paper.
2.) Brush one side of each slice of baguettewith olive oil and sprinkle salt and pepper over both. Place in the oven and bake for 10 – 15 minutes, until crostini is firm and starting to brown. Flip the crostini over about halfway through baking time.
3.) Serve and enjoy, or place in an airtight resealable bag, squeezing all of the excess air out, and store at room temperature for one week.
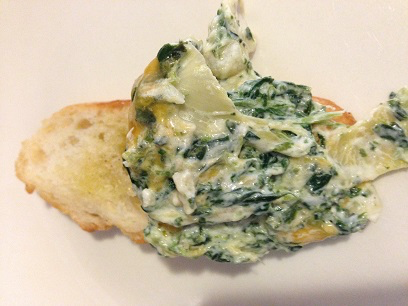
I’m sort of conflicted as to why artichoke and spinach dip appears on just about every single restaurant menu. On the one hand, it’s absolutely delicious. I mean, it’s so good that you don’t even care if you wreck your appetite for that $15 meal you ordered that will arrive after that dip, so it’s easy to see why restaurants would push it. On the other hand though, it’s so simple to make at home I don’t understand why anyone would pay to have someone else make it for them. Seriously, this dip takes just two minutes in the mixer, then 15 in the oven; and when it comes out, you’ll have an ooey gooey dip that’s perfect for any party – or just when you need a snack.
1 box (10 oz.) frozen cut or chopped spinach, thawed 1 jar (12 oz.) artichoke hearts, drained and roughly chopped 1/2 cup cream cheese, softened 3/4 cup sour cream 1 cup Cheddar cheese, grated 1/2 teaspoon salt 1/4 teaspoon black pepper Crostini, pita chips, or tortilla chips, to serve
Directions:
1.) Preheat the oven to 400 degrees Fahrenheit.
2.) Place the spinach between two sheets of paper towel and squeeze all of the excess water out.
3.) Place the cream cheese in the bowl of a mixer with the paddle attachment and whip until it’s softened. Add the spinach, artichokes, cream cheese, sour cream, and cheddar. Season with salt and pepper and mix everything together. Taste and adjust seasoning if necessary.
4.) Spoon the mixture into a round oven-proof casserole dish and smooth out the top so that the dipcooks evenly. Place the dish into the oven and bake for 15 minutes until the cheese has melted and the dish is entirely hot throughout.
5.) Serve with chips, crostini or crackers, and enjoy!
When I first started thinking of garnishes for the blog, to be honest, I didn’t know if it was something that was really worthwhile. But as time has marched on and I’ve found more and more pretty and delectable garnishes, I’ve found that it’s truly got some merit to it – especially when it’s something as dainty as a orange that has been “Supremed”. Many people think that this technique is “segmenting” an orange but in truth, if you want to do that, all you have to do is peel the orange and separate all the pieces. If you want the garnish that gives you a jeweled orange to sit atop any salad or other dish, you must Supreme it. And it’s really easy to do. Here’s how:
Start by cutting off both ends of the orange. You don’t want to take too much of the orange when you do this, just enough to show the flesh of the orange.
Stand the orange up on one of its ends. Using a short paring knife, cut the peel off the orange just where the white membrane meets the pulp of the orange. Let the knife follow the curve of the fruit, slicing the peel away as you do.
Now, if there is a tricky part to this technique (which there’s really not), it’s getting those wedges out perfectly. Remember that if you just cut away where the membrane is, you’ll end up with those somewhat uglier segments that haven’t been Supremed, they’ve simply been cut out of the orange. To get the Supreme wedges, cut each wedge just inside of those membranes. You’ll need to cut them out on a slight angle, and then repeat with the opposite side before continuing on with the rest of the orange.
That’s really all there is to it! Just three simple steps to take an orange from average to Supreme. Now, how are you going to use it now that you’ve got it? In any way you choose!