Originally published on December 27, 2014
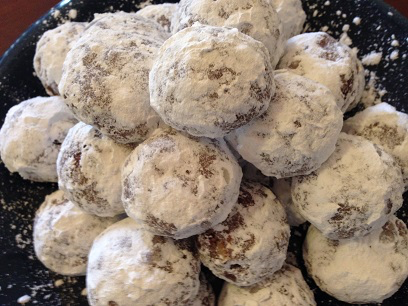
I think these might be the only cookies I’ve ever made that get better tasting the longer they sit after being cooked. I’ve experienced this a lot with savoury dishes, but don’t think I’ve ever come across it in a cookie. My mom was the first to notice, for instance, that the orange zest becomes much more detectable the day after these cookies have been baked so if you want to add more, just beware that they might end up tasting more like chocolate orange cookies than they do sugar cookies. And even though I do love the orange zest, the thing I love the most about this cookie is that one batch makes 7 or 8 dozen, which is perfect when it’s this time of year and you’ve got a lot of cookies to bake for a lot of people.
Ingredients:
2 cups butter (1 pound)
4 ounce semi-sweet chocolate (if you buy the kind that comes in two bars, this is one full bar)
2 cups powdered sugar
1 cup white sugar
2 eggs
2 teaspoons vanilla extract
1 teaspoon orange zest
1 teaspoon baking soda
1 teaspoon cream of tartar
1 teaspoon salt
4 1/4 cups flour
1/2 cup white sugar
Directions:
1.) Preheat the oven to 325 degrees and line two (or more, depending on how many you have) baking sheets with parchment paper. Place the 1/2 cup white sugar in a small bowl to use later.
2.) In a double boiler or a microwave, melt the butter and the chocolate together, stirring occasionally as you do. Once melted, stir the mixture smooth and transfer them to a large, cool mixing bowl. Add the 1 cup of white sugar and the powdered sugar and stir the entire mixture thoroughly. Set aside to cool.
3.) When the chocolate mixture is cool to the touch, add the eggs one at a time, fully incorporating them after each addition.
4.) Add the vanilla, orange zest, baking soda, cream of tartar, and salt. Stir to ensure that the entire mixture is thoroughly mixed together.
5.) Add flour in roughly half cup increments, making sure that the entire is mostly mixed together after each addition. The main reason for doing this is so that you and your counter don’t end up wearing the flour after adding it, so don’t be too worried about getting the measurement exact when you add it.
6.) Once all ingredients have been thoroughly mixed together, use your fingers to roll it all into one-inch balls and then roll in the bowl of sugar you’ve set aside. Make sure the cookies are entirely coated in sugar and then place on your baking sheets. Flatten them slightly, just so they won’t roll off the tray or move too much when you go to put them in the oven.
7.) Bake the Chocolate Sugar Cookies for 10 – 15 minutes, until the bottoms just begin to brown. Remove from oven, let cool on the baking sheets for 5 minutes, and then transfer to a wire rack or plate to cool completely.
8.) Serve and enjoy!