Lemon Zucchini Bread

Originally published on August 23, 2014

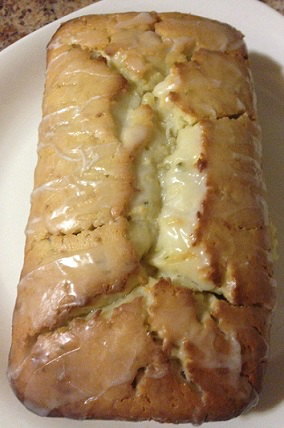
I’ve made zucchini bread many times before. It usually comes out much like banana bread, dense and dark, and maybe a smidgen more nutritious than the banana variety. But when my mom sent me this lemon zucchini bread, I knew I had to try it out. Man, what a difference it is! This comes out of your oven moist and light, and oh so much lemon taste! It’s truly delicious and the glaze makes it much more of a dessert than the snack or breakfast food my regular zucchini bread is. And while the recipe at Lilluna.com gave me a good start, I will say (modestly) that mine is better. The cook time on the original just wasn’t right and they also don’t actually tell you how to make the glaze. Granted, it’s not rocket science, but it’s still a recipe. I also adapted the recipe to be made in a stand mixer because ya know, any chance to use my stand mixer. If you don’t have one yet, just mix wet and dry ingredients separately and then combine the two just before bake time.

Ingredients:

For the bread:

2 cups cake flour
1/2 teaspoon salt 
2 teaspoons baking powder
2 eggs 
1/2 cup canola oil
1 1/3 cups sugar 
Juice of 2 lemons
1/2 cup buttermilk
Zest of 1 lemon
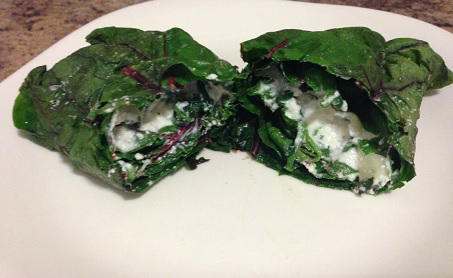
1 cup grated zucchini

For the glaze:

1 cup icing sugar
2 tablespoons lemon juice
1 tablespoon milk

Directions:

1.) Preheat oven to 350 degrees Fahrenheit and grease a 9″ x 5″ loaf pan.

2.) Place eggs into the bowl of a stand mixer with the paddle attachment attached and beat well. Add oil and sugar and continue beating until well blended. Then add lemon juice, buttermilk, and lemon zest and mix until all ingredients are fully incorporated. Add the zucchini and mix well.

3.) In a medium-sized bowl combine flour, salt and baking powder and mix very well. Add this mixture to the wet mixture in the bowl of the stand mixer and combine everything very well.

4.) Pour mixture into prepared loaf pan and place in the preheated oven. Bake for about 1 hour – 1 hour, 10 minutes, until a toothpick inserted into the centre comes out clean.

5.) While the loaf is baking combine icing sugar, lemon juice and milk. Stir together to completely incorporate everything together until a silky glaze forms. If the mixture is too tight, add one more teaspoon of milk.

6.) When loaf comes out of the oven, allow to cool in the loaf pan for about 10 – 15 minutes. Then, gently turn it out of the loaf pan onto a plate. Slowly drizzle the glaze over top, allowing it to run down the sides. Then allow the loaf to cool completely, and allow the glaze to set up completely before slicing and serving.

7.) Serve and enjoy!

Strawberry Pie

Originally published on August 25, 2014

I’ve been baking a lot this summer. I don’t really know why that is, as I’ve always considered myself someone who loves to cook – that is, fry, saute, roast meat and vegetables and barbecue – but has always been a bit of a klutz when it comes to baking. But this year, it’s been going okay for me, leading me to do more and more of it. The problem is, my dear husband doesn’t like too much of what I bake. He’s not big on zucchini bread at all, and even when I made strawberry rhubarb pie he snubbed his nose at it and asked if I could make just a plain strawberry pie the next time the urge to bake rushed over me. It didn’t happen until we celebrated an anniversary in August, and it was a hit! In fact, the best dessert I’ve ever made, he said. I think part of what made it so good was the pie crust I used.

I don’t know what happened with this pie crust. I used the same ingredients I usually do, and even used the food processor like I’ve been doing the last few times I made it. But when I made this one using The Martha Stewart Living Cookbook, it just turned out…better. I don’t know why. Maybe the humidity was just right that day, or maybe the Spirit of Martha was with me when I made it. Either way, it helped bring the entire pie together in a beautiful way and made it even more phenomenal.

Ingredients:

For the pie crust:

2 1/2 cups all-purpose flour, plus more for dusting
1 teaspoon salt 
1 teaspoon sugar 
1 cup chilled, unsalted butter, cut into pieces 
1/4 cup to 1/2 cup ice water 
1 egg yolk
1 tablespoon heavy cream 

For the filling:

5 cups strawberries, hulled and quartered
1/4 cup cornstarch 
2/3 to 3/4 cup sugar, according to sweetness of strawberries
1/8 teaspoon salt
1 teaspoon vanilla extract
1 tablespoon lemon juice
Whipped cream, optional

Directions:

1.) Place the flour, sugar, and salt in the bowl of a food processor, and process for a few seconds to combine. Add the butter pieces to the flour mixture and process until the mixture resembles coarse meal, about 10 seconds. Add the ice water in a slow, steady stream, through the feed tube with the machine running, just until the dough holds together. Do not process for more than 30 seconds.

2.) Turn the dough out onto a work surface. Divide into 2 equal pieces and place on 2 separate sheets of plastic wrap. Flatten and form two disks. Wrap and refrigerate at least 1 hour before using (you’ll only need 1 disk for this recipe, so you can freeze the other for up to a month to use later.)

3.) Roll out pie dough to fit pie dish. Gently press dough down into the dish so that it lines the bottom and sides of the dish. Then use a knife or a pair of kitchen scissors to trim dough to within 1/2″ border of the edge of the dish. Fold edges of the dough underneath itself, creating a thicker, 1/4″ border that rests on the lip of the dish. Then, crimp edges.

4.) Heat oven to 425 degrees Fahrenheit. Place a baking sheet on the middle rack of the oven. Pierce the bottom of the pie crust with a fork to prevent air pockets or bubbles forming while baking. Line the crust with two sheets of aluminum foil, being sure to push the foil against the edges of the crust. Then, fill foil with dried rice, dried beans, or pie weights. Refrigerate for 30 minutes or freeze for 10 minutes, or until firm to the touch.

5.) Place pie crust onto preheated baking sheet and reduce oven temperature to 400 degrees Fahrenheit. Bake 20 to 30 minutes or until the crust is golden.

6.) Make egg wash by mixing egg yolk and cream in a small bowl. Then, remove ice, beans, or pie weights and foil from pie crust. Brush bottom and sides of crust with egg wash. Bake until egg wash is dry and shiny, 3 to 5 minutes. Cool crust completely before filling.

7.) Add 2 cups of strawberries to a small saucepan and mash until they are slightly chunky. Add sugar, corn starch, vanilla extract, lemon juice, and salt. Bring to a simmer over medium heat and cook, stirring occasionally, until sugar dissolves and glaze has thickened; 3 to 5 minutes. Cool completely.

8.) Combine remaining 3 cups of strawberries with cooled strawberry glaze. Stir until strawberries are well coated. Spoon strawberry filling into cooled pie crust.

9.) Refrigerate at least 2 hours before cutting to allow filling to set. Just before serving, top with whipped cream, if using.

10.) Serve and enjoy!

Cake Flour Substitute

Originally published on August 27, 2014

Walk down the “baking” section of any grocery store and you will quickly become dazed and confused just looking at all the different types of flours that are on the shelves. There’s of course, all-purpose, but there’s also bread flour, cake flour, whole wheat flour, and if you go one step further, chick pea flour, almond flour, quinoa flour, and a host of others. And it seems, the more you cook and bake, the more you need to have at least several different types of flour in your pantry. And if you’re a real stickler about following recipes word for word, you can quickly eat up a large portion of your grocery budget if you buy them all. That’s why today, I’m here to tell you about one flour that has an easy substitute – cake flour.

Cake flour is used for more than just cakes. It’s also used in many tart and pie recipes, and any other recipe that calls for a lighter flour than all-purpose. But if you want to cut back on the plethora of flours in your cupboard, you can, just by using all-purpose with a bit of cornstarch in the mix.

I thought I already had this substitute in the page “Common Kitchen Substitutions” page that’s on the site. But when I went back to check, I was surprised that the only cake flour substitution was “1 cup all-purpose flour minus 2 tablespoons.” That’s true, up to a point. When using all-purpose as a substitute for cake flour, you do need to measure out 1 cup of all-purpose and then remove two tablespoons and put them back in your flour jar. But, you need to replace those 2 tablespoons of flour with 2 tablespoons of cornstarch. I don’t know how this works, but some type of science happens once the heat hits that mixture and it makes the flour mix lighter and fluffier than all-purpose alone would. And it really does work! I used this substitute when I made my Lemon Zucchini Bread, and it was the moistest, lightest dessert bread I’ve ever made.

So there ya go, your new cake flour substitute that will work, and that will give you all the flour you need while buying less of it. Now if you’ll excuse me, there’s a page on my site that needs fixing…..

How to Make Your Own Garlic Powder

Originally published on August 30, 2014

The other day I wanted to try a new chicken wing recipe my mother had sent me. Reading through it while checking all my cupboards to make sure I had all the ingredients, I was disheartened by the fact that I had no garlic powder, an important ingredient I needed for the rub they’d soak up for a few hours before being tossed on the grill. Not wanting to give up on the entire idea altogether, I did remember that I had about five bulbs of garlic sitting in another cupboard. And then the idea struck! Make your own garlic powder! I don’t have a dehydrator, but I am not to be stopped when I get an idea in my head (especially if I’m in the kitchen when it strikes) and so onward I went – on a mission to make my very own garlic powder using fresh garlic. I only used one head of garlic (after all, I didn’t reallyknow how this little experiment was going to turn out,) and that, I was hoping, would give me the amount of garlic powder I would need for  my recipe. It did; it yields about 3 – 4 tablespoons. If you want more though, just use more garlic. I promise you, this really works!

Ingredients:

1 head of garlic    $0.33

Directions:

1.) Preheat your oven to its lowest setting (mine was 170 degrees Fahrenheit.) Peel and slice the garlic very thinly. Make sure that you get them all to about even thickness so that they can all dry evenly and you won’t have some very dry pieces and others that are still moist and soft in the middle when they’re done cooking.

2.) Place all the slices in a single layer on a baking sheet. (My one head fit onto one baking sheet, but of course use more than one if you  need to. The single layer is VERY important here, as the garlic will not dry out if it’s covered by other pieces of garlic.)

3.) Place the baking sheet in the oven and slowly cook and dry them out for about 2 hours (for one head,) checking on them every 30 minutes or so. You will know when they’re ready to be taken out of the oven when they are extremely dry and brittle. It’s okay if the edges turn slightly brown during this process but for the most part, they should remain white.

4.) When garlic is finished drying, remove from the oven and place into a blender or food processor. While my processor usually wins out, I chose the blender this time as the bowl of the processor is simply too big and I wondered if it would be able to get at all the garlic inside. If I do it again using more heads of garlic, I’ll likely use the processor. Process or blend until the garlic is completely broken down into a powder – and watch your face when you take that lid off; there’s a lot of dust! Remove any large bits that did not break down and/or are still moist.

5.) Use and enjoy!

Marinated Bocconcini

Originally published on September 1, 2014

I fell in love with bocconcini cheese many moons ago, when I was still a teenager working in a restaurant kitchen in my hometown. Bocconcini is really just fresh mozzarella and you’ll find that it comes in a shape that falls somewhere between an oval and a square (unless you buy the really tiny pearl bocconcini, when it then – fittingly – takes on the shape of a pearl.) The term “bocconicini” means “little bites” in Italian, and while it’s delicious all on its own, marinating them like this provides an extra oomph to any dish you’re adding them to, and can also be a great stand-alone appetizer when entertaining.

Ingredients:

5 – 8 bocconcini, cut in half (you can do more or less depending on how many you need)
2 tablespoons fresh rosemary, chopped
2 tablespoons fresh basil, chopped
2 tablespoons fresh thyme, chopped
2 tablespoons fresh parsley, chopped
1/4 cup olive oil
1/4 cup balsamic vinegar 
Salt
Pepper 

Directions:

1.) After chopping the herbs, leave them on the cutting board and add salt and pepper. (You can transfer them to a bowl or plate if you wish, but I find you lose less herbs if you don’t move them.) Mix the herb mixture thoroughly and then roll the bocconcini halves, one by one, in it, being sure to thoroughly coat all sides. Place bocconcini in a container that can be closed with an airtight lid, but leave it open for now.

2.) Place the balsamic vinegar in a bowl and, while quickly whisking, slowly add the olive oil. When dressing is mixed and slightly thickened, pour over the bocconcini in the container. Do not shake or roll the bocconcini in the dressing, just let it sit. The cheese will absorb some of the dressing, and moving them too much in the liquid can cause them to lose a lot of the herb mixture.

3.) Place the lid of the container on tight and leave the bocconcini in the fridge for two hours to absorb all the flavours.

4.) Serve and enjoy!

Cream of Mushroom Soup

Originally published on September 5, 2014

Cream of mushroom soup can be more than just a great meal (and this one is truly great!), it can also be stored in your freezer along with your stock and used as an ingredient in any dish that calls for it. I can’t tell you how many times I’ve turned away a recipe because it calls for pre-made ingredients such as cream of mushroom soup. No, I can stop doing that and so can you, when you make your very own and still have everything made completely from scratch. But before you go filling your freezer, make sure you at least have a bowl or two of this creamy soup – it’s delicious!

Ingredients:

3 cups sliced mushrooms, plus 1 cup
1 onion, finely diced 
2 stalks celery, finely diced 
4 cloves garlic, minced 
2 – 3 tablespoons fresh thyme, chopped 
2 tablespoons butter
2 tablespoons olive oil, plus 1 tablespoon 
2 tablespoons all-purpose flour 
4 – 5 cups chicken stock or vegetable stock 
1 cup heavy cream 
1/2 cup fresh parsley, roughly chopped
Salt 
Pepper

Directions:

1.) Place 1 tablespoon of olive oil and 2 tablespoons of butter in a large pot and set over medium heat. When it has melted and the foam has subsided add the celery, onion, garlic, and 3 cups of mushrooms. Stir to completely coat everything in the fat and then cook for about 10 minutes, until everything has softened and mushrooms are just starting to brown. (With this many mushrooms, I found it impossible to get them all to brown – let alone brown evenly, so just wait until some start to brown and then move on with the rest of the soup.) Stir the pot regularly to ensure that all vegetables are as evenly cooked as possible, then add thyme, salt, and pepper.

2.) Sprinkle all-purpose flour over all the vegetables, stir to completely coat, and allow the flour to cook out for about 2 or 3 minutes. Then add the stock, stirring constantly. Turn heat to medium-high and let the soup come up to a boil. Then lower heat to a simmer and allow all ingredients to cook together for about 20 minutes. Taste regularly, and adjust seasoning as necessary.

3.) While the soup is simmering, pour two tablespoons of olive oil in a separate skillet and place over medium heat. When hot add the remaining cup of sliced mushrooms and stir to coat them entirely in the fat. Cook for about 5 – 7 minutes, until they are really carmalized (you should be able to get them quite a bit darker as there aren’t that many of them in this pot.) When mushrooms are nicely browned, remove them from the heat, salt them, and set aside.

4.) When soup has finished simmering, turn heat down to low, add the cream, and stir to fully incorporate it. Keep soup on the heat as long as it takes to completely warm the whole thing through, about 3 or 5 minutes. Taste, and adjust seasoning if necessary.

5.) When ready to serve, remove soup pot from the heat and ladle into bowls. Garnish with the carmalized mushrooms and the chopped parsley.

6.) Serve and enjoy!

Stuffed Swiss Chard

Originally published on September 6, 2014

Typically when I buy Swiss chard, I cut the tough stems off, chop it all up, and throw it into a skillet with some olive oil, salt, and pepper. When I saw it staring up at me from my shopping cart this week though, I wanted to do something different with it. I mulled it over on the way home and decided that I’d do something  a bit like cabbage rolls, but maybe something simpler, and perhaps even make it a vegetarian option. These are what I came up with.

Ingredients:

1 bunch of Swiss chard, leaves removed, washed, and dried thoroughly 
1 cup ricotta cheese
2 cups fresh spinach leaves 
1/2 onion, finely diced 
4 cloves garlic, minced
Juice of 1/2 lemon 
2 tablespoons olive oil, divided
Salt
Pepper

Directions:

1.) Preheat oven to 350 degrees Fahrenheit.

2.) Heat one tablespoon of olive oil over medium heat. When hot add onion and garlic and saute until onion is soft and translucent, about 5 minutes. Then add spinach and cook for another two minutes, just until the leaves have completely wilted. Remove from heat, transfer everything to a bowl and season with salt and pepper. Allow to cool, and then add ricotta cheese. Mix the entire mixture so that all ingredients are fully combined. (I tell you, this mixture is so good I had to stop myself from eating it all up with a spoon.)

3.) One by one, lay the Swiss chard leaves out flat and cut out most of the tough rib that travels up the centre of the leaf. You will be left with a big slit in your leaf. Take the smaller side and lay it so that it lines the other side, bridging the gap that was left when you cut out the rib. Then take a tablespoonful of the ricotta mixture and lay it at the narrowest end. Roll the ricotta mixture up into the leave, tucking the sides in and allowing them to be folded along the way. When finished one roll, place it in a square casserole dish for baking and repeat with the other leaves of Swiss chard.

4.) When all Swiss chard has been rolled, use the remaining tablespoon of olive oil to brush the leaves gently (you only need to do this on the side that’s facing up, as those are the only leaves that will turn crispy if you don’t.) Squeeze the lemon juice over all of the leaves (to help them stay green and give a bit of “zing” in your bite at the same time,) and season with salt.

5.) Place the Swiss chard into the oven and bake lightly for 10 minutes, just long enough to get the cheese kind of “gooey” and to slightly warm the entire thing through.

6.) Serve and enjoy!

Veggie Burgers

Originally published on September 8, 2014

Let’s be real for a minute. I’m a carnivore at heart. I love bacon and sausages, steak, and there’s little that I find as tasty as a really delicious burger. I’ve eaten veggie burgers too, but those are usually reserved for restaurants or the frozen food aisle at the grocery store. That was, until I thought, “I bet I could make my own veggie burgers.” Turns out, I can not only make them, I can knock them out of the park! And even this true carnivore would actually choose these over meat patties at any barbecue. Beware before you embark on this adventure, there is a lot more prep required than just throwing some meat together with some seasonings and egg, but I promise you, it is entirely worth it!

Ingredients:

2 cups button or cremini mushrooms, chopped in a very small dice 
1 cup cauliflower florets, processed to make a very basic cauliflower rice 
1 yellow bell pepper, chopped in a very small dice 
1 cup zucchini, grated 
1 egg, lightly beaten
1 cup rolled oats, processed until they are fine crumbs 
1 tablespoon paprika 
1 tablespoon garlic powder 
1 tablespoon onion powder
1 teaspoon celery seed
1 teaspoon dried chili peppers
1 teaspoon mustard powder 
1 teaspoon salt, divided
1/2 teaspoon black pepper 
2 tablespoons olive oil, divided
4 hamburger buns
4 leaves of lettuce (optional)
1 cup diced tomatoes (optional)
2 tablespoons mayonnaise, divided (optional)

Directions:

1.) Getting the moisture out of the vegetables is critical when making veggie burgers, otherwise the burgers will not hold together and they’ll be very mushy. For this reason, the grated zucchini needs to be placed in a colander in a clean sink. Sprinkle 1/2 teaspoon of salt over top, toss the pieces to get the salt throughout and pull some of the moisture out of it. Let the zucchini sit for about 15 minutes, then place them all in a paper towel and squeeze to get rid of the excess moisture. Then place them back in the colander, this time over a bowl.

2.) Heat 1 tablespoon of olive oil in a skillet over medium heat. When hot add mushrooms and stir to coat all pieces in the oil. Cook for five minutes before adding the yellow pepper, cauliflower, and zucchini. Stir to mix all ingredients. While veggies are cooking add the paprika, garlic powder, onion powder, celery seed, dried chili peppers, mustard powder, 1 teaspoon of salt, and black pepper. Stir again and cook for just another minute to brighten the spices and seasoning and marry all the flavours together.

3.) Once the veggies and the seasoning has been cooked, turn heat off and place everything in a bowl to cool. It needs to be completely cooled down before adding anything else.

4.) As soon as the veggies are cooled down, add the egg and the rolled oats and combine thoroughly to completely mix all ingredients together. Divide the veggies into equal servings and then form into patties and place on a plate or platter. When all burgers are formed, place in the fridge, uncovered, and let them sit for 30 minutes. This will help the patties set up and become firmer, eliminating the chance of them simply falling apart when cooked.

5.) After patties have set up in the fridge, heat an indoor or outdoor grill to medium heat and brush with olive oil. (I made mine on an indoor grill and added more olive oil whenever the grill pan became too dry.) When grill is hot, place veggie burgers on and cook on one side for about 5 – 7 minutes until nice grill marks appear and that side is completely firm. Then flip and cook for another 5 – 7 minutes. Try to only turn the burgers once, as that will help hold their shape and keep them from falling apart.

6.) When burgers are completely cooked, remove them from the grill and place on hamburger buns. If using, top with mayonnaise, diced tomatoes, and lettuce.

7.) Serve and enjoy!

Chardonnay Ham

Originally published on September 9, 2014

My mom inspires a lot of my recipes. Whether it’s a dish from my childhood that I want to recreate or a recipe link that interested her and she passed on to me, I often find my recipes going back to my mom. This ham dish though didn’t come from something she likes, but something she’s actually not all that fond of – glazed ham. I love glazed ham, but even more, I don’t really care for a slab of ham that hasn’t been flavoured or seasoned in any way. So is there a common ground that will let mum and I eat ham across from each other in peace? There is, and it’s this Chardonnay ham (mom, if you’re listening, I know you don’t really care for wine either, but go with it on this one. It’s tasty, I promise!)

Ingredients:

1 3-4 lb. smoked ham
2 cups Chardonnay, divided
1 onion, finely diced
3 sprigs fresh thyme sprigs 
2 tablespoons fresh thyme leaves
1/2 cup Dijon mustard
1 tablespoon honey
2 tablespoons butter
Salt 
Pepper

Directions:

1.) Preheat oven to 300 degrees Fahrenheit and score the top of the ham crosswise one way, using 1/2″ parallel cuts. Then, working from the opposite end of the ham, score it crosswise in the other direction so that the cuts resemble small diamond shapes when done. This will help the sauce really soak into the ham and give it the fullest flavour. Place ham in a roasting pan and set aside for the time being.

2.) Place 1 cup of Chardonnay in a pot and add 4 cups of water. Set over high heat and bring to a boil. Boil for about 5 minutes, then remove from heat and pour right over the ham. Place the roasting pan with the ham inside into the oven and bake for approximately 90 minutes, basting with the pan juices occasionally.

3.) While ham is cooking, heat butter over medium heat in a skillet. Add onion and thyme sprigs and cook until onions are very soft and translucent, about 10 minutes. Add the remaining cup of Chardonnay, stir, and bring to a boil again. Boil for about 5 more minutes, until the mixture is reduced to approximately 1/4 cup. Remove skillet from the heat, discard thyme sprigs, and place the mixture into a blender. Blend for just a minute or two until the mixture is entirely smooth. Then add the thyme leaves, mustard, honey, salt and pepper. Blend again for just another minute to fully combine all ingredients.

4.) Remove the ham from the oven, drain the juices in the bottom of the pan, and increase the temperature to 350 degrees Fahrenheit. Brush the Chardonnay mixture over the entire ham and return it to the oven. Bake the ham for another 30 minutes.

5.) Transfer the ham to a platter, tent with foil, and let rest for 10 – 15 minutes before slicing.

6.) Serve and enjoy!

Mashed Potato Balls

Originally published on September 11, 2014

Who doesn’t have leftover mashed potatoes in their fridge after a night of comfort-food-eating? It happens to all of us. And while you can just leave them in the fridge for the mandated four days before tossing them, or end up reheating them as they are, you can also turn them into something completely new. And while my daughter, Paige, probably isn’t alone in thinking that “they taste like potatoes,” it just goes to show that while something may taste familiar, doing just a little bit of tweaking and presenting them in a way that’s just a little bit different puts a fresh spin on them that makes them entirely unique. Oh, and my hubby? The one that likes his boring old mashed potatoes on this side of his plate and the same old hunk of meat on the other side? He not only gobbled these up, he went back for more!

Ingredients:

1 cup all-purpose flour
3 eggs, plus 1 
1 cup mozzarella cheese, grated
2 cups panko or bread crumbs 
1 tablespoon paprika
1 tablespoon garlic powder 
1 tablespoon onion powder
1 teaspoon dried dill
6 – 8 cups of canola oil, vegetable oil, or lard, for frying
3 – 4 cups of leftover mashed potatoes
Salt 
Pepper
Directions:

1.) Place leftover mashed potatoes into a large bowl. Add the mozzarella cheese and one of the eggs and combine thoroughly. One by one, take a small handful of potatoes and roll them into a ball, setting aside on a plate as you do.

2.) Set up a breading station. In one bowl, place the all-purpose flour. In a second bowl, place the remaining 3 eggs and beat lightly. In a third bowl add the panko or bread crumbs, the paprika, garlic powder, onion powder, dill, salt, and pepper. Mix the bread crumbs together with the seasoning to thoroughly incorporate all ingredients together.

3.) One by one, roll the balls first in the flour, making sure to thoroughly coat all sides. Then, dip in the egg, turn to coat, and remove, letting excess drip off. Lastly, place the ball into the bread crumb mixture and roll to coat all sides. Remove, set aside on another plate and repeat with remaining potato balls.

4.) When all potato balls have been formed and breaded, place canola oil in a large Dutch oven and heat to 350 degrees Fahrenheit (or use a deep fryer.) When oil is hot, place mashed potato balls in, in batches if necessary. You’ll need to turn them after about 3 minutes in the oil to fry all sides. When one batch is finished, remove from the oil, place on a plate lined with paper towel, and sprinkle with salt, if desired. Then repeat with remaining uncooked mashed potato balls.

5.) Serve piping hot, and enjoy!