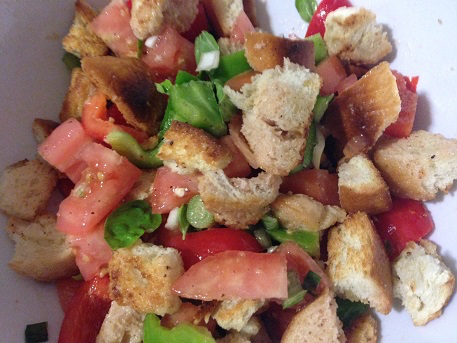
When I first heard of this thing known as bread salad, or “panzanella,” I didn’t know quite what to make of it. I guess that’s par for the course with me, as I might be the only person I know that doesn’t like croutons on my Caesar salad. But, getting through hard crunchy bits that hurt my teeth aside, if you put a bunch of bread in a bowl and then pour dressing over top of it, wouldn’t the bread go soggy? And who wants to eat a bowl of soggy bread? Nonetheless, it was a dish that interested me, and it is Italian after all – a food type that has a very special place in my heart. So I had to give it a try. I don’t know how it happens, but the bread doesn’t manage to get all that soggy. You may get a piece every now and then that does, but for the most part, your croutons will stay crispy and being a big fan of salads, I have to say that this is one that is truly delicious!
Ingredients:
4 cups croutons 2 large tomatoes, diced 1 red bell pepper, chopped in a large dice 1 green bell pepper, chopped in a large dice 2 green onions, sliced 1 cup basil leaves, torn 3 tablespoons capers, drained
For the dressing:
1 teaspoon minced garlic 1/2 teaspoon mustard 3 tablespoons white wine vinegar 1/2 cup olive oil 1/2 teaspoon salt 1/4 teaspoon freshly ground black pepper
Directions:
1.) Start by making the dressing. Place the garlic, mustard, white wine vinegar, olive oil, salt and pepper in a blender. Blend for a minute or two, until all ingredients are fully incorporated.
2.) Place the croutons, tomatoes, bell peppers, green onions, basil leaves, and capers in a large bowl. Pour the dressing over top and mix to thoroughly combine.
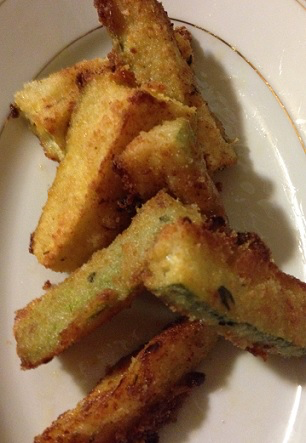
You can expect to see a lot of zucchini recipes on the site in the next few weeks. That’s right, it’s zucchini season! And while this vegetable can be somewhat pricey in the grocery stores, if you can find a farmers’ market or a vegetable stand, they typically sell for about a dollar apiece. (And they might be cheaper at the grocer’s now, I just rarely even look at them when I’m in there during the summer months.) Remember when you’re choosing a zucchini to choose one that’s small to medium in size. The bigger they get the woodier they get, and they start to lose a lot of their flavour.
Ingredients:
2 small green zucchini, cut in half and then quartered 1 large egg 1/4 cup bread crumbs 1/4 cup panko 1/4 cup Parmesan cheese 1 teaspoon garlic powder 1 teaspoon onion powder 1 teaspoon paprika 1/2 teaspoon cayenne pepper Salt 2 tablespoons olive oil
Directions:
1.) Preheat the oven to 425 degrees Fahrenheit and line a baking sheet with aluminum foil. Spray the foil with non-stick cooking spray.
2.) In a large bowl combine the bread crumbs, panko, Parmesan cheese, garlic powder, onion powder, paprika, cayenne pepper, and salt. In a separate bowl, beat the egg lightly.
3.) One by one, dip the zucchini pieces into the egg, coating entirely. Then drop them into the bread crumb mixture and turn to fully coat. As you’re finished breading, place the zucchini sticks onto the prepared baking sheet. When all zucchini has been breaded, lightly drizzle with olive oil.
4.) Place in the preheated oven and bake for 5 before turning and baking for another 5 minutes on the other side.
5.) When zucchini is finished baking, remove from oven and sprinkle lightly with a bit more salt.
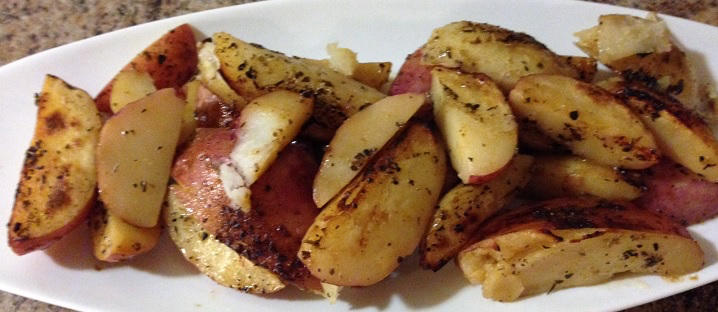
It seems my entire adult life I’ve been trying to find new ways to cook potatoes. The only side dishes that dear hubby really likes are rice and potatoes, leaving me constantly trying to find new ways to stave off boredom when it comes time to prepare (and eat) them. I’ve only done this technique once and it’s already one of my favourites. And it’s no surprise that it comes from the Queen of Cooking and Crafts, Martha Stewart. It can be found in her Martha Stewart Living Cookbook, and I have to say, if you’re a foodie and haven’t yet checked out this book, you should.
When I first hefted it up onto my counter, it reminded me largely of Julia Child’s Mastering the Art of French Cooking. It’s an encyclopedia of food and cookery, filled with 1,200 different recipes along with tips, techniques, and just a vast, vast knowledge of different ingredients and cooking methods. Like Mastering though, while she includes the most basic recipes (including mashed potatoes) she also provides new and fresh recipes – recipes that will leave you asking yourself “Why didn’t I ever try doing this before?”
That’s how it was for me with these potatoes. They come out of the oven just like roasted potatoes, but they’re covered in water and, due to the high heat, come to a rolling simmer while in there. Martha calls them “Lemon Roasted Potatoes” in the book, but as I only had orange juice on hand, I used that instead, and they were absolutely delicious. And I did also change a couple of other things (why do I wince when I say that in this particular instance and hope that Martha never, ever finds out?) I used smaller potatoes than the Idahos the book calls for, and I also kept the skins on instead of peeling them. What can I say? I wanted roasted potatoes, and mine always end up with their skins intact. But it’s really the technique that is sheer genius, and I kept completely true to it.
Ingredients:
6 – 10 small potatoes, washed and quartered 1/2 cup extra virgin olive oil 1/2 cup orange juice 1 tablespoon dried oregano 1 tablespoon kosher salt 1/4 teaspoon freshly ground black pepper
Directions:
1.) Preheat the oven to 500 degrees Fahrenheit and place the potatoes in a 10 x 15″ baking dish. Add 1 cup of water and the olive oil, orange juice, oregano, salt, and pepper. Toss the potatoes until they are well coated.
2.) Place in the oven and bake, uncovered, until tender when pierced with the tip of a knife and brown on the edges, about 40 minutes. Turn the potatoes halfway through for even browning; add more water if all the liquid has been absorbed.
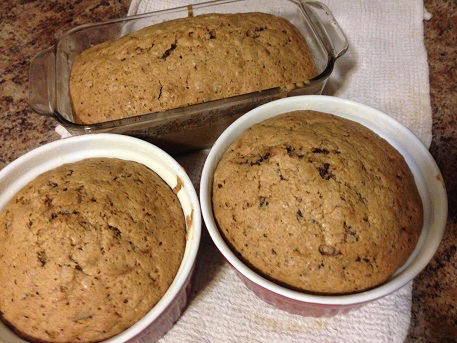
When you get tired of eating banana bread for your breakfast or snack, or just happen to have several zucchinis in your fridge like I did, turning them into a delicious loaf is a good way to use them all up. If you’re worried about all the sugar in this recipe, don’t be. I did some fast math on this one and 2 3/4 cups of sugar going into three loafs that make about 8 slices each, equals out to about 1.75 tablespoons of sugar in each slice. Of course, that’s not including the chocolate but if you are worried about it you can always substitute the chocolate for nuts or fruit (my sister puts dates in her zucchini bread and it’s really good.) Here’s another tip, too. If you don’t want your chocolate or nuts to sink the bottom of the dish as they inevitably will without some interference on your part, gently fold them into the loaf batter at the last minute rather than just sprinkling them on top like so many recipes call for.
Ingredients:
3 eggs 1 cup oil 2 3/4 cup white sugar 3 teaspoons vanilla 1 teaspoon salt 1 teaspoon baking soda 1 1/4 teaspoon baking powder 3 teaspoon cinnamon 2 cups shredded zucchini 3 cups flour 1 cup chocolate chips
Directions:
1.) Preheat your oven to 325 degrees Fahrenheit. Grease three loaf pans by coating all sides with butter and then lightly flouring. Set aside.
2.) Combine the flour, cinnamon, baking powder, baking soda, and salt in a large mixing bowl. Set aside.
3.) In the bowl of a stand mixer with the paddle attachment, place eggs, oil, sugar, and vanilla and beat until all ingredients are fully incorporated and the mixture is smooth.
4.) Add the dry ingredients to the wet ingredients in the stand mixer with the mixer running and mix for several minutes until all ingredients are fully incorporated.
5.) Add the zucchini to the mixture, followed by the chocolate chips.
6.) Place in the oven and bake for about 1 to 1 1/2 hours, until a toothpick inserted into the centre of each loaf comes out clean. (I kept checking on mine after the hour mark to make sure I didn’t overcook them.)
7.) Remove loaf pans from the oven and place on wire racks to cool before turning the loaves out of their pans.
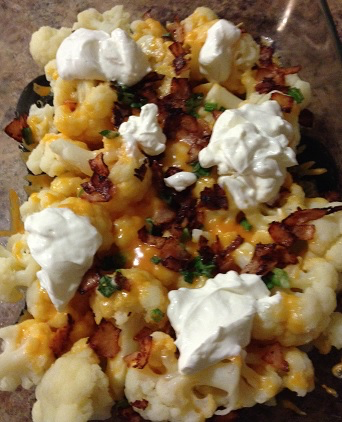
As we saw a few months ago during Cauliflower Week here on the site, there are tons of creative ways you can use this vegetable. You can turn it into tots, or fried rice, or even pizza. You really can use it for just about anything – even turn it into baked potatoes as I did when I made this loaded cauliflower just last night. And it’s super quick, and super easy.
Ingredients:
1 head cauliflower, broken up into florets 2 tablespoons butter 1 cup Cheddar cheese, grated 3 slices bacon, chopped 2 green onions, chopped 1/2 cup sour cream Salt Pepper
Directions:
1.) Preheat oven to 400 degrees Fahrenheit and either spray a 9″ x 13″ casserole dish with non-stick cooking spray, or brush with oil.
2.) Place chopped bacon in a skillet and cook, over medium heat, until bacon is brown and crisp. Drain on paper towels and set aside.
3.) Place cauliflower florets into a medium-sized pot and fill with salted water. Bring to a boil and cook just until cauliflower is fork-tender.
4.) Drain cauliflower and place florets in a single layer in the casserole dish. Season with salt and pepper. Sprinkle grated cheese over top, then bacon and green onions. Place the cauliflower in the oven and cook for 5 – 10 minutes, just until the cheese has melted. Remove the cauliflower from the oven and top with dollops of sour cream.
Martha Stewart has taught me a lot this week. First she taught me that you can boil roasted potatoes, and just yesterday she taught me the differences between certain pie crusts. I had always been making the same one – cold butter or shortening cut into flour, and then just a tiny bit of ice cold water added in to make it all come together. This way is certainly not wrong, but it does have an actual name – and it’s French! Making pie crust this way gives you what’s called a pate brisee, a very versatile crust that can be used for either sweet or savoury dishes. If you add a pinch of sugar into it, you’ve made pate sucree, a pie crust that is essentially exactly the same as pate brisee, but has sugar added into it and therefore, is used mostly for desserts. And then there’s a whole other type of pastry dough you can make that’s called pate sablee, a sandier type of dough that often has the addition of eggs and results in a tender dough that will hold its shape very well and is often used in the making of Empire biscuits.
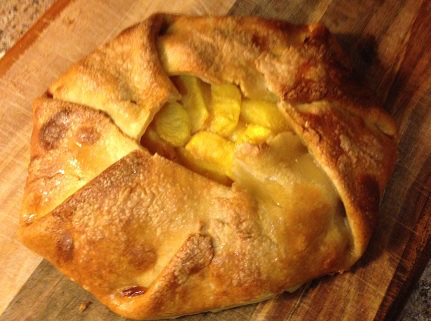
This recipe of Martha’s calls for pate sucree, so that’s what I made. And what the heck is a Peach Galette? It’s essentially a very rustic peach pie, baked right on a baking sheet, and with no top crust. Instead, the bottom crust is made a bit larger so that it can fold over most of the top with just a bit of the filling showing dead centre. There, now you’ve been culinary schooled, just like I was yesterday.
Ingredients
For the patee brisee:
2 1/2 cups all-purpose flour 1 teaspoon coarse salt 1 teaspoon sugar 1 cup chilled unsalted butter, cut into pieces 1/4 to 1/2 cup ice water
For the filling:
4 3/4 cups fresh peaches, sliced 1/3 cup granulated sugar, plus more for sprinkling 1 teaspoon fresh lemon juice 1/4 teaspoon coarse salt 1 tablespoon cornstarch 1 large egg, lightly beaten About 1/4 cup all-purpose flour, for work surface
Directions:
1.) Place the flour, salt, and sugar in the bowl of a food processor, and process for a few seconds to combine. Add the butter and process until the mixture resembles coarse crumbs, about 10 seconds. With the machine running, add the ice water in a slow, steady stream through the feed tube, just until the dough holds together. Do not process for more than 30 seconds.
2.) Turn the dough out onto a work surface and divide in two. Place each half on a sheet of plastic wrap. Flatten and form two discs. Wrap and refrigerate at least one hour before using.
3.) Preheat oven to 375 degrees and line a rimmed baking sheet with parchment paper.
4.) Stir together the sliced peaches, 1/3 cup granulated sugar, lemon juice, salt, and cornstarch.
5.) Roll out pate brisee into a 13″ round,about 1/8″ thick, on a lightly floured surface. Transfer to a baking sheet. Arrange fruit in centre, leaving a 2″ border. Fold over border to enclose fruit, leaving the centre open. Brush crust with egg, and sprinkle with a bit more of the sugar.
6.) Bake until golden brown and bubbling in the centre, about 1 hour and 10 minutes. Let cool on a baking sheet and then slide parchment paper onto a wire rack to cool completely.
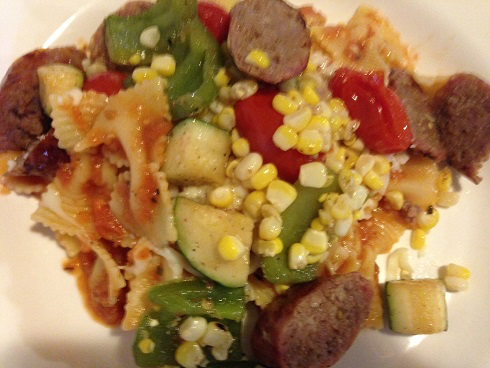
The other day we had a high of 14 degrees Celsius. On the 14th of August. It was also raining. Despite all of this, we had just gotten a new gas tank for our barbecue and I was dying to grill, char, and smoke something. So, neither rain nor chilly weather would stop me – off I went! I pretty much just threw as much onto the grill as I could so all it went, except for the actual pasta and the spaghetti sauce. The result was a pasta dish that reminded me of summertime in the middle of August.
Ingredients:
1 package bow tie pasta 1 can of spaghetti sauce (about 3 cups of homemade) 4 Italian sausages 1 cob of corn 1 cup cherry tomatoes 1 green pepper, cut into chunks 1 small zucchini, cut into chunks 1 tablespoons butter 2 tablespoons olive oil 1/2 cup mozzarella cheese, grated Salt Pepper
Directions:
1.) Place the spaghetti sauce into a small pot, cover, and set over medium-low heat, allowing it to fully heat through.
2.) Place Italian sausages into a medium-sized pot and cover with water, making sure there is about 2 inches of water above the sausages. Place them on the stove over high heat and bring to a boil. Lower heat to low and allow sausages to simmer for about 10 minutes. I find this allows the sausages to fully cook through before placing them on the grill to get nice and charred. When sausages are done cooking, turn off heat and remove them from the water.
3.) Place the cherry tomatoes, zucchini, and green pepper in a grill tray. Drizzle with the olive oil and season with salt and pepper. Smear the cob of corn with the one tablespoon of butter and place in the grill tray.
4.) Heat an outdoor grill to medium heat. When hot, place the sausages on and let them cook for about 10 minutes, until their casing is nicely browned and charred. When they are finished, move them to the upper rack of the grill to get them further away from the heat.
5.) While the sausages are cooking, place the cob of corn right onto the grates. Lower the lid and let it cook for about 5 minutes, turning occasionally, until some of the kernels become nicely charred. When corn is finished cooking, place on the top rack with the sausages.
6.) While everything else is cooking, place the grill tray with the veggies inside onto the grill. Lower the lid and cook for about 5 minutes, turning the vegetables at least once, until they too start to become nicely charred and the tomatoes have just begun to split. When everything on the grill is finished cooking, place it all into the grill tray with the veggies and turn off the grill.
7.) Set a large pot of heavily salted water over high heat and bring to a rolling boil. When boiling, add bowtie pasta and cook for about 8 minutes, just until it’s al dante.
8.) Meanwhile, cut kernels off cob of corn (you can do this by standing it up on a cutting board on its flat end and running your knife down the cob) and add to the grill tray of veggies. Slice the sausages up on a diagonal and also add them to the veggies in the grill tray.
9.) When pasta is fully cooked, reserve about 1/2 cup of the cooking water. Drain pasta and place it back into its pot. Pour spaghetti sauce over top, with the reserved cooking water and mix to fully coat all the pasta with the sauce.
10.) Place pasta on individual plates or a big platter and then top with the sausage/veggie mixture. Sprinkle with mozzarella cheese.
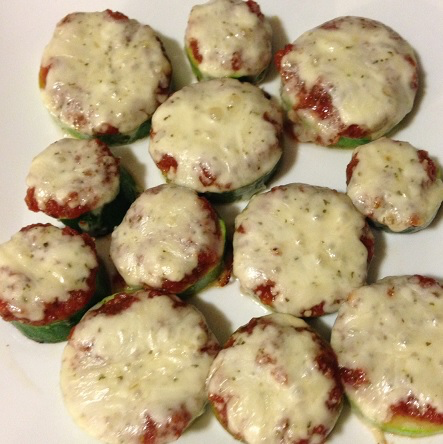
Looking back on when I made these zucchini pizzas (which was just a couple of days ago) I’m so conflicted. I mean, they were good – really, really good. But I was so hoping that by slathering slices of zucchini with spaghetti sauce and cheese, my older daughter Paige – who hates zucchini – would love them. I mean, she loves cheese pizza, and you can slather spaghetti sauce on just about anything and kids will love it, right? Well, I hate to tell you, that wasn’t the case this time. She still hates zucchini and when I asked how she was enjoying this particular lunch, she said “A little bit,” which is kid speak for “I hate it. Please never make it again.” (Well, in my house anyway.) But I loved them, and my other daughter, Maddie loved them. I don’t know if I’ll make them again, simply because I don’t believe in making different things for different people and Paige really does despise zucchini. If I don’t, it’ll be a shame because they’re so incredibly easy to make and use only five ingredients (including your salt and pepper!)
Ingredients:
1 zucchini, sliced into 1/2″ inch circles 3/4 – 1 cup pizza or spaghetti sauce 1/2 cup – 1 cup mozzarella cheese Salt Pepper
Directions:
1.) Place zucchini slices into a colander and sprinkle with salt. This will draw the water out so the zucchinis don’t go soggy in the oven, but don’t be too liberal with the salt, as you won’t be rinsing it off. Just sprinkle the zucchini, toss, give another small sprinkle, and then toss again. Let the slices sit in the colander for 15 – 20 minutes to get some of the water out of them.
2.) While zucchinis are being salted, preheat the oven to 400 degrees Fahrenheit and line a baking sheet with aluminum foil or parchment paper.
3.) When zucchinis are salted and ready, place them on the baking sheet and lightly sprinkle with pepper. Place about one tablespoon of spaghetti sauce onto each zucchini slice. The amount you use on each slice will vary depending on how large your zucchinis are, but try to completely cover the tops of each. Then sprinkle generously with the mozzarella cheese.
4.) Place baking sheet in the oven and cook zucchinis for 5 – 10 minutes, just until both the zucchinis and sauce are hot and the cheese is melted.
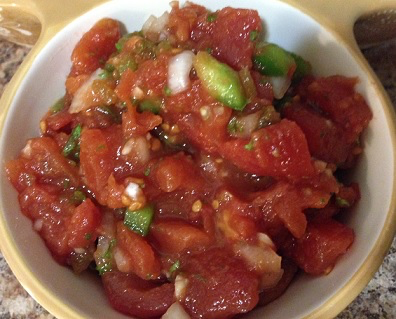
Today is Wednesday, and that means that yesterday was Taco Tuesday in our house. Usually I just make Pico de Gallo as a topping, but now that I’ve been working in a restaurant for the past several weeks, I’ve been able to see how really, really good salsa is made. And even more, I’ve been able to see that it’s okay to use canned tomatoes for it. I always wrote canned tomatoes off if they were being eaten raw, just because they’re so soupy and not very fresh. But I have to tell you, that’s exactly what you want in your salsa. Or, it’s what I want, anyway. I don’t like my salsa to be very chunky, but rather a smoother concoction that can be easily scooped up. And that’s exactly what you get when you use canned tomatoes. This is a pretty close adaptation to that salsa recipe I’m always making when I’m at the restaurant, but I did change a few things up from it. (Not because their salsa isn’t good, only because I don’t want to give away all their secrets.) And no, sorry. This time I can’t tell you what I did differently. I can just tell you that it’s really, really good.
Ingredients:
1 can diced tomatoes, with some of the juices 1/2 green pepper, chopped in a small dice 1/2 onion, finely diced 3 cloves garlic, minced 2 tablespoons pickled jalapenos, diced 1/2 teaspoon cumin 1 teaspoon ground coriander 1/4 cup fresh parsley, chopped Juice of 1 lemon Juice of 1 lime Salt
Directions:
1.) Place a colander over a large bowl and empty can of tomatoes into it. Allow the tomatoes to sit for about 15 minutes, scraping down the sides occasionally. This allows as much water to drain as possible so that your salsa isn’t too wet. When tomatoes are finished draining, place them on a cutting board and roughly chop them to break them down even further.
2.) Place the drained tomatoes into a large bowl and add all other ingredients. Stir to combine all ingredients very well and then cover and place in the fridge for an hour or so to allow all flavours to marry.
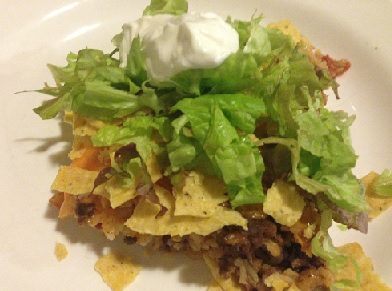
I’ve talked a lot about Taco Night in our house, and even about how we always have a ton of leftovers. Who doesn’t after Taco Night? I mean, you always want to make sure that you have enough beef and toppings for everyone to stuff until they’re stuffed, but what are you supposed to do with that already-cooked beef, a handful of diced tomato, and maybe a bit of cheese? Throw it all together and make a casserole out of it! It not only makes for a tasty way to use up your leftovers, but it also gives you a super easy weeknight meal that takes just minutes to get into the oven.
Ingredients:
1/2 pound – 1 pound, cooked and seasoned 3 cups cooked Spanish rice 2 cups tomatoes, diced 2 cups salsa 5 hard taco shells, broken up 2 1/2 cups Cheddar cheese, grated 1 1/2 cups shredded lettuce, for serving Sour cream, for serving
Directions:
1.) Preheat the oven to 350 degrees Fahrenheit.
2.) Add beef, Spanish rice, tomatoes, and salsa to a large bowl. Mix thoroughly to combine all ingredients.
3.) Place the beef and rice mixture into a 9″ x 13″ casserole dish and top with grated Cheddar cheese. Put the entire casserole dish into the oven and bake for 30 – 45 minutes, until cheese is hot and bubbling.
4.) When casserole is finished cooking, remove it from the oven and sprinkle broken hard taco shells completely over the top of the casserole.
5.) Cut portions out of the casserole and place on individual serving plates. Top with shredded lettuce and a dollop of sour cream, if using.