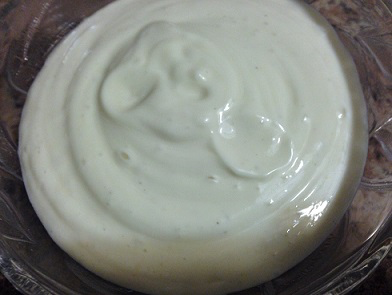
I truly feel super bad for anyone that can’t eat eggs. I really do think they’re the perfect food, and it’s gotten to the point where my husband even teases me because of my love for them. So when I hear of someone who can’t eat them, my heart goes out to them and I like to find ways to recreate the foods that eggs help make so yummy. Recently, I was asked by a couple of people about eggless mayo, and it seemed to be a challenge I was up for. I’ve made aioli before, so how much different could it be? I substituted the egg for soy milk (as many people who can’t eat eggs also can’t eat dairy) and then just kept the oil and the lemon juice and ditched the garlic. What I got was an eggless mayo that is so light! In fact, if you’re looking to cut down on your cholesterol, this would be perfect in salad dressing, dip, coleslaw, and anything else you would typically put mayonnaise in.
Ingredients:
3/4 cup soy milk Juice of one lemon (about 1 1/2 tablespoons) 1 1/2 tablespoons Dijon mustard (you can also use ground mustard seeds) 3/4 cup olive oil (vegetable, canola, and safflower oil will also work) Salt Pepper
Directions:
1.) Place soy milk, lemon juice, and mustard in a blender and blend until smooth.
2.) With the blender still running, slowly stream in the oil until the mixture becomes thick. Season, taste, and adjust seasoning if necessary.
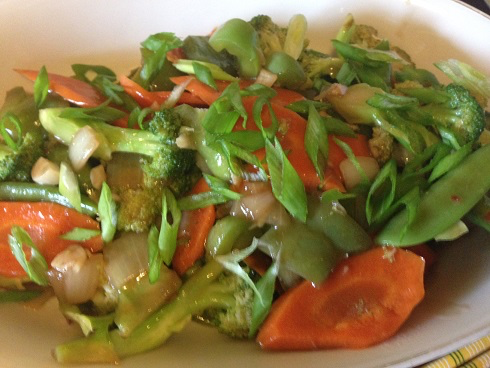
If you’ve already tried the egg rolls, ginger beef, or chow mein recipes up on the site (or have just seen me post them,) you know I love Chinese food. And even more, I love not paying the big bucks to get it delivered to my home. So when I figured out that I could also have those Chinese vegetables that are swimming in sauce and ever-so-crisp at my table, I was one very happy girl. Maybe a little too happy. My husband said I was glowing as I cooked them.
Ingredients:
1 onion, diced 3 cloves garlic, minced 2 tablespoons ginger, grated or minced 1 tablespoon red chili flakes 1 head of broccoli, florets removed 1 green pepper, cut into a large dice 1 large carrot, thinly sliced 1 cup snap peas 2 tablespoons vegetable oil 2 tablespoons sesame oil 2/3 cup vegetable broth, plus 2 tablespoons 1 tablespoon soy sauce 1 tablespoon cornstarch Salt 1 or 2 green onions, sliced, for garnish
Directions:
1.) Combine vegetable oil and peanut oil in a large skillet and heat over medium-high heat. Add in garlic, ginger, and red chili flakes; stir, and cook for about 30 seconds.
2.) Add the broccoli florets, green pepper, carrot, snap peas, onion and soy sauce. Stir fry for about 2 minutes, just until the broccoli is bright green and the entire mixture is fragrant.
3.) Add the vegetable stock, cover, and allow the vegetables to steam for another 2 minutes. Meanwhile, mix together the 2 tablespoons of remaining broth and the cornstarch, combining thoroughly.
4.) Add broth/cornstarch mixture to the vegetables, leave uncovered, and allow to cook until the mixture has thickened, about 1 minute. Stir to coat vegetables in the sauce. Season with salt, taste, and adjust seasoning if necessary. Move vegetables to a platter and garnish with green onions.
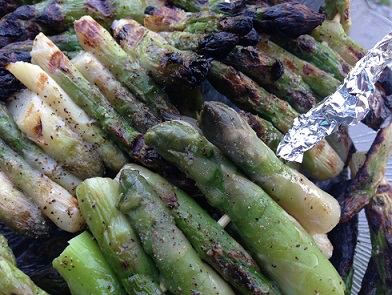
There are lots of ways to cook asparagus, but of all of them, simple roasted asparagus is probably my favourite. And in the summertime, taking them outside and throwing them on the grill is my most favourite of all. But if you’ve ever tried to do it, you’ve probably noticed the same thing I did. That those grill slots are the perfect size for asparagus spears to fall down and get incinerated by the flames. So, how do you get smoky roasted asparagus that has only been kissed by flames, and not eaten up by them? For this my friend, skewers are your answer.
Ingredients:
1 bunch asparagus 2 tablespoons olive oil, plus more for the grill Salt Pepper
Directions:
1.) If you’re using wooden skewers, soak them in water for at least half an hour before placing them on the grill. I find that the exposed ends will still get burned up even with a soaking, so I like to fold aluminium foil around the ends of mine.
2.) Heat an outdoor grill to medium heat on both sides and brush the grill with oil so the asparagus doesn’t stick. Close the lid and allow it to come up to temperature. Meanwhile, skewer the asparagus onto each of the skewers. Drizzle with olive oil and season with salt and pepper.
3.) Place the skewered asparagus onto the grill and cook for a couple of minutes. Flip, and cook other side for another few minutes, until asparagus has some char marks on it and has begun to soften.
4.) Remove asparagus from heat and turn grill off. Asparagus can be left on the skewers, or removed to a platter.
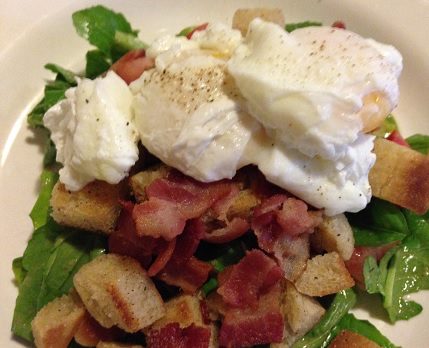
We’re big on bacon and eggs around here. When my husband was growing up it was tradition in their household to enjoy a big breakfast every Sunday morning. Everyone filled up, and everyone got their eggs to order. I’ve carried on with that tradition now that we have our own two little ones to feed. Sometimes that hot breakfast makes its way past Sunday morning and like many, we’ll often have breakfast for dinner during the week as well. But the last time I thought about doing it, I put my own little twist on it. What if you were to pile all those fantastic items into a salad?
Well, I did. Poached eggs were placed on top of greens, English muffins were turned into toast/croutons, bacon bits were everywhere, and much of it was covered in the same dressing I used for my Cobb salad. The beauty of this salad is that the yolk from the egg runs into the salad and the dressing, creating something truly dynamite that can be eaten for lunch, dinner, or breakfast!
Ingredients:
For the eggs:
8 eggs 1 tablespoon vinegar Salt Pepper
For the vinaigrette:
3 tablespoons red wine vinegar 1 tablespoon Dijon mustard 1 tablespoon sugar 1 green onion, roughly chopped 1 clove garlic, smashed 1/3 cup olive oil Salt Pepper
For the salad:
2 cups arugula 8 strips bacon, chopped 3 English muffins or 3 slices of sourdough bread, diced 2 green onions, sliced 1 tomato, diced 3 tablespoons butter Salt
Directions:
1.) Start by making the salad dressing. Place red wine vinegar, Dijon mustard, sugar, one green onion, garlic clove, salt, and pepper in a blend. Puree until smooth and then slowly stream in as much olive oil as you need until it thickens slightly. Taste, adjust seasoning if necessary, and set aside.
2.) Assemble the salad ingredients. Place bacon pieces in a skillet over medium heat and cook, stirring occasionally, until they are brown and crisp. Remove to a plate lined with paper towel.
3.) Heat 3 tablespoons of butter in a separate skillet over medium heat. When melted and foam has started to subside, add English muffin pieces and sprinkle with salt. Cook for 5 – 10 minutes, turning the bread a few times, until it becomes toasted and golden brown. Remove to a plate and set aside.
4.) Place arugula, tomatoes, and green onions in a bowl and dress lightly with salad dressing. Serve remaining salad dressing separately on the table.
5.) Prepare the poached eggs. Bring a medium-sized pot to a simmer. Add one tablespoon of vinegar and stir. One by one, gently add eggs and allow them to cook until the whites have fully set around the yolk, about 7 minutes. Remove them from the pot with a slotted spoon onto a plate lined with paper towel and season with salt and pepper.
6.) Bring all the salad ingredients together. Divide arugula mixture onto four different plates. Top with croutons and bacon bits, and finish by laying two poached eggs gently on top of each plate.
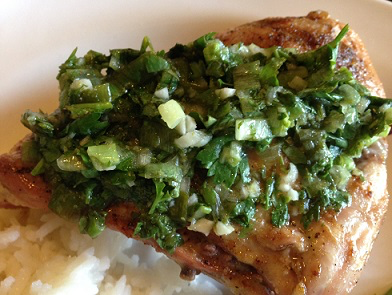
Herbs are one of my favourite ingredients in the kitchen, especially this time of year when gardens and kitchens seem to be overflowing with them. But they’re good for more than just sprinkling into a dish here or using as a garnish there. You can use them as a main part of your recipe, or as a recipe all on their own. Pulse them in a food processor with garlic and some hot pepper of any variety and you get a chimichurri sauce. Or blend them with nuts, garlic and lemon juice and you’ll have a beautiful pesto.
Or you can do this. Leave out the nuts, use zest instead of juice, and keep the garlic and herbs, and you’ll have an Italian gremolata – one of those fancy cooking terms you may have heard on Hell’s Kitchen or MasterChef, but maybe never really knew what it was. If you want to keep it really authentic, the herb to be used is parsley and the zest, lemon. But seeing as how when I made gremolata all I had were limes and cilantro in my kitchen, those were the two that I used, and that’s how my gremolata got a new twist on its name.
Ingredients:
1 cup cilantro, roughly chopped Zest of 1 lime 2 cloves garlic, roughly chopped 1 tablespoon olive oil Salt Pepper
Directions:
1.) Place the cilantro and garlic into a food processor and pulse until the entire mixture is a fine dice. Add the zest of the lime, a pinch of salt and pepper, and as much olive oil as you’d like (it can help tone down the taste of raw garlic.) Mix thoroughly.
2.) Serve on fish, chicken, grilled meats, or use as a condiment, and enjoy!
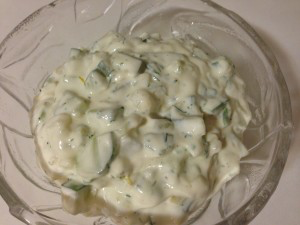
Tzatziki is so good, and if you’re one of the ones still trying to figure out how to pronounce it, it’s za-DZEE-kee. It’s hard to imagine that this delicious Greek dip/condiment is made up mostly of cucumbers and yogurt, but that really is all it takes. Well, and maybe a little lemon juice and garlic. If you’re not a big fan of salting veggies and letting the water drain out of them, you can also grate the cukes, wrap them tightly in paper towel and squeeze really hard (like you do when making potato pancakes – and in fact, this dip would taste fantastic on those!)
Ingredients:
1 English cucumber, seeded and diced 1/2 onion, diced 1 teaspoon salt 2 cups Greek yogurt Juice and zest of 1 lemon 3 cloves garlic, grated or minced 3 tablespoons fresh dill, chopped 3 tablespoons fresh chives or green onions, chopped
Directions:
1.) Place cucumbers and onions in a colander in a clean sink and sprinkle salt over top. Toss to coat and then let sit for 30 – 60 minutes to drain.
2.) Meanwhile, combine yogurt, lemon zest and juice, garlic cloves, dill, and chives or green onions in a bowl. When cucumbers and onions are ready, add them to the yogurt mixture and place in the fridge for at least half an hour to allow the flavours to marry.
3.) Serve, on kabobs, grilled meats, or burgers, and enjoy!
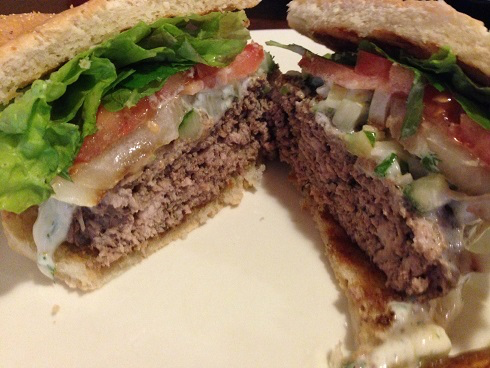
The other day I talked about how I was craving Spanish food one night and so I went online in search of the best Spanish ingredients and created something from them. Last night, I was craving Greek food and so I did the same thing. Hooked up with my BFF Google, asked him what some of the most common Greek ingredients are, and then used those to create a burger. The results? Let’s just say that I plan to revisit Greece very, very soon.
Ingredients:
1 pound medium ground beef 1 pound ground pork 1 tablespoon Worcestershire sauce 1 egg, lightly beaten 1 tablespoon paprika 1 head of garlic, plus 3 cloves 2 tablespoons olive oil 1 onion, grated 1 onion, sliced into thick rings (do no separate the rings) 2 tablespoons fresh oregano, chopped, plus 1/2 cup whole oregano leaves 1 tomato, sliced 10 – 12 leaves of leaf lettuce 1 cup fresh mint leaves, whole 1 lemon, cut in half 1 cup tzatziki 8 hamburger buns 4 tablespoons mayonnaise (approximately) Salt Pepper
Directions:
1.) Preheat the oven to 350 degrees Fahrenheit. Wrap the entire head of garlic in aluminium foil. Drizzle on some olive oil, then sprinkle with salt and pepper. Place in the preheated oven and roast for 45 – 60 minutes, until the entire head has softened and turned golden brown. Remove from oven, allow to cool slightly, and then squeeze out the soft cloves of garlic into a bowl. Set aside.
2.) Next, prepare your burger patties. To a large bowl add ground beef, ground pork, Worcestershire sauce, egg, paprika, 3 cloves of garlic, grated onion, 2 tablespoons chopped fresh oregano, salt, and pepper. Combine until all ingredients are evenly incorporated, but do not over-mix. Divide patties into 8 even portions (do this using your hands and pressing lines into the meat in the same pattern as if you were cutting a pie.) Then, taking one portion at a time, shape them into patties and make a little well in the centre with your thumb. Be sure to make an indentation, but not to go all the way through the burger. This will allow for expansion when the patty is cooked. Set aside on a plate.
3.) Turn an indoor or outdoor grill to medium heat and oil the grates well and brush the fruit side of the lemon halves, as well as the onion rings, entirely with olive oil. When the grill is hot, place them directly onto the grill, and cook for about one minute. After that time you can remove the lemon halves, but flip the onion rings and cook for another minute to allow them to be cooked through thoroughly. Move to a plate, tent with foil to keep warm, and set aside.
4.) Place the burger patties directly onto the grill and cook, without moving or touching them, for about 5 minutes. Flip, cook for another five minutes and then feel for doneness. When patties are cooked to your liking, set them aside on a plate.
5.) Brush each side of every hamburger bun with mayonnaise (this is a little trick to keep them super moist and delectable, but you can use butter or skip this step entirely.) Place face-down on the grill, and press them down slightly so that they get as much heat as possible. I actually like to take another empty skillet and place it on top of the buns, but this does make them really flat. If you don’t like them that way, you can also skip this step and just leave them alone on the grill. Grill the buns for about 2 minutes before removing them and placing them on a plate.
6.) At this point I like to just place the patties, toppings, and buns all separately on the table and let people build their own. If you want to assemble them for everyone though, or just want to make your own Big Fat Greek Burger, assemble like so: Place open bun on a plate. Onto the bottom portion spread some of the roasted garlic. Onto the top half place a couple of lettuce leaves, some fresh oregano, some fresh mint, a grilled onion ring or two, and a slice of tomato. Place patty on top of roasted garlic and squeeze some of the grilled lemon directly onto it. Top with tzatziki, close burger up together, and place two toothpicks into each half before slicing the entire burger in half (unless you can pick it up and eat it whole in which case, I applaud you.)
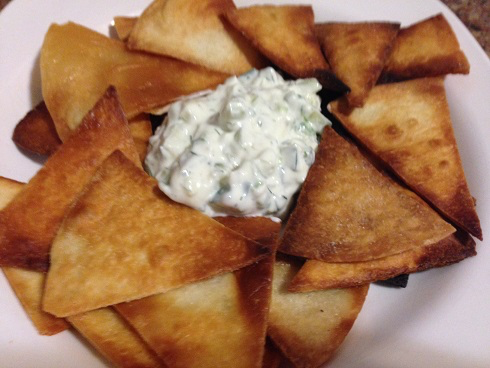
You might think that making tortilla chips is pretty straightforward; I know I did. Slather them with some oil, cut them into triangles, and then throw them into a hot oven. Right? Right? Someone tell me I’m right. Actually, I wasn’t right. And the first time I tried to make tortilla chips this way, I was disappointed when I pulled them out of the oven and found hard little bits of I-don’t-even-know-what. Instead, take the time to prep them a little bit, let them take a swim in lots of oil, and there will be no disappointment on your menu.
Ingredients:
1 pack of flour tortillas, or 12 homemade tortillas 3 or 4 cups of vegetable oil (or canola, or peanut), plus more for brushing Salt
Directions:
1.) Preheat the oven to 200 degrees Fahrenheit. When warm, add tortillas directly on the rack and leave in for about 10 minutes. The intention here is not to cook them, only to dry them out.
2.) In a large Dutch oven on the stove, warm 3 or 4 cups of vegetable oil on the stove to about 375 degrees Fahrenheit. While oil is heating, cut the dried-out tortillas into triangles. The easiest way is to pile all the tortillas on top of each other and then slicing them in half. Place one of the piles on top of another, and then cut all of the tortillas in half again. If needed, make several piles (because they might be getting too tall to cut all at once,) and cut each pile in half.
3.) When oil on the stove is hot, add tortilla triangles in batches into the oil. Cook for 1 or 2 minutes, until the tortillas are slightly puffed and golden brown and then add another batch. Remove from oil, drain on paper towel, and season with salt immediately.
4.) When all tortilla chips are finished cooking, serve with pico de gallo, guacamole, or your favourite dip, and enjoy!
Quinoa confuses me. Firstly, yes, when I first saw it on store shelves, I was one of those that contorted my mouth into all kinds of different shapes trying to pronounce it exactly as it’s spelled. When I learned that it was pronounced KEEN-wah, I thought I was all set. Until I read the back of the box and found out it had carbs in it. What?!?!? Had everyone lied to me?
All I had heard about was how quinoa was a ‘perfect protein,’ a ‘pure protein’ that had no carbs whatsoever – that it was actually a seed, yet tasted and acted like a grain. A perfect solution for those trying to cut down on their carb intake. At first I figured it must have been the add-ins that were in the box. It was the type that had quinoa and garlic, some veggies I believe, and a whole spattering of other ingredients. But then I purchased a package of regular ol’ quinoa. No seasoning, no other ingredients, nuthin. I must be on the right track now, right? I flipped the package over, and to my dismay, saw that this regular quinoa had 72 mg of carbs per every 100g serving. That seems like a lot, doesn’t it?
So what’s going on? I don’t know. And if you’re in the same boat as me, I’m afraid I don’t have any answers for you. I have a feeling that with so many experts turning towards it and promoting it as one of the best things you can do for your health, it probably is better than eating a stack of potatoes or a huge pile of rice. But I’m not sure. I mean, in the 90s all we heard about was how butter and other monounsaturated fats were bad for us, and today we know differently.
I do know that quinoa still tastes really good – and that this quinoa salad is one of my favourite ways to eat it. Here’s a tip when you’re using this grain/protein, no matter how you’re preparing it: soak it in cold water for about 10 minutes, place it in a fine mesh colander, and then give it a good rinse. That will get rid of some of the coating that’s on there that can make it taste a little soapy or bitter. And if you have any idea what the real deal is with quinoa, please leave a comment below.
Ingredients:
1 cup uncooked quinoa, soaked and rinsed 1 1/2 cups water Salt 1 cup cherry tomatoes (I used tri-colour tomatoes, but of course just red is fine if that’s all you can find), quartered 2 green onions, chopped 1 stalk celery, diced 3 or 4 radishes, diced 3 tablespoons basil, chopped 3 tablespoons parsley, chopped 2 tablespoons dill, chopped 2 or 3 tablespoons of olive oil (a couple of good glugs) Zest and juice of 1 lemon Salt Pepper
Directions:
1.) Place uncooked quinoa in a medium-sized pot. Add water and salt, cover, and bring to a boil. Once boiling, turn heat to low and let simmer for about 20 minutes, until all of the water has been absorbed and the quinoa is nice and fluffy. Fluff with a fork, transfer to a bowl, and place in fridge to let cool for 30 – 45 minutes.
2.) Remove the bowl of quinoa from the fridge and add: cherry tomatoes, green onions, celery stalk, radishes, basil, parsley, dill, and lemon zest. Pour in olive oil and give everything a good toss to thoroughly combine all the ingredients. Sprinkle with salt and pepper, toss again, and taste. Adjust seasoning if necessary.
3.) Serve, or keep in fridge if making ahead, and enjoy!
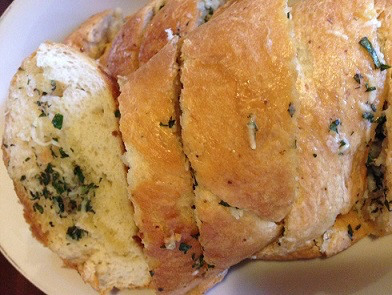
Along with potato skins and Buffalo wings, when my husband used to have poker nights, I always had this stuffed garlic bread on the menu – even though it was always all gone by the time I had a chance to sit and maybe swipe a slice for myself. Sadly, we’ve moved away from his poker buddies, but this garlic bread continues to be a regular at our dinner table. If you’re going to be making your own bread (and I strongly suggest that you do,) form it into a log, baguette-style, instead of the traditional loaf shape. It’ll be easier to stuff and get waaaaay down to the bottom of the slices.
Ingredients:
1 loaf of Italian, French, or homemade bread 1/2 cup butter 6 garlic cloves (more if you like it especially garlicky) 1/2 cup fresh parsley, chopped 1/2 cup Parmesan cheese, finely grated Salt
Directions:
1.) Preheat the oven to 400 degrees Fahrenheit. Slice the bread just as you would as if you were serving it, but make sure you don’t cut all the way through. You want to slice a good couple of inches, but ensure that the whole loaf is still intact.
2.) Combine the butter, garlic, parsley, and a bit of salt to make a compound butter.
3.) Stuff the compound butter into the slices you’ve mad in the bread. I like to start with a little down each slice, and then add more at the end just to ensure each slice gets some of the butter. This will get really messy, and some butter will likely slop over the top of the bread – that’s okay! In fact, once the butter is fully melted, it’ll make the bread even more scrumptious.
4.) Wrap the entire loaf in foil and then place in oven. Cook for about 10 minutes, until the butter has fully melted and has just started baking right into the bread.
5.) Remove the loaf from the oven, unwrap, and finish the cuts in each slice so you have individual pieces of bread.