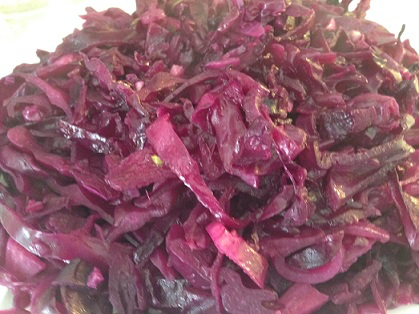
When we think of cabbage as a side dish, too often we limit ourselves to just coleslaw. But there’s a lot you can do with this cruciferous vegetable, and braised red cabbage is one of the prettiest side dishes of all. I’ve kept it pretty basic this time, but you can add nearly anything you’d like to it, and even turn it into the classic cabbage and bacon side, just by crisping up some bacon first and using the fat from it instead of butter and oil.
Ingredients:
1 tablespoon butter 1 tablespoon olive oil 1 small red onion, halved and thinly sliced 1 small head red cabbage (about 2 pounds), thinly sliced 3 tablespoons cider vinegar 4 tablespoons sugar 1/2 cup water
Directions:
1.) Melt butter and olive oil in a large skillet over medium-high heat. Add red onion and cabbage and stir to coat in the fat. Season with salt and pepper and saute for about three minutes.
2.) Add the vinegar, sugar, and water. Bring to a boil then lower heat, cover, and simmer for 25 to 30 minutes. Taste and adjust seasoning with salt, pepper, and sugar if needed.
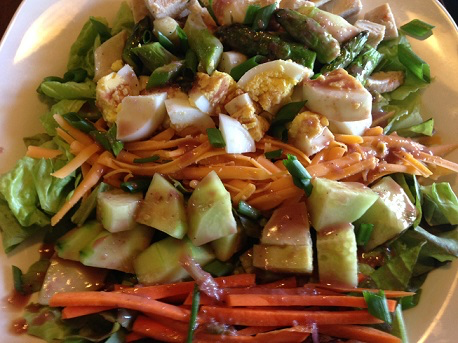
Recently I took a trip to my hometown of Niagara-On-The-Lake and while there, my mom and I got talking about Cobb salad one day. We discussed the things that typically went into it, as well as how it got its name. Ever since that conversation, I’ve been thinking about the Cobb, which was also one of the very first things I learned to make in restaurants. There’s definitely a lot of chopping that goes into it – maybe that’s why prep work was always my favourite in the kitchen. Once you’ve got it all done though, it’s really just a matter of assembling this composed salad, and all you need for the vinaigrette is a blender and a few simple ingredients.
As for the conversation that began my reminiscing of the Cobb salad? Turns out it was created by Robert Cobb way back in the 1930s, and just like Caesar salad, it was invented by Cobb throwing together whatever he had on hand in his own kitchen that day. There are typical ingredients that go into it and they can be remembered through the mnemonic EAT COBB: Egg, Avocado, Tomato, Chicken, Onion, Bacon, Blue Cheese. Of course, today’s recipe standards are a bit looser so you can substitute some of the ingredients, according to what you have on hand in your own kitchen. I did away with the blue cheese, tomato, and avocado and substituted them with roasted asparagus (at least I still got the “A” in there,) Cheddar cheese, green onions, and carrots. It was all still very, very good!
Ingredients:
For the salad:
1 head of lettuce, ripped into pieces, washed and dried 4 pieces bacon 2 large carrots, peeled and julienned 1/2 English cucumber (about 1 – 1/2 cups), peeled and diced 1 cup Cheddar cheese, shredded 3 eggs 1 tablespoon white vinegar 1 cup asparagus (10 – 12 thick stalks) 2 tablespoons olive oil 2 cups cooked chicken, cubed 2 green onions, diced Salt Pepper
For the vinaigrette:
3 tablespoons red wine vinegar 1 tablespoon Dijon mustard 1 tablespoon sugar 1 green onion, roughly chopped 1 clove garlic, smashed 1/3 cup olive oil Salt Pepper
Directions:
1.) Dice up the bacon and place it in a skillet over medium heat. Cook, stirring occasionally, until bacon bits are nice and golden brown. Remove from heat, drain on paper towels, and set aside.
2.) Meanwhile, place eggs into a medium-sized saucepan and fill with water. Add one tablespoon of white vinegar. Cover and bring to a boil over high heat. Once it’s come to a rapid boil, turn heat off, leaving the lid on and the pan on the burner. Let sit for ten minutes before transferring eggs to a bowl of ice water. Once the eggs have cooled down, gently crack and roll along the countertop. Hold under cold running water while gently peeling the egg away. Once all the eggs have been peeled, dice them up and set aside.
3.) Set the oven to 350 degrees Fahrenheit. Roughly chop up the asparagus, place them in a shallow casserole dish or baking tray and coat with olive oil, salt and pepper. Turn them to ensure that all ingredients are fully combined and then place them in the hot oven. Allow to roast for about 10 minutes before removing and setting them aside to cool down.
4.) In a blender, combine all the ingredients for the salad dressing except for the olive oil. Blend until smooth and then slowly stream in the olive oil to thicken. Set aside.
5.) Arrange lettuce on four plates, allowing it to completely cover the bottom of the plate. In columns, arrange veggies and proteins in columns. You can do this any way you feel is the prettiest, but to mix up the colours a bit this is the order in which I did mine: bacon, carrots, cucumber, cheese, egg, asparagus, and cooked chicken. Sprinkle green onion over top of each plate and then drizzle vinaigrette over top.
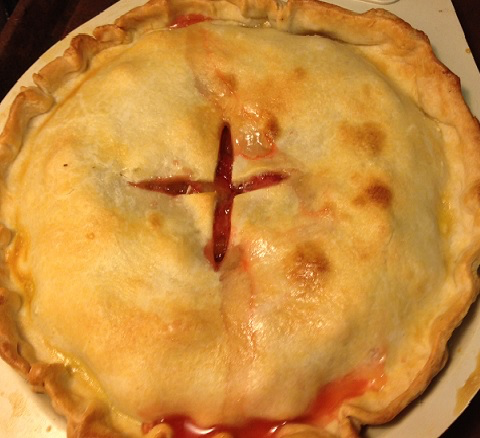
I ate a lot of pie growing up. My grandma is sort of a genius when it comes to pastry. I can still vividly remember walking into her house on a Sunday afternoon and being hit with the aroma of that delicious combination of flaky pie crust, and a filling you could just imagine bubbling over in ooey gooey goodness. Strawberry rhubarb pie was always my very favourite of all the pies grandma made, which is why I’m so very happy that ‘the rhubarb month’ has finally arrived.
Remember when making strawberry rhubarb pie to never leave it open-faced. While it’s been done before, both of these fruits become pretty juicy while baking and so you need both a bottom and top crust to kind of keep it together. Also, while all-butter crusts can be nice, use either an all-shortening crust for this pie, or a half-and-half mixture of butter and shortening. Because there is so much juice from the fruit, you need a crust that can really stand up to it, and so, you need at least a little bit of shortening in there to help.
Ingredients:
1 pie dough recipe that provides 2 pieces, a top and bottom 2 1/2 cups rhubarb stalks, sliced (about 4 or 5 stalks) 2 1/2 cups strawberries, hulled and sliced 1 cup sugar 1/3 cup all-purpose flour 2 tablespoons cold butter, cut into 1/4″ pieces 1 large egg 1 teaspoon water 1 to 2 tablespoons of sugar, for sprinkling
Directions:
1.) Preheat the oven to 450 degrees Fahrenheit.
2.) Roll out one half of the pie crust so that you have a circle with a diameter of about 11 inches, and so the dough is about 1/4″ thick. Place it into an ungreased pie plate and press down gently so that the dough sort of adheres to the pie plate and the edges hang over the sides. Poke holes in the bottom with a fork five or six times, then cover loosely with a tea towel and place in the freezer for ten minutes.
3.) In a large bowl, mix the rhubarb and the strawberries with the sugar and flour. Pour the fruit into the bottom pie crust and dot with butter pieces.
4.) Roll out the top pie crust until it’s the same shape and width as the bottom crust. Using a pastry brush that’s been dipped in water, moisten the edge of the bottom pie crust. Lay the top pie crust over top, and trim the edges using sharp kitchen shears. Crimp the two crusts together to seal.
5.) Combine the egg with the teaspoon of water and use a fork to beat it slightly. Brush the egg wash over the top of the pie so it can form a glaze and sprinkle with one or two tablespoons of sugar. Transfer the pie to a baking sheet to catch any drips as it cooks.
6.) Place the pie in the preheated oven and bake for 15 minutes. Then, reduce the heat to 350 degrees Fahrenheit and bake for another 30 minutes, until the crust is golden and the filling is hot and bubbly.
7.) Remove from oven and allow to cool completely before serving.
Who doesn’t love bacon? I don’t know many who don’t. Even I, who would prefer to see sausages alongside her eggs rather than bacon, still have a soft spot for this fatty cured meat. But just like all food, the world of bacon is evolving. While you can still throw it into a skillet, turn it occasionally, and be left with beautifully crisp pieces of the stuff, more and more people are finding new ways to cook it.
One of the most popular ways is to bake it. Now, unless you have a baking sheet equipped with a wire rack, I implore you not to even try baking your bacon. Sadly, I did, and what I was left with was a soggy, greasy mess that not even my husband – the biggest lover of bacon of all – wanted to eat. I understand baking it is probably great if you do happen to have that wire rack. There’d be little mess, the grease would magically fall off it into the pan below, and you’d be left with a superior product. But, did you know that you can get this same effect on the barbecue too?
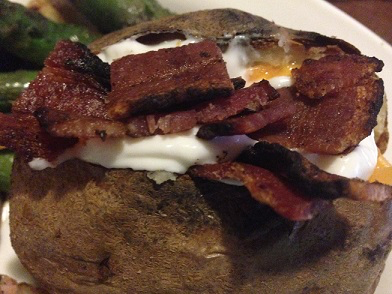
It’s true. Last night it was hotter than heck in my house (being June with no air conditioning and all.) After the harsh winter we just went through, no one was complaining, but we weren’t so keen on turning on the oven or stove either. So, I grabbed some pork chops and some potatoes, and went out to fire up the grill. But what about turning those bakers into loaded bakers? At first, I dismissed the idea – because it would mean cooking on the stove. Then, the light bulb went off. Why didn’t I just throw the bacon onto the grill? Could I? Should I? I did.
Okay, as you know, bacon is quite fatty, so you have to be careful how you do it. I started by laying aluminium foil down over one part of the burner. I was going to use indirect heat anyway, but again – fat means flareups, and I didn’t feel like playing the part of a firefighter either. Then, I turned on the gas and lit only one half of the grill, the half that didn’t have foil covering it up. I kept the heat at about medium. To the half of the grill that did have the foil underneath, I laid my strips of bacon across. Then, I closed the lid and waited for my bliss to come. But it wasn’t actually that easy.
After a few minutes, I opened the lid and saw that my bacon was still raw, and worse, flareups were still happening right on top of the foil. It probably would have been fine if I had left it like that, but I wanted to eat dinner sometime that night (and so did the rest of my family.) So, I moved the bacon up to the top rack of the grill (still on the half using indirect heat) and, wearing silicone gloves and armed with stainless steel tongs, I lifted up the bottom rack and carefully took out the foil before closing the lid. Voila! The bacon immediately started to sizzle and crisp up and, because it still wasn’t over any direct heat and was far enough away from any actual flame, it was much safer and easier to do it this way.
Now, I don’t recommend cooking your bacon this way if you’re just making some up for breakfast in the morning. But if your house gets super hot this summer and you want to cook entirely on the barbecue, or if you’ve got some guests over that you want to impress, try this method and then tell them that you’ve barbecued the bacon. It’ll work, trust me.
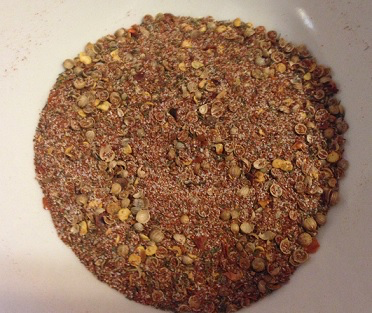
Montreal steak spice is one of our favourite things to smear or shake onto any steak before it goes onto the grill. But it is super expensive! If you love it as much as we do, save your money and – just like anything else – start making it at home. You can opt for the dry rub that’s not so expensive in stores, or the kind that comes in that itty bitty glass jar that works more like a wet marinade and will only give you a couple of uses before you’re scraping the bottom of it. Can you believe that this latter type costs upwards of five bucks, and sometimes even more than that? Well, no more. You can now be happy to say that you’ve beat the steak system.
1.) Place the whole black peppercorns and the whole coriander seeds in a mortar and, using the pestle, crush until they are all broken up completely (it’s okay to have a few larger pieces, as long as there are no whole seeds or peppercorns.) Add the paprika, salt, garlic powder, onion powder, dill, and crushed red pepper. Taste, and adjust seasonings if necessary before sprinkling onto your steak. You can then choose to let the steak sit for a few minutes to absorb the flavours, or grill it right away.
Ingredients for the wet marinade:
1/4 onion, roughly chopped 3 cloves garlic, smashed 1 tablespoon whole black peppercorns 1 tablespoon whole coriander seeds 2 tablespoons paprika 1 tablespoon kosher salt 1 tablespoon fresh or dried dill 1 tablespoon crushed red pepper 2-3 tablespoons water
Directions
1.) Place the onion, garlic, peppercorns, coriander seeds, paprika, salt, dill, and crushed red pepper into a blender. Blend for a few minutes, so the ingredients can start to come together and some of them (the onion and the garlic) can be slightly chopped. Little by little, start adding the water to form a paste. Continue to add water until the mix reaches your desired consistency. Taste, and adjust seasonings if necessary.
2.) Smear the paste onto the steak and allow it to sit for 15 minutes at room temperature before grilling.
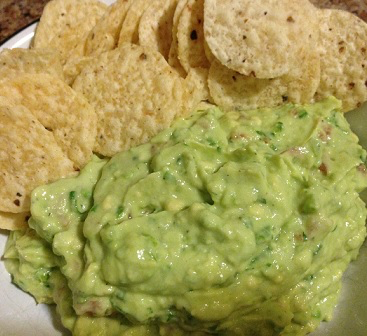
My mom is a proud member of the Stamford Lioness in Niagara Falls. There are many benefits to being part of such a great club, but aside from the biggest ones (you know,like being part of the community and serving others) she also gets to meet a lot of really great people and eat a ton of really good food. She recently had a meeting out of town at the Beamsville Lioness for Mexican Night, and everyone brought a dish. This guacamole was brought by a lady named Cheryle (who’s now known as Guac Royalty in my books.)
I typically trust my mom when she tells me that something is really, really good. After all, she’s never lead me astray before. But when she uses phrases like “da bomb,” I know it’s gotta be serious. She asked for the recipe and then passed it on to me, and it wasn’t in my hot little hands for too long before I was in my kitchen whipping up a batch for myself. I leave you now, with the recipe and these words of advice from my mom. “It’s da bomb. You will love it.”
Ingredients:
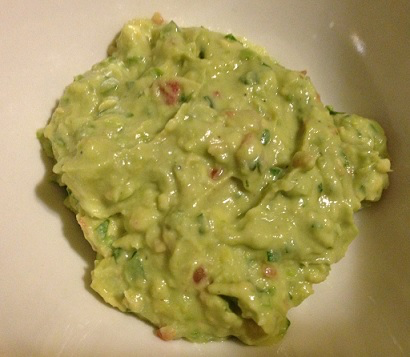
4 ripe avocados, mashed but still a bit chunky 1/2 teaspoon salt 1 jalapeno pepper, seeded and finely chopped 1/4 cup cilantro, chopped (leaves and tender stems) Juice from one lime 1 medium tomato, seeds and pulp removed then finely chopped 1/4 cup sour cream 2 green onions, finely chopped 1 or 2 garlic cloves, grated or finely chopped
Directions:
1.) Mix all the ingredients together thoroughly, taste, and adjust seasonings if necessary. Use immediately or wrap tightly in the fridge to store.
2.) Serve with nachos, tortillas, or pita chips, and enjoy!
I love guacamole. A lot. But I have a problem. Every time I make it, I can’t eat it all at once and I put it in the fridge. But an awful, awful thing can happen to guac when it’s put in the fridge. Air gets to it. It oxidizes. And that beautiful green guacamole that you got just perfect turns into a brown goopy mess. No matter how good it tastes, there’s not a chance you’re going to want it after that, and it will probably end up in the trash. But wait! Before you throw one more bowl of guacamole in the trash, there is something you can do to stop this from happening.
First, forget about everything else you’ve heard about on the Internet (yes, I realize you’re reading this on the Internet, but mine is a solution that actually works.) The advice you’ll typically find include things such as placing a piece of plastic wrap right over the guacamoleto keep it from turning brown. That’s not bad, but it gets even crazier, including putting the avocado pit in the middle (um, what does that do?!) and pouring water over the plastic wrap once it’s been laid right over top of the guacamole. This is supposed to seal the guacamole in its own little airtight bubble, and keep it from oxidizing – therefore keeping it from turning brown. I’ve tried all of these methods, and they just don’t work. In fact, the simplest way – simply putting a piece of plastic wrap over the guac is the best thing for keeping it from turning brown. That was the case for me anyway, until I really thought about it and came up with a new way to do it.
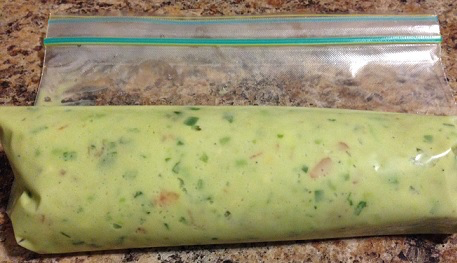
It’s easy. Fold down the top of a realable bag just as you would if you were filling it up with frosting to pipe onto a cake or other pastry. Using a spoon, place your guacamole into the bag, making sure to keep it at the very bottom of the bag and being careful not to smear it onto the sides of the bag (or at least try to do that as little as possible.) Close the resealable bag and then, squeeze all of the guacamole down as far as you can into the bottom of the bag. Once it’s as far down as it will go, start rolling the guac up and over itself, just as you would a burrito or sandwich wrap, until you’ve reached the top of the bag. Then, you can just put the bag in the fridge and the next time you reach for it, your guac will be just as green as it was when you first made it.
The reason why this works is because when you roll the bag right around the guacamole, there is no chance for air to get to it. It’s even better than laying the plastic wrap right on the surface of the guac because there are no little holes or spaces where oxygen can get through and turn it brown. The guacamole at the top of this post was in the fridge for two days and there wasn’t a brown spot to be found. That might not sound like a lot, but anyone who’s tried to keep guacamole nice and green for any length of time knows what a huge deal that is.
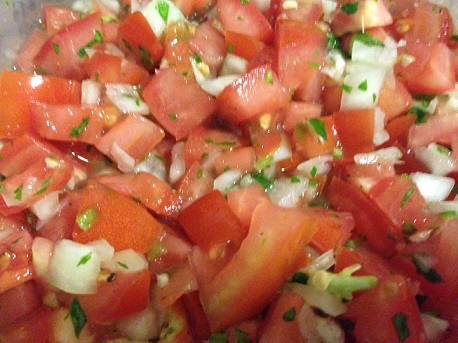
I love salsa, and that’s really all Pico de Gallo is. It hails from Mexico and so naturally it goes really well with tacos, guacamole, tortillas, and really any time you pull out some chips. It’s super easy to make too and, while I like things spicy and leave the entire jalapeno in there (seeds, ribs and all) you can leave these out, or leave out the entire pepper if you just want a taste of fresh without the spice. I’ve also seen others take out the seeds and pulp of the tomato, but I like my salsa to have a lot of liquid to it and so, I leave them in. That one too, is also entirely your call.
1 or 2 garlic cloves, minced 1/4 cup cilantro, finely chopped Juice of 2 limes Salt Pepper
Directions:
1.) Place everything into a bowl and mix thoroughly. Taste, and adjust seasonings. I find that leaving it in the fridge for an hour or so allows all the flavours to come together (and the salt releases some of the juice from all the veg) but it can also be used right away. Pico de Gallo can be stored in the fridge, covered, for several days, or used right away.
Here’s another great reason to go to the Farmer’s Market this summer – you’ll get to keep parts of the vegetables that typically get tossed by the grocery store. And why do grocery stores throw out these delectable bites, instead of letting you take them home and add them to your plate? I’m calling a conspiracy, although no one can be quite sure.
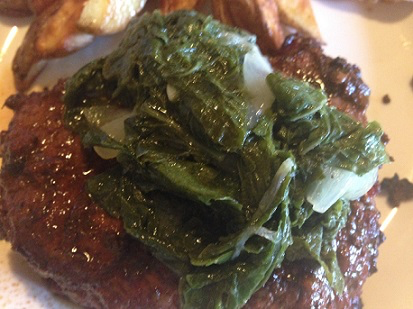
Of these “trashed” items you’ll find at the market but not the store are radish greens. Yes, you can eat radish greens! Just like any other leafy bitter greens such as spinach, Swiss chard or kale, all you have to do is braise them a little bit and you’ll soon be happily munching on radish tops – and they’re tasty too!
The most irritating part of cooking radish greens is cleaning them. They can get awfully soiled, so make sure you soak them in a sink full of cold water for a good 20 minutes to loosen up some of that dirt. As you take them out, give them another quick rinse under cold, running water to make sure that no dirt got stuck to the leaves. Then just blot dry on a paper towel, and your radish greens are ready to cook!
Ingredients:
1 head of radish greens, rinsed and dried 1/2 onion, diced 2 cloves garlic, diced Juice of 1 lemon 1/2 cup white wine 1 cup chicken stock 1 tablespoon olive oil 1 tablespoon butter Salt Pepper
Directions:
1.) Place oil and butter in a pan set over medium heat. When melted, add onion and garlic and cook until onion just becomes soft, about 3 minutes, stirring occasionally.
2.) Add radish greens, season with salt and pepper, and toss in the fat. Cook just until they begin to wilt, about a minute or so.
3.) Add lemon juice, chicken stock and white wine to the pan and stir to incorporate all ingredients. Bring to a boil and then reduce heat to low. Partially cover the pan and allow to simmer for 25 – 30 minutes until the greens are tender.
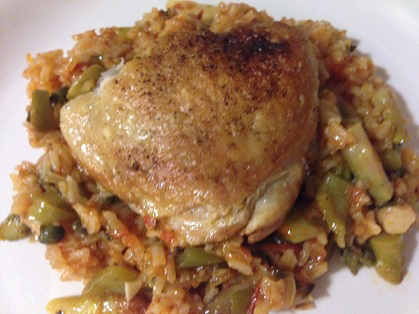
Sometimes you just want to try a dish that comes from somewhere else in the world, even if you don’t know exactly what that dish is. One night, as I was staring at a full roaster chicken, I decided I wanted to go Spanish with it. The only problem? Other than tomatoes, I didn’t really know what flavours were heavily used in Spain (although I’ve heard they use a lot of the same ingredients as Italians, just in different ways.) After a quick Google search, I found some of the main ingredients used in Spanish cooking – tomatoes, garlic, olive oil, rosemary, peppers, parsley, olives, paprika, wine, and onions – and that I had on hand. When I put them all together the end result was something much like Spanish rice with a whole ton of vegetables, and beautiful pieces of chicken sitting on top.
Ingredients:
1 roaster chicken, cut into 8 pieces 1 green pepper, diced 1/4 cup green olives, sliced 2 tablespoons capers 1 cup asparagus, chopped 4 cloves garlic, minced 1/2 cup white wine 1/2 cup chicken stock 1 can crushed tomatoes 2 green onions, chopped 2 tablespoons parsley, chopped 2 tablespoons rosemary, chopped 1 tablespoon paprika 3 tablespoons olive oil 1 1/2 cups long grain rice 3 red chili peppers, dried (or 1 tablespoon red chili pepper flakes) Salt Pepper
Directions:
1.) Preheat the oven to 400 degrees Fahrenheit.
2.) Season the pieces of chicken on both sides with salt and pepper. Place olive oil in a large oven-proof skillet over medium-high heat and when hot, add all pieces of chicken, skin side down. Cook for about 5 – 7 minutes, until chicken begins to turn golden brown and then flip and cook other side for another 5 minutes. Remove chicken from the pan, place on a plate, and set aside.
3.) Turn the heat down to medium and add to the skillet: green pepper, olives, capers, asparagus, garlic, green onions, parsley, and rosemary. Season with salt and pepper, stir, and cook for just about 3 minutes, until all vegetables start to soften.
4.) Add rice to the pan, stir to ensure rice has been evenly coated in fat, and then cook for 1 minute.
5.) Add white wine to the pan, stir, and scrape up any brown bits that have formed on the bottom of the pan. Add the paprika, chicken stock, crushed tomatoes, parsley, rosemary, and dried peppers (or dried chili flakes.) Stir well to ensure that everything is fully combined, and then place chicken pieces back right on top (try not to submerge them or cover the skin with any liquid, as that will result in soggy, rubbery skin.)
6.) Place the entire skillet in the oven and allow to bake for 30 – 40 minutes, until the rice is cooked and chicken is fully cooked through (juices should run clear when pierced with a knife.)