Originally published on May 23, 2014
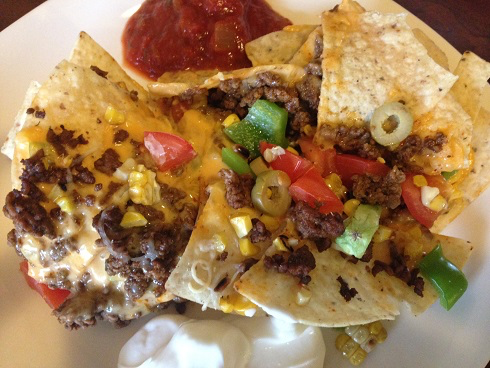
Nachos are one of my favourite appetizers. And when I heard that my two daughters had never even had nachos before, I decided to make an entire dinner out of it. When making nachos, you have a couple of options for the cheese. You can simply scatter shredded cheese over top of the chips and let it melt. But I warn you, if you do it this way, you’re likely to end up with hard bits of cheese all over the place, and it’s not the most appetizing way to eat those delicious chips. Instead, make an ooey gooey cheese sauce, and let that drape over your chips before you add your toppings. I used simple green peppers for mine, as the salsa I paired with it was already quite spicy and my girls can only take so much. But by all means, if you like it really spicy use jalapenos in place of the green peppers in the sauce – I’m betting it’s delicious! Also, don’t feel as though you’re limited to the toppings I used on our nachos. These are the ones I like, but you can use whatever you’d like. Normally I don’t put corn on my nachos either, but I had some left over from the other night and so, on it went.
Ingredients:
For the cheese sauce:
1 tablespoon butter
1/2 onion, finely diced
2 garlic cloves, minced
1/2 green pepper, finely diced
1 teaspoon red chili flakes
1 1/2 cups milk
1 tablespoon cornstarch
1 1/2 cups cheddar or queso fresco cheese, shredded
2 teaspoons yellow mustard
Pinch of salt
Pinch of pepper
For the nachos:
1 bag tortilla chips
1 pound ground beef
1 tablespoon vegetable oil
2 tablespoons chili powder
1 tablespoon paprika
1 tablespoon cumin
1 tablespoon ground mustard
1 tablespoon ground coriander
1 teaspoon dill
1 tomato, diced
1 green pepper, diced
1/2 cup olives, sliced
3 cobs of corn, with the kernels cut off
Sour cream for serving, if desired
Salsa for serving, if desired
Directions:
1.) Preheat the oven to 425 degrees Fahrenheit.
2.) First, make the cheese sauce. Place a medium pot over medium heat and add the butter. Wait until it melts and then add the onion, the garlic, the green pepper, chili flakes, and a touch of salt and pepper. Saute for about 5 minutes, just until the onion and pepper start to soften. Then, add the yellow mustard, and whisk to fully mix with the other ingredients. Add the milk and bring up to a simmer. Whisk in the cornstarch and allow the mixture to heat through, for just about two minutes. Lower the temperature to low and slowly add the cheddar cheese, in batches, being sure to incorporate each batch fully before adding another. Once all the cheese has been added, keep the temperature on low and stir occasionally to keep the sauce from forming a skin.
3.) Next, prepare the beef mixture. In a small bowl, combine the chili powder, paprika, cumin, ground mustard, ground coriander, dill, salt, and pepper. Heat 1 tablespoon of vegetable oil over medium heat and when hot, add the ground beef, breaking it up as you do. Add the spice mixture and then add to the ground beef. Cook, stirring regularly, until beef is completely cooked through, about 7 or 8 minutes.
4.) Arrange tortilla chips on a baking sheet so that the chips cover the entire surface, piling them high if you need to. Drizzle the cheese sauce over top, then sprinkle on the ground beef, green peppers, tomatoes, olives, and corn kernels.
5.) Place the nachos in the preheated oven and cook for about 15 minutes, just enough time to let the nachos come together, and for everything to be heated through.
6.) Serve, with salsa and sour cream if desired, and enjoy!