Chicken Pad Thai

Originally published on May 13, 2014

I just recently discovered something. I love Thai food! I love noodle soup, I love peanut sauce, and I love the traditional ingredients that are used, including chilies and peanuts. I also just found out that I really, really love pad Thai. It’s a dish that I’ve always had to stay away from because it typically involves shrimp, as well as fish sauce – which typically involves oyster and clam juice of some kind. Being severely allergic to shellfish, it was just something that was always off-limits to me. That is, until I got into my own kitchen and became determined to make a dish that is pretty darned close to the authentic dish.

So my version of pad Thai uses chicken instead of shrimp, and soy sauce in place of fish sauce. While eating it, I wanted to sing the song from that commercial. You know the one where the dad goes on a business trip and sings about how lucky he is to be away from his kids? (I always thought there was a certain level of horribleness to that commercial.) But, one of the main lines he sings is – “That’s really good pad Thai!” And this certainly is.

Ingredients:

1/2 package (about 2 cups) rice noodles
2/3 cup chicken stock 
1/2 cup ketchup 
1/4 cup soy sauce 
2 tablespoons white sugar 
2 tablespoons cornstarch 
Zest and juice of one lime
1 teaspoon hot sauce 
4 teaspoons vegetable oil 
2 eggs, lightly beaten
2 boneless, skinless chicken breasts, sliced 
2 carrots, julienned 
1 red bell pepper, julienned 
2 cloves of garlic, minced 
1 tablespoon fresh ginger, minced 
2 green onions, sliced 
1/4 cup unsalted peanuts, chopped
Lime wedges, for garnish

Directions:

1.) Fill a kettle with water and bring to a boil. Pour water into a very large bowl and place noodles in it. Soak them for 20 minutes, then drain and place in a large bowl filled with ice water. Allow to soak in the ice water for about 5 minutes, then drain and set aside.

2.) Meanwhile, in a small bowl, combine the chicken stock, ketchup, soy sauce, sugar, cornstarch, lime juice and zest, and hot pepper sauce. Whisk to fully incorporate all ingredients and then set aside.

3.) In a large skillet or wok, heat 2 teaspoons of the vegetable oil over medium heat. Add eggs and cook, stirring constantly, until they are scrambled, about 2 minutes. Transfer to a plate and set aside.

4.) Add remaining oil to the skillet or wok and increase heat to medium-high heat. Add chicken and brown thoroughly, cooking for about five minutes. Transfer to a plate.

5.) To the pan add carrots, red peppers, garlic, and ginger and cook for about 3 minutes, or until the vegetables are slightly tender. Add noodles and cook for about one minute, while incorporating everything together.

6.) Add chicken back to the pan and stir in the sauce. Stir everything together and cook for about 3 minutes, until the sauce is thickened and the chicken is no longer pink inside.

7.) Return egg mixture back to the pan and toss gently for one minute, or until it’s heated through.

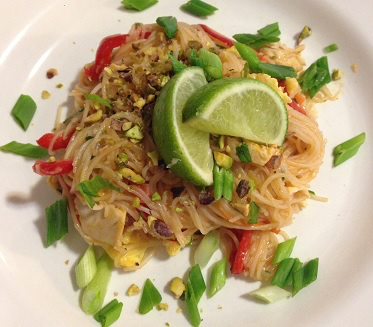
8.) Plate the pad Thai, sprinkle with green onions and peanuts and garnish with lime wedges.

9.) Serve and enjoy!

Breaded Pork Chops

Originally published on May 14, 2014

Way back in the day when I was still a young thing in high school, I had a boyfriend whose mom made the very best pork chops. It was one of the reasons I loved going over there for dinner, even if his parents weren’t the nicest people I’d ever met in my life. But those chops, man were they good. They were super duper thick, and breaded all around so that with every bite you got a nice, satisfying crunch. They were also moist and juicy, and just about some of the best pork chops I’d ever eaten. Well, the relationship didn’t last, but I’ve never stopped thinking about those pork chops. Now, I can eat them in the comfort of my own grown-up kitchen.

Ingredients:

4 thick bone-in pork chops 
1 cup all-purpose flour
2 eggs, lightly beaten
2 cups bread crumbs 
1/2 cup Parmesan cheese
2 teaspoons dried basil
2 teaspoons dried oregano 
Salt 
Pepper 
4 tablespoons olive oil, divided 

Directions:

1.) Preheat the oven to 400 degrees Fahrenheit and line a baking sheet or two with parchment paper (depending on the size of your trays and of the chops.)

2.) Set up a breading station with three different bowls, side by side. In the first bowl place the all-purpose flour. In the second, the lightly beaten eggs. In the third, place the bread crumbs, Parmesan cheese, basil, oregano, and salt and pepper. Mix the bread crumbs up thoroughly so that everything is fully combined.

3.) Pat the pork chops dry with a paper towel and season with salt and pepper. One by one, place them in the flour first, covering to ensure that the chop is fully coated. Remove from the flour and shake off excess. Then place in the bowl of eggs, submerging them so the pork chop is fully covered. Remove from the eggs and let the excess egg drip off it. Lastly, place the chops in the bowl of bread crumbs and cover with the crumbs. Pat down slightly so that the crumbs stick to the chop. Remove from the bowl, shake off excess crumbs and then place it on the baking sheet. Repeat with the remaining pork chops.

4.) When all pork chops have been breaded, drizzle them with the olive oil, and place them in the preheated oven and bake for 30 – 40 minutes, until they are completely cooked through.

5.) Serve and enjoy!

Right on the Rack Pork Roast

Originally published on May 15, 2014

There are about a million different ways you can do pork roast. It’s a relatively neutral canvas so whether you’re feeling Italian, French, or even Southwestern, you can pretty much season it however it suits your fancy at the time. It seems that every time I find a new way to do it, it becomes my favourite – until the next time I come across a great pork recipe. I have to say, this way is my new favourite, even though it’s not really a recipe.

What I mean  is that, again, you can flavour the roast however you want, but it’s the technique that really makes this pork what it is. It’s very similar to those huge open ovens you see in the streets of Greece (I’ve actually never been to Greece, but I have seen it done on TV) where the roast rotates on a spit and drips down onto potatoes below, infusing them with flavour and turning them golden brown. I was always jealous of those that got to eat this type of roast, but now I’ve figured out that you can do it right in your own oven. And let’s be honest. Doing it this way really has nothing to do with the roast, because it’s the potatoes that steal the show.

Ingredients:

1 pork roast, about 3 pounds
1 tablespoon ground coriander 
1 tablespoon ground mustard
1 tablespoon paprika 
1 teaspoon dill 
Salt 
Pepper 
4 or 5 russet potatoes, quartered
1 tablespoon bacon fat or lard 
1 tablespoon vegetable oil

Directions:

1.) Preheat the oven to 450 degrees Fahrenheit and grease a cast iron skillet with the bacon fat or lard. Make sure that one oven rack is in the centre of the oven, and another is directly below it.

2.) Pat the pork roast dry. In a small bowl combine the coriander, ground mustard, paprika, dill, and some salt and pepper. Rub generously over the entire pork roast.

3.) In a large bowl, place the potatoes, salt, pepper, and vegetable oil. Toss so that the potatoes are just covered in the oil and then place into the cast iron skillet.

4.) Place the cast iron skillet into the oven, onto the second rack (the one at the bottom.) Then, place the pork roast directly on the oven rack above, fat-side up, making sure the entire pork sits right over the cast iron skillet. You don’t want the juices running right onto the burner elements, or anywhere else in the oven. They need to be able to drip right down into the potatoes.

5.) Cook the pork roast and the potatoes at this high temperature for 15 minutes, then lower the heat to 300 degrees and cook for another one hour, or 20 minutes per pound until the center has reached 140 degrees F. Don’t worry – your potatoes will not be mushy when it’s time to remove them from the oven. Also stir the potatoes once or twice while cooking at the lower heat, but remember to pull out both racks when you do so that the pork juices once again don’t just fall into the oven.

6.) When two hours has passed, remove both the potatoes and the roast from the oven. Allow the roast to rest for about five minutes while you arrange the potatoes on a large platter. Then slice the pork roast into about 1/2″ slices and arrange right on the potatoes, or to the side.

7.) Serve and enjoy!

Watermelon Tomato Salad

Originally published on May 16, 2014

I always have an abundance of watermelon during the summer (who doesn’t?) and my kids can never gobble it all up before it goes bad. This year though, I’m prepared, with a watermelon margarita recipe, and this delicious watermelon tomato salad. Both are so good, I’ll have to be careful to leave some watermelon in the fridge just for snacking.

Ingredients:

5 cups watermelon, cubed and seeded
2 tomatoes (make sure they’re quite ripe,) cut into cubes
3 teaspoons sugar
1/2 teaspoon salt
1 red onion, finely diced 
1/2 cup white wine vinegar 
1/4 cup extra virgin olive oil 
Black pepper, to taste

Directions:

1.) In a large bowl combing watermelon and tomatoes. Sprinkle with sugar and salt and toss to coat. Allow to stand for 15 minutes.

2.) Stir in onion, vinegar, and oil. Cover and put aside in refrigerator for two hours. When about to serve, sprinkle with pepper to taste.

3.) Serve and enjoy!

Cat’s Pizza Sauce

Originally published on May 17, 2014

If you’re already going to the time and trouble of making your own pizza dough, why not take it a step further and make your own pizza sauce too? This one from Cat Cora is easy to make, comes together in a snap (although you’ll have to wait a bit for the flavours to marry,) and you’ll take that “from scratch” idea up another level. And if you haven’t been watching, make sure you check out Cat along with other celebrity chefs on Sunday for America’s Best Cook. Just because, it’s a really great show!

Ingredients:

1 4-ounce can of tomato paste
1 1/2 cups water 
1/3 cup olive oil 
2 cloves garlic, minced 
1/2 tablespoons fresh oregano, chopped
1/2 tablespoon fresh basil, chopped
1/2 tablespoon fresh rosemary, chopped
Salt
Pepper 

Directions:

1.) Mix together the tomato paste, water, and olive oil and mix well. Add garlic, oregano, basil, rosemary, and salt and pepper to taste. Mix well and place in fridge to allow flavours to develop for two hours. Then just spread over pizza dough.

2.) Serve and enjoy!

Roasted Asparagus

Originally published on May 18, 2014

If you’re going to be looking for asparagus this summer, do yourself a favour and don’t buy it from the grocery store. Instead, go to your local Farmer’s Market or find a friendly farmer nearby that’s toiling in the fields so that you can have beautiful plump stalks on your dinner table. And as an added bonus, you’ll probably get them for much cheaper too. These ones (aren’t they gorgeous?) came from an avid gardener that my husband works with. Trust me, by buying asparagus this way, you’ll end up with asparagus twice the size of what you’ll find in the store, yet they won’t be stringy or fiberous at all. When it comes time to roast them, you have several options. This is how I do mine.

Ingredients:

1 pound asparagus 
2 tablespoons olive oil 
2 cloves garlic, minced 
Salt 
Pepper 
Juice of half a lemon 

Directions:

1.) Preheat oven to 400 degrees Fahrenheit and line a baking sheet with parchment paper.

2.) Trim asparagus if needed and then place them in a large resealable bag. Pour in the olive oil and give them a shake and roll to ensure that stalks are fully coated. You can also place them in a bowl or right on the baking sheet and then drizzle and roll them in oil, but I do find this is the easiest way to do it, and you also won’t waste as much oil.

3.) Place asparagus on the baking sheet and season with salt and pepper and sprinkle minced garlic over top.

4.) Place into the oven and cook for 8 – 10 minutes, until the asparagus are softened but still crisp.

5.) Remove and spritz with juice of half a lemon.

6.) Serve and enjoy!

Pamuchim

Originally published on May 19, 2014

One night when I was making Chinese food at home, I wanted to add a little salad. But what kind of salad goes with Chinese food? I didn’t know any, especially those that were straight up vegetables like I wanted and didn’t include noodles of any kind. Luckily, I have a book my grandma gave me – Chinese Food Made Easy – and this recipe was inside. It is indeed very easy, and it stars an ingredient you might not think would ever be the main star in any dish (I know I never did) – green onions! Now, I introduce you to a Chinese salad that is supposedly very popular in the Far East – Pamuchim.

Ingredients:

6 – 7 green onions 
1 teaspoon rice vinegar 
1/2 teaspoon sesame oil
Pinch of red chili flakes
Pinch of salt
Pinch of ground black pepper 

Directions:

1.) Wash the green onions very well and slice them, lengthwise, so that they are long thin strips. Place them in a bowl of ice water for 30 minutes.

2.) Drain the green onions and pat them dry as best you can. They will be very curly.

3.) Place the green onions in a large bowl. Add the rice vinegar, sesame oil, chili flakes, salt and pepper. Toss to thoroughly coat the green onions in all the ingredients.

4.) Serve and enjoy!

Nanaimo Bars

Originally published on May 20, 2014

One of my Twitter followers has asked me to post a Canadian recipe, and there are two that I always think of first – butter tarts, and Nanaimo bars. Since I’ve already posted the butter tarts, I thought I’d go with the latter – the scrumptious dessert that originated in Nanaimo, British Columbia. I usually make both desserts for Canada Day, and was going to wait until then to post this Canadiana treat, but no one minds if we eat them a little early this year, do they?

Ingredients:

For the crust:

1 cup graham cracker crumbs 
1/2 cup sweetened shredded coconut 
1/3 cup walnut halves, finely chopped
1/4 cup cocoa powder
1/4 cup granulated sugar
1/3 cup butter, melted 
1 egg, lightly beaten

For the filling:

1/4 cup butter
2 tablespoons custard powder
1/2 teaspoon vanilla
2 cups icing sugar
2 tablespoons milk 

For the topping:

1/2 cup semisweet chocolate, chopped 
1 tablespoon butter

Directions:

1.) First, make the crust. Preheat the oven to 350 degrees Fahrenheit and line an 8″ by 8″ cake pan with parchment paper.

2.) In a bowl, stir together graham cracker crumbs, coconut, walnuts, cocoa powder, and sugar. Drizzle with butter and egg; stir until combined.

3.) Press crumb mixture into the prepared cake pan and place in oven for about 10 minutes, until firm. Let cool on a rack while still in the pan.

4.) Next, make the filling. In a bowl, beat together the butter, custard powder, and vanilla. Gradually beat in the icing sugar, alternating with the milk until smooth. If the mixture is too thick to spread after all the icing sugar and milk is added, gradually add up to 1 tablespoon more milk. Spread over the cooled crust, then place in the refrigerator to let it firm up, about one hour.

5.) Then make the topping. In a double boiler or a heatproof bowl set over simmering water, place chocolate and butter together. Stir to combine and fully melt both ingredients, then spread over filling. Refrigerate until the mixture is just about set, about 30 minutes, before cutting into bars with the tip of a knife.

Grilled Mexican Corn

Originally published on May 21, 2014

I’ve been waiting all spring to try out this recipe! When I heard that there was a Mexican street food that included corn on the cob, slathered in mayonnaise and then covered in cheese – I mean, come on. How could I contain my excitement? So the minute my store had fresh ears of corn piled high in that massive cardboard box, I loaded up a couple of bags, knowing exactly what I was going to do with them. Of course, I had to change it up a bit, but I promise it was only because of logistical issues. My store doesn’t carry queso fresco cheese, so I had to substitute Parmesan. And because my little ones were eating it, I sprinkled it with paprika instead of cayenne. It was super good with the substitutions, and I’d bet it’s just as good with the traditional ingredients. I do find that grilling corn isn’t really worth all the trouble. It actually takes longer than boiling it, and it’s difficult to cook it through without burning it. I will be making this corn recipe again, but next time I think I’ll just boil it instead.

Ingredients:

4 ears of corn on the cob 
1/2 cup mayonnaise
Juice of 1/2 lime
1/4 cup cilantro, chopped 
1 cup Parmesan cheese
2 tablespoons paprika, divided 
Salt 
Pepper
Lime wedges, for garnish (optional)

Directions:

1.) In a small bowl combine the mayonnaise, lime juice, cilantro, and a touch of salt and pepper. Lay the Parmesan cheese

2.) Husk the corn, removing as much of the silk as possible. Preheat an outdoor grill to medium heat and arrange the corn directly over the flame. Cook for a few minutes before turning and cooking on the other side.

3.) Remove the corn from the grill and, while it’s still hot, brush each ear with the mayonnaise mixture. Repeat with the remaining ears of corn. One by one, lay the ears of corn down in the cheese and roll it around so that the entire ear of corn is covered. Sprinkle a bit of paprika over top each one and garnish with lime wedges, if desired.

4.) Serve and enjoy!

Chicken, Bacon and Ranch Sandwiches

Originally published on May 22, 2014

Chicken breasts aren’t the best part of the bird in my opinion – especially the boneless, skinless variety. They are pretty tasteless, can dry out super quick, and just aren’t all that exciting. But sometimes, only chicken breasts will do. And sometimes, you even need them to be boneless and skinless, such as when you’re making this sandwich. Because you’ll be using the most finicky part of the chicken, you’ll need to brine the breasts for a little bit first – but not too long, or else you’ll only contribute to the drying out of the chicken. About a half hour or so is all you need.

Ingredients:

4 boneless, skinless chicken breasts 
4 strips of bacon 
1/2 cup ranch-style dressing
4 slices Cheddar cheese
1/2 tomato, thinly sliced 
12 cups of water (for the brine) 
1 cup salt, plus a couple pinches
1/2 cup sugar
2 bay leaves 
4 hamburger buns 
Pepper 

Directions:

1.) Place chicken breasts between two pieces of plastic wrap or in a large resealable bag. Using a meat mallet, pound them out slightly, just until each one is of even width. Place water, salt, sugar, and bay leaves in a very large bowl or pot. Add chicken breasts and brine for about 30 minutes. When finished brining, remove chicken breasts, rinse thoroughly, and pat dry.

2.) While chicken is brining, place bacon strips in a skillet set over medium heat and cook, turning occasionally, for about 10 minutes, just until bacon is very crispy and cooked through. Cut each piece of bacon in two, place on paper towels to drain and set aside.

3.) When chicken breasts are ready to be cooked, heat an outdoor grill to medium heat. Season chicken breasts with a little salt and pepper and place them on the grill. Cook for about 5 minutes before flipping and cooking for another 5 minutes on the other side. The pounding of the meat and the fact that it’s done on a grill (which is much faster than stovetop,) this is really all the chicken should need but be sure that it’s fully cooked through before taking it off the grill. Turn the grill off and allow chicken to rest for just a few minutes.

4.) While the chicken is resting, prepare and assemble the sandwiches. Spread a bit of the ranch dressing on both sides of the bun, and then to just the top of the bun add tomato (I like to season the tomato slices with a bit of salt and pepper,) the cheddar cheese slices, and two pieces of bacon (so that each sandwich has one whole slice of bacon.) Place the chicken breast on the other side of the bun, close up the sandwich, and cut each in half if desired.

5.) Serve and enjoy!