Peppers and Eggs

Originally published on May 1, 2014

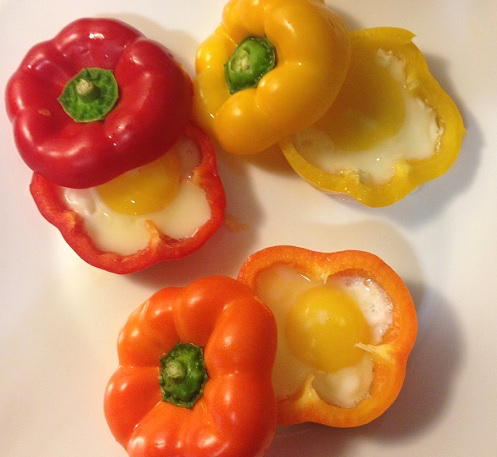
As most of you know, I love eggs. And when it comes to food, the only thing I might love more than eggs are eggs that are stuffed inside of other food – such as avocados, or even in bread such as with Frog in a Hole. That’s why when I saw this new craze (most popular on Pinterest) of stuffing bell peppers with my favourite food, I was excited. And when I made them, I was even more so. First of all, they look like little flowers in your pan – they’re so pretty! But when it’s time to dig in, the sweetness of the pepper cuts through the richness of the egg yolk, creating the perfect balance, and the perfect breakfast. You can change this up however you want, cooking the eggs for longer if you like firmer yolks, or flipping the peppers in the pan before adding the egg.

Ingredients:

3 bell peppers, of any colour 
3 eggs 
2 tablespoons vegetable oil 
Salt 
Pepper 

Directions:

1.) Crack each egg into its own small bowl, making sure that no shell falls in and that the yolks don’t break. Pour the vegetable oil into a skillet set over medium heat so the pan can begin to preheat. Take the spatula you will use to take the peppers out of the skillet, and run the front and back of it along the bottom of the pan. This will coat the spatula in oil, making the pepper slip off it when it’s time to transfer to a plate (or, if you’re more prepared than I am, simply spray it with non-stick cooking spray.)

2.) Cut tops off peppers and slice one fairly thick ring, about an inch thick. Sprinkle salt and pepper on the inside. This will season the eggs so that you don’t have to season the eggs and mess up how pretty they’ll be when they’re finished cooking.

3.) Place the pepper rings inside the skillet. Then, one by one, hold one of the peppers down while you pour the egg yolk into the centre of it. This will help ensure that the whites of the egg don’t run out of the bottom of the bell pepper, leaving you with very little in the centre. Cook for about 5 minutes, until the eggs have set. Carefully remove and transfer to a plate.

4.) Serve and enjoy!

Blackberry Smoothie

Originally published on May 2, 2014

I did the greatest thing this weekend. I moved my blender from the back of the cupboard where it was hiding, and put it on my counter. Why is this so great? Because when something is out of sight, it’s also out of mind, and that was the case with my blender. Purees were made in my food processor, and smoothies were all but forgotten. But, when I did the big spring clean in my kitchen this weekend, I found it and I moved it to my counter knowing that if I was ever going to use it, putting it right in front of my face would be the only way to do it. So, because I always have a freezer full of blackberries (thanks again, grandma!) I knew that this would be the fruit I used for my first smoothie. And while this isn’t the first blackberry drink I’ve created, it is the first smoothie I’ve made using this tart fruit. I’m betting it won’t be the last.

Ingredients:

1 cup frozen blackberries
1 cup chocolate milk
1 teaspoon vanilla 
1 teaspoon brown sugar 
Just a pinch of salt

Directions:

1.) Place everything in a blender and blend until smooth. You can strain it afterwards if the seeds really bother you, but I didn’t do it with mine and it was fine.

2.) Serve and enjoy!

Whole Wheat Crackers

Originally published on May 3, 2014

I’ve long since been making my own chips – whether they’re made out of pitas, radishes, or potatoes. But crackers? Come on. Do we really need to be making our own crackers? And is it really that much easier or cheaper than just running out to the store to buy some? I was to say the least, pretty suspicious about the entire idea. But, as always, I had to give it a go before I made a final judgement. So, I pulled up my bootstraps, took out the (very few) ingredients that are needed for it, and started mixing up my own. I have to say, it took very little time, and it made me feel really great to make something from scratch that I knew was good for my kids, and that only had ingredients I could actually pronounce. Now, anytime we have soup in this house – or just need something yummy to dunk into dip – the chances are good that we’ll have homemade crackers on hand to enjoy with it.

Ingredients:

1 1/2 cups all-purpose flour
1 1/2 cups whole wheat flour
2 teaspoons sugar
2 teaspoons salt 
4 tablespoons olive oil 
1 cup water, plus 1/4 cup, if needed 
Salt 
Sesame seeds (optional)
Celery seeds (optional)
Fennel seeds (optional)
Caraway seeds (optional)

Directions:

1.) Preheat the oven to 450 degrees Fahrenheit and place your oven rack in the lower third of your oven. Cover a baking sheet with parchment paper.

2.) In a large bowl, mix together both flours, sugar, and salt. Pour in the olive oil and 1 cup of water. Stir until the dough comes together,and is soft and not sticky. If you find there’s a lot of dry flour still left in the bowl, add more water just a little at a time, until it all comes together into a smooth ball.

3.) Divide the dough into two halves and set one aside. Using a rolling pin, roll out the dough as thin as you can until it’s approximately 1/8″ inch thick.

4.) Brush the entire surface of the dough very lightly with a bit of water. Evenly sprinkle salt over top, as well as any of the optional toppings you choose (and don’t think they need to be reserved to the list above – they’re your crackers, so top ‘em with whatever you think will be most awesome!)

5.) Using a sharp knife, pizza cutter, or cookie cutter, cut the crackers into squares or whatever shapes you prefer.

6.) Place in the oven and cook for 12 – 15 minutes, checking often to ensure they don’t burn. Remove from the oven as they start to become brown and crisp.

7.) Serve and enjoy!

*Crackers can be stored at room temperature, in an airtight container for up to 5 days. If the crackers start to get a bit soggy, they can be reheated in the oven for just a few minutes.

Lime Margarita

Originally published on May 5, 2014

It’s Cinco de Mayo today, and what goes better with guacamole than a refreshing margarita? This time, I didn’t blend it or shake it up with a bunch of crushed ice, but chose to simply pour it over the rocks. When you take out the slush factor of margaritas, they turn into a cocktail that’s pretty much entirely made up of alcohol, so I added a splash of water to tone it down a bit. And, as my father-in-law once told me when offering me Drambuie, remember that this is a “sipping drink.” (But I promise you, this tastes much better than Drambuie.)

Ingredients:

Coarse salt 
1 1/2 ounces silver pure agave tequila
1 ounce triple sec or orange liqueur such as Grand Marnier 
Juice of two limes
1 thin lime wedge, for garnish
Ice cubes 
A splash of water (as little or as much as you would like)

Directions:

1.) Place coarse salt on a plate. Rub the lime wedge around the rim of the glass and then, holding the glass at a 45 degree angle so no salt gets inside the glass, gently coat the rim of the glass in salt.

2.) Place some ice cubes in the glass, and more into a cocktail shaker. Into the shaker place the tequila, Grand Marnier, and lime juice. Place the top on the shaker and hold while shaking vigorously, until the outside of the cocktail shaker is frosty. Pour over the ice cubes in the glass.

3.) Serve and enjoy!

Thai Peanut Sauce

Originally published on May 6, 2014

This Thai sauce is perfect for dipping summer rolls into but can be used for just about anything, including fish and chicken. You don’t even have to put it over the heat if you don’t want to, but I do find that doing so helps their flavours marry a bit better and helps the overall flavour.

Ingredients:

3/4 cup smooth peanut butter 
1/3 cup water 
3 tablespoons hoisin sauce
Juice of 2 limes 
1 1/2 tablespoons soy sauce
1 tablespoon white sugar
2 teaspoons chili paste, or hot sauce
3 garlic cloves, minced
1 teaspoon sesame oil
Salt 

Directions:

1.) Place the minced garlic on a cutting board or other work surface. Sprinkle a generous amount of salt over top and then use the blade of your knife to press down on the pieces of garlic, moving the blade from one side to another as you do. This will turn the garlic into a bit of a paste and will mellow the flavours of it. (It will also allow the garlic to blend nicely into the sauce, as opposed to having large pieces of it floating around in the sauce.)

2.) Place all of the ingredients, including the garlic paste, into a small saucepan set over medium heat and heat until it’s just warmed through, about ten minutes, stirring occasionally.

3.) Serve and enjoy!

Summer Rolls

Originally published on May 6, 2014

I love rolls. Any kind of rolls really. Whether something is rolled in tortillas, egg rollwrappers, or even lettuce, there’s something about having a neat little bundle on your plate that’s just incredibly satisfying. These summer rolls are not only pretty, but they’re also very, very healthy. Plus, you won’t be able to stop at just one. To make the assembly of these even easier on yourself, make sure you have the vegetables prepped before you even begin. Once those rice papers are softened, you’ll need to move quickly. I also placed the chili peppers in just a couple for those that like heat, and I placed them right on top of all the other vegetables. This way, those that don’t want them can easily see which ones won’t set their mouths on fire and opt for those instead.

Ingredients:

4 rice papers 
2 small packages (about 2 cups in total) rice noodles
1 cup watercress
1 cup baby spinach 
1 yellow bell pepper, thinly sliced 
4 or 5 radishes, thinly sliced 
2 chili peppers, sliced (optional) 
1/2 cup fresh cilantro, chopped (optional) 

Directions:

1.) Bring a large pot of water to a boil. When it’s rapidly boiling, place the rice noodles in, stir to break them up a bit, and then let them sit for three minutes. Use tongs or a spaghetti spoon to take the noodles out of the water and transfer them to a bowl of ice water. This will stop the cooking process, and will also prevent the noodles from sticking together once they’re drained. Reserve the boiled water in the pot, as you’ll need it for the rice papers. Once the rice noodles have sat in the ice water for a few minutes, drain them completely.

2.) Assemble the summer rolls one by one. Start by dipping the rice papers in the hot water in the pot and let it sit for one or two minutes. While you should try to submerge as much of the rice paper as you can, try not to let it go completely as the wrapper will become very thin and pliable, and there’s a chance you may not be able to pull it out of the water nice and straight if you let go of it.

3.) Once the rice paper has softened, lay it down on a cutting board or plate and start to assemble the rest of it. Start by laying some of the spinach and watercress down the centre of the wrapper. On top place a small handful of the rice noodles, with some pepper pieces and sliced radishes (and chili peppers, if using.)

4.) Fold one side of the rice paper over the filling, and press down lightly to make it stick. Fold the ends up and over the filling, and press lightly. Tightly, tucking the filling under as you do, roll the rest of the wrapper to ensure that the rolls are fairly tightly packed and then press the seams gently to make sure that they stick and will not come undone.

5.) When finished, sprinkle all rolls with cilantro if you choose, and serve with a dipping sauce such as Thai peanut sauce, if you choose.

6.) Serve and enjoy!

Simply Sauteed Swiss Chard

Originally published on May 7, 2014

Swiss chard, just like kale or spinach, is a delicious vegetable that will also give you your daily quotient of leafy greens that all of us need. They also aren’t very hard to cook. Just saute it like you would saute spinach with lemon or another acid, and it takes just a couple of minutes before you get a tasty healthy side dish on your plate. Remember when you’re buying Swiss chard that it comes in a couple of varieties – red and green – so you may have to experiment a bit before deciding which one you like the best. When looking for either type, also keep in mind that their stems are quite delicate, so be sure not to purchase any that are bruised or broken. But, unlike other types of leafy greens, you can eat Swiss chard whole – meaning the stems and the leaves, and both are perfectly appetizing.

Ingredients:

1 bunch Swiss chard (red or green,) washed and dried, and chopped
2 tablespoons butter 
2 tablespoons olive oil
1 clove garlic, minced
1/2 onion, diced 
1/2 cup dry white wine 
Juice of 1/2 lemon
2 tablespoons Parmesan cheese, grated
Salt
Pepper

Directions:

1.) Heat butter and oil in a skillet over medium heat. When hot, add garlic and onion and saute just until onion is soft, about three minutes.

2.) Add Swiss chard and toss to coat in oil. Add wine and lemon juice and toss to coat. Cook until Swiss chard has just wilted, and then remove from heat. Sprinkle with Parmesan cheese, season with salt and pepper, and then taste, adjusting if it needs more seasoning.

3.) Serve and enjoy!

Tuscan Chicken

Originally published on May 8, 2014

I really, really love Italian food and chicken recipes such as this one prove that it doesn’t always have to be pasta. When I first heard about Tuscan Chicken, I heard that it was the Italian version of lemon chicken (which it isn’t) and that it has a very interesting marinade (which it does.) That marinade is in fact,a mirepoix that simply sits on top of the chicken while it sits in the fridge for a couple of hours. Then when you’re ready to cook, you pretty much just have to bring it up to a boil and then let it simmer away. Takes some time, yes, but the entire thing is really pretty easy.

Ingredients:

4 chicken legs with thighs attached
1/4 cup olive oil
2 carrots, chopped
1 onion, chopped 
3 celery stalks, chopped 
4 cloves garlic, minced
Zest and juice of one lemon 
3 twigs of rosemary, stripped of leaves
1 cup dry red wine
1 small can tomato paste 
1 cup chicken stock 
Salt 
Pepper 
Torn basil leaves for garnish, if desired

Directions:

1.) Rinse and pat chicken dry and place in a large pot (the same one you will cook the chicken in.) In a separate bowl combine the olive oil, carrots, onion, celery, garlic, lemon zest, juice, rosemary, salt and pepper. Mix together to ensure that all vegetables are coated and then pour over top of chicken. Place in the fridge and marinate for 3 or 4 hours.

2.) When ready to start cooking, take the pot out of the fridge and bring the chicken back up to room temperature. This will probably take about an hour.

3.) Place pot over medium-high heat and brown the chicken on both sides. This should take about 15 minutes. Add the wine and reduce for 5 minutes. Combine the tomato paste with the chicken stock and then add to the pot, mixing well to ensure that everything is combined thoroughly. Bring to a full boil then lower the heat and simmer for 30 – 45 minutes more, until the chicken is completely cooked through. Scatter torn basil leaves over top, if desired.

4.) Serve and enjoy!

Grilled Peaches

Originally published on May 11, 2014

Happy Mother’s Day! There are several dishes I make that always remind me of my mom. Grilled cheese sandwiches are one of them, and anything with peaches is another. My mom lives in beautiful Niagara-on-the-Lake, an area that’s known for a lot of things – wine and peaches being just two of them. Every year my mom goes to an orchard just around the corner from her house and buys me an enormous bag of peaches. The bag is not your average grocery bag. It’s a gigantic clear bag that is as big as a garbage bag, and it’s as full as it can get (and still be lifted by a human being) with peaches. I spend a day or two canning most of them, but always reserve a good bowlful or two to create beautiful peach dishes (peach pancakes and peach pie being two of them.) But doing something with these peaches doesn’t always have to be long and involved. In fact, often I’ll just brush them with a bit of honey and toss them on the grill. They’re really nothing short of brilliant, and one of my favourite ways to enjoy one of my favourite summertime fruits.

So this one mom, goes out to you. Thanks so much for the peaches, and just for being my mom. I hope you  have a very, very happy Mother’s Day!

Ingredients:

6 peaches, cut in half with the pit removed 
3 tablespoons extra-virgin olive oil 
4 tablespoons honey
Whipped cream for garnish, if desired

Directions:

1.) Preheat outdoor or indoor grill to medium-high.

2.) Brush each peach half with olive oil and drizzle honey over top.

3.) Place peaches, cut-side down, on grill and cook for about two minutes, just enough to warm the surface of the peach and carmalize it a bit, and to show grill marks.

4.) Remove from heat and garnish with whipped cream if desired.

5.) Serve and enjoy!

Compound Butter

Originally published on May 12, 2014

Today’s post isn’t really a recipe at all, but rather just a “how to” make sauces, breads and rolls, steak, and anything else that you think could use a bit of extra flavour. The secret is compound butter, and not only can you add it to just about anything you want, but you can add any flavour you’re craving into it. It’s super easy.

First, start with softened butter. If you don’t, you won’t be able to blend all the other ingredients that you need into it. Second, decide what ingredients you want to add to the butter. Fresh tarragon, dill, basil, and even thyme are all great ingredients as are spices including garlic powder, onion powder, and anything else you think would be complimentary to the butter. This might also depend on the dish you plan on using it with, as you’ll want to make sure that the different flavours won’t be off-putting with anything you pair it with. I also suggest putting just a bit of salt into the butter as well, even if you’re using salted butter. This will help bring out the flavour of anything you’ve added to the butter. Then just put it all in a bowl and mash it all up until everything is thoroughly mixed together.

If you want to make the butter really pretty, place it on a big sheet of plastic wrap, right down the centre. Fold the plastic wrap over it and then roll it back and forth, until the butter has formed a log. Then to store it just wrap the rest of the plastic right around the butter log and place it in the fridge to set. You can even place it in the freezer and then just take off slices as you need it. It’s particularly good for butter-basting steak, or even rubbing along the crust of pizza dough (make sure it’s softened first if doing it this way.)

There is little that I love more than something that is so simple to do, but yet tastes so good!