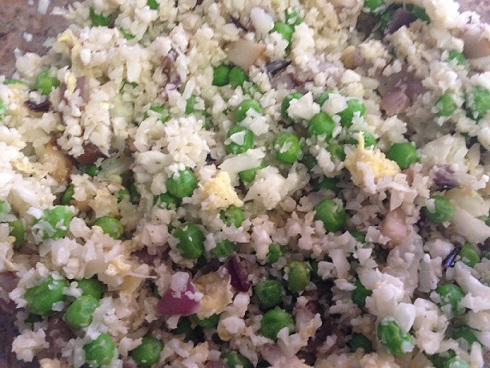
Yesterday we talked about “ricing” cauliflower – the process of putting florets into a food processor and pulsing it until they began to look just a bit larger than pieces of regular rice. Doing this allows you to take cauliflower to a whole new level, such as turning it into a cauliflower pizza crust. But you can simply keep this “cauliflower rice” and turn it into just that – a rice dish, without a grain of actual rice to be seen. And it’s pretty simple to do.
Ingredients:
2 tablespoons vegetable oil 1/2 red onion, diced 1 cup mushrooms, chopped 1/2 head cauliflower 1 tablespoon freshly grated ginger 2 cloves garlic, minced 1 cup frozen peas 1 egg 2 tablespoons soy sauce Salt Pepper
Directions:
1.) Chop cauliflower into florets and pulse in a food processor to make “rice cauliflower.”
2.) Heat oil in a large skillet over medium heat. When oil is hot, add diced onion and mushrooms and cook, stirring occasionally, until mushrooms just begin to brown, about five minutes. Add the garlic and the ginger and cook for another minute or so.
3.) Add the cauliflower rice and stir to combine. Add frozen peas, stir, and cook for about five minutes. You want the cauliflower to start cooking through, and the peas to become hot.
4.) Spread vegetables all around the sides of the pan, creating a well in the centre. Lightly beat the egg and drop it in this empty centre. Stir the egg, allowing it to scramble fully while keeping it away from the other vegetables as best you can (don’t worry if it mixes in a little bit.)
5.) When the egg is fully cooked, stir into all of the vegetables until all ingredients are fully incorporated.
6.) Add soy sauce and stir again to fully mix. Taste, and then season with salt and pepper accordingly.
Of all the cauliflower recipes I’ve given you this week, this one might be my favourite!
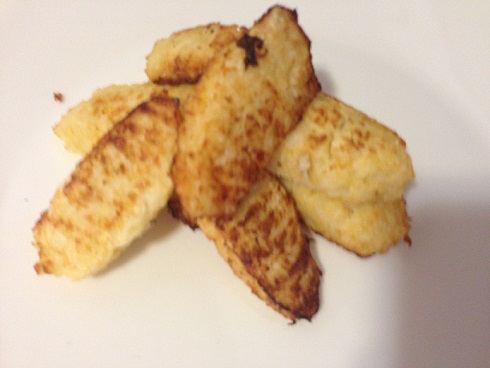
I once watched a Diners, Drive-Ins, and Drives where Guy Fieri interviewed a restaurant owner that made his own tater tots. There was much discussion about how this was a very difficult thing to do, and how it’s next to impossible to get the right taste and the right consistency. I think I’ve found their problem. All those other restaurants have been using potatoes! Silly people, when obviously cauliflower is the only way to get that same delicious taste and texture. This recipe promises just that. Cauliflower that tastes just like tater tots. Finally, an unprocessed, gluten-free way to enjoy those delectable freezer treats. But, really?
I have to tell you, I had no faith that I was going to pull this recipe off. And as I got further into the cooking process, my faith started to lessen. I tasted as I went and yes, they tasted good. But like tater tots? Not really. And I have to say, they’re a heck of a lot of work. But that just goes to prove that you don’t get anything good without trying. Because once these were pulled out of my pan for the final cook and I bit into one, I couldn’t believe it! They tasted just like tater tots! And you know how tots have that slightly chunky texture that you can feel with every bite? These even have that! Yes, they are a lot of work, so just go into it knowing that. And if you don’t have a good pastry bag (like me,) just form the cauliflower mixture into French quenelles using two spoons (I’m hoping to put up a video tutorial on this at some point.) I find that they’re very pretty this way, and do look even more like tater tots.
Okay, so are you ready? Here goes…
Ingredients:
1 medium cauliflower 2 tablespoons heavy cream 2 tablespoons butter 1/3 cup old (sharp) Cheddar cheese 4 egg whites 1 tablespoon of vinegar Salt Pepper About 3 cups canola oil for frying
Directions:
1.) Clean and trim the cauliflower and place the florets into a large saucepan. Add butter and cream, cover pan, and cook for about five minutes, until the cauliflower is just fork-tender.
2.) Add this mixture to a food processor and add Cheddar cheese, salt, and pepper. Pulse just until the cauliflower breaks apart, but not until it’s mushy like a puree. The consistency should look like cooked oatmeal. Transfer mixture to a bowl and refrigerate for at least half an hour.
3.) Meanwhile, beat egg whites until they become frothy. Add vinegar and beat until they form stiff peaks. (This vinegar bit wasn’t in the original recipe, but I’ve never beaten egg whites and not added vinegar or cream of tartar. It seems to take away the eggy tasty, without leaving any taste behind, and that was the case with this recipe too.)
4.) Fold 1/3 of the egg whites into the cauliflower mixture once it’s cooled, and then fold the remaining cauliflower mixture into the rest of the egg whites. Quickly fold the two mixtures together until they are fully combined. Refrigerate again for another half an hour so that the mixture will hold its shape.
5.) Line a baking sheet with parchment paper and preheat oven to 375 degrees Fahrenheit.
6.) When mixture has come out of the refrigerator, place into a piping bag and pipe 2″ lengths onto the baking sheet. Or, do like I did and use two spoons to form the quenelles, gently laying them onto the baking sheet when finished.
7.) Place into the preheated oven and bake for 10 – 12 minutes, until they have dried out some and have puffed up slightly.
8.) Heat 1/4 inch of oil in a large skillet set over medium-high heat. When hot, add cauliflower tots and fry for about 1-2 minutes on each side, until they are golden brown.
9.) Remove from heat as tots are finished baking, and sprinkle immediately with salt.
All week long we’ve been looking at different cauliflower recipes because you know, cauliflower is the new kale. And I think we’ve proven that by shaping, reforming, and revamping cauliflower in many different ways. Today, we do it again with Buffalo Cauliflower. All the great taste of buffalo wings, in a batter that’s gluten-free and much better for you, and without all the fat that comes from those wings. Hey, I’m not saying you have to give up the wings altogether. But if you’re looking for a healthier alternative once in a while, these are a great way to do it.
Ingredients:
1 head of cauliflower 1 cup almond milk 1 cup almond flour 1 teaspoon garlic powder 1 cup hot sauce Salt Pepper
Directions:
1.) Preheat oven to 450 degrees Fahrenheit and line a baking sheet with parchment paper.
2.) Chop the head of cauliflower into florets. In a bowl combine the almond milk, almond flour, garlic powder, salt, and pepper. Mix and allow to sit for a few minutes.
3.) Dip the cauliflower into the almond milk mixture and turn to coat entirely. Remove from the batter and allow excess to drip off. Place on the baking sheet.
4.) Place in the preheated oven and cook for 10-20 minutes, until the cauliflower begins to brown.
5.) Remove from the oven, toss in the hot sauce, and place back in the oven to cook for 8 to 10 minutes.
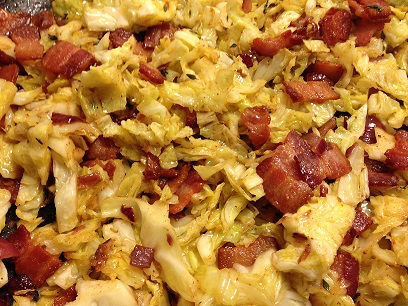
Bacon really does make everything better. I love cabbage just about any way you cook it, but I know a lot of people that don’t. But if you want to reap all the health benefits it holds, and not be distracted by that taste and texture you just can’t get over, do what many do for Brussels sprouts and fry up some bacon – leaving the cabbage to soak up all that yummy fat and get all salty-like and delicious. My kids aren’t big fans of cabbage either, but they will eat this when it’s the side dish for supper. I myself love cabbage, which is just one thing I love about this recipe. But there’s also the fact that it’s a five-ingredient dish, and that it’s super cheap to make.
Ingredients:
1/2 head of green cabbage, diced 3 slices of bacon, diced 1/2 teaspoon cumin Salt Pepper
Directions:
1.) Place the bacon pieces into a large skillet over medium heat and fry until crisp. Remove from the pan and set on paper towels to drain.
2.) To the hot fat in the pan, add the cabbage pieces and stir to coat the cabbage entirely in the fat. Add the cumin, salt, and pepper, and cook stirring occasionally, until the cabbage becomes softer, 5-7 minutes.
3.) When cabbage has finished cooking, add bacon bits back to the pan, and stir to combine thoroughly.
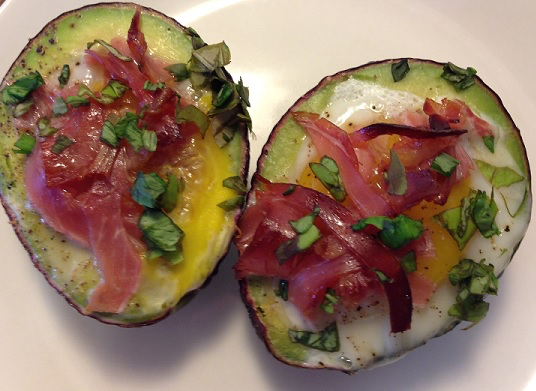
This might be one of my new favourite recipes, especially for the middle of the day when I want something really tasty, really satisfying, but doesn’t take a long time to make. I’ve seen eggs stuffed into avocados and baked a couple of times, and it’s always been just a little different each time. That’s really the best part about it, is that you can spruce it up however you want, and mix whatever you want into it. If you want to go vegetarian, just leave out the prosciutto (or bacon,) and if you’re craving a full breakfast, sneak a couple of home fries underneath the egg. This is one that can truly go anywhere you want it to. And another beauty of this recipe? Take away the basic salt and pepper (which everyone ALWAYS has in their cupboard anyway,) and it becomes a 5-ingredient dish!
Ingredients:
1 avocado, halved and with the pit removed Zest and juice of one lime 2 eggs 2 slices prosciutto, thinly sliced 2 tablespoons fresh basil, thinly sliced Salt Pepper
Directions:
1.) Preheat the oven to 450 degrees Fahrenheit. Zest and juice the lime into the same bowl.
2.) Remove the pit from the avocado and with a spoon, scoop out a bit more of the flesh so there is room for the egg to nest inside of it. Brush the zest/juice mixture entirely over the surface of the avocado. Carefully break one egg into each avocado, and season with salt and pepper. Carefully place the prosciutto slices over the egg, being sure not to break the yolk. Place in the preheated oven and bake for about 12 minutes, until the egg has set to your liking.
3.) Remove from oven and sprinkle with fresh basil. Drizzle with more of the zest/juice mixture if desired.
Being a type of fish that I know will always be good for me and will never cause me to break out in an allergic reaction, I love tuna. But still, I overlook it far too often. This dish however, is one that I’ve been making for years and one that not only looks cute, but also really packs a punch. Not only is it super flavourful, but just one portion of these (in the serving size you see above anyway,) will really fill you up. And another bonus? You get to have all the goodness of tuna, without all that white bread.
Ingredients:
1 can tuna, drained and separated into flakes 1 English cucumber Juice of 1 lemon 1 stalk of celery, very finely diced 1/4 red onion, very finely diced 1/2 cup mayonnaise 1 tablespoon dried dill Salt Pepper 1 tablespoon fresh basil, parsley, or dill, chopped (optional)
Directions:
1.) Slice cucumber, lengthwise, evenly down the centre. Using a spoon, scrape out all the seeds.
2.) In a small bowl combine the tuna, lemon juice, celery, red onion, dried dill, mayonnaise, and salt and pepper. Go very easy on the salt, taste, and add more if needed. I find it’s way too easy to over-salt tuna, which can really ruin the dish. Stir all ingredients together until they’re fully combined, and then scoop evenly into the hollowed-out cucumber. Cut into individual serving sizes and store in the fridge for about an hour. You don’t really have to store it in the fridge if you need the boats right away, but I find letting them chill makes the tuna taste a lot better, and gives all the flavours a chance to marry. Just before serving, sprinkle the fresh herb over top.
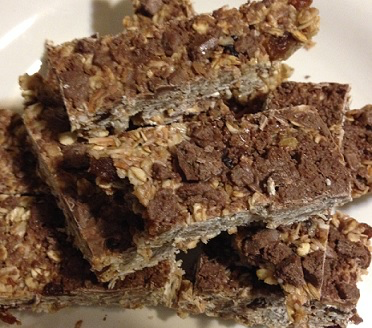
You can have granola, or you can spend a few minutes squishing it all down into a casserole dish, let it sit in the fridge overnight, and have granola bars. I prefer the latter, and just to keep everyone on their toes (and to comply with the peanut-free zone at the school,) I use a few different ingredients when my granola is going to be in bar form.
Ingredients:
2 cups old fashioned rolled oats 1/2 cup sweetened coconut 1/3 cup honey 1/4 cup butter 1/4 cup brown sugar 1/2 teaspoon vanilla extract 1/4 teaspoon salt 1/2 cup dried cranberries 1/2 cup raisins 1/2 cup chocolate chips, divided
Directions:
1.) Preheat the oven to 350 degrees Fahrenheit. Line a baking sheet with parchment paper and spread oats and coconut evenly out onto the paper. When the oven is preheated, place oat mixture inside and toast for 5 minutes. Remove from oven, give everything a stir, and place back in for another 3 minutes. When done, remove to a bowl and allow to cool for 5 minutes.
2.) Meanwhile, combine the honey, butter, brown sugar, vanilla extract, and salt in a small saucepan on the stove. Warm over medium heat while stirring constantly, until the butter has melted and the sugar has fully dissolved.
3.) Remove honey and butter mixture from the stove and allow to cool very slightly. Line an 8″x 8″ x 2″ casserole or baking dish with parchment paper, allowing it to come up the sides.
4.) Pour the honey and butter mixture into the bowl with the oats and coconut and stir to fully combine. Add 1/2 of the chocolate chips and stir again. Don’t worry if they melt, this will help them to act as glue when the bars are cooling and forming. Add cranberries and raisins and transfer oat mixture to the dish lined with parchment.
5.) Lightly dampen the palms of your hands and for one full minute, press the oat mixture into the dish. Do this until it’s all spread evenly, and then continue to press and push on the mixture to further solidify it. The longer you push and spread the oat mixture, the firmer and more bar-like it will be when you remove it from the fridge.
6.) Sprinkle the remaining chocolate chips on top and using a rubber spatula, push them into the top. They will likely melt and form a thin chocolate glaze on top.
7.) Place bars in the fridge and allow them to set for at least two hours (preferably overnight,) before cutting them into bars and serving.
Let’s get one thing clear. Saying that this recipe is “the greatest chocolate cake I’ve ever made” is not something I do lightly. I realize it’s a bold statement, and I understand that once it’s out there, certain expectations are put into place. But make no mistake. This is indeed, the greatest chocolate cake I’ve ever made. And the fact that I have more flops than successes in this area speaks to the fact that making chocolate cake is not one of my fortes. But this chocolate cake, I promise you, will now be the greatest chocolate cake in your wheelhouse too.
Not only is it DE-LICIOUS, bu it takes about 5 minutes to make. There’s no hand mixer, no sifting, no fuss. You don’t need butter or eggs. If you have cocoa powder, you can pretty much whip up chocolate cake anytime you want. In under an hour. You don’t even have to frost the cake if you don’t want to. The chocolate chips melt nicely while still holding their shape (how does that happen?) and it’s just as tasty without frosting. Frosting is always good too, especially if you don’t have the chocolate chips, but it’s still a great go-to chocolate cake without frosting or the chips.
I got this recipe from someone that works with my husband and – I’ll say it again – it’s the greatest chocolate cake I’ve ever made. I’m quite thankful she passed it on to me and once you make it, you will be too.
Ingredients:
1 2/3 cup flour 1 cup white or brown sugar 1/4 cup cocoa 1 teaspoon baking soda 1 cup water 1/3 cup vegetable oil 1 teaspoon vinegar 3/4 teaspoon vanilla extract 1/2 cup semi-sweet chocolate chips
Directions:
1.) Preheat the oven to 350 degrees Fahrenheit and grease an 8″ x 8″ x 2″ baking pan.
2.) Combine the flour, sugar, cocoa, and baking soda and whisk together to mix. In a separate bowl mix together the vegetable oil, vinegar, and vanilla extract.
3.) Add the wet ingredients to the dry, stir with a wooden spoon until the batter is smooth, and pour into the prepared pan.
4.) Sprinkle the chocolate chips over top and bake for 35-40 minutes, until a toothpick inserted into the centre remains clean. Remove from the oven and cool on a rack for at least 10 minutes, or completely if frosting.
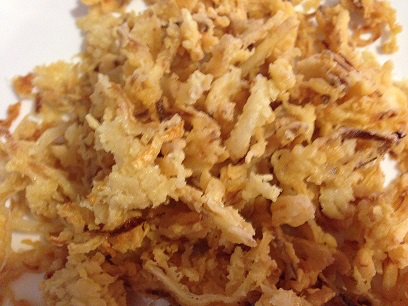
Ya know those delicious fried onions that you put on green bean casserole (or just to eat as a snack?) The ones that you can find among the condiments in the grocery store, and that come in a can? Well, I personally don’t believe you should ever eat onions from a can, even if they have been fried to a delicious golden brown. Instead, make them yourself at home, eat as many as you want, and take deep satisfaction from knowing that you’ve done a great job. It’s really easy to do, just give yourself a little time as the onions need to soak for quite awhile. And don’t worry if those rounds break up a bit during the process. I think the fact that these look more like broken onions are what makes them even better than onion rings for me.
Ingredients:
1 large onion, left whole and sliced into very (very!) thin rounds 2 cups milk 2 teaspoons white vinegar 2 cups all-purpose flour 2 teaspoons salt, divided 1 teaspoon black pepper 1/2 teaspoon cayenne pepper
Directions:
1.) In a shallow casserole dish, combine the milk and the vinegar until it becomes thick, and don’t worry if it starts to look curdled. You’re essentially making buttermilk. Separate the onion slices into individual rounds, and place them in the milk mixture so that none are sticking out. Leave the onion rings soaking for one hour.
2.) Combine the flour, one teaspoon of salt, the black pepper, and the cayenne pepper on a plate or in a bowl. Meanwhile, heat a deep fryer or a Dutch oven filled with about 8 cups of vegetable oil to 375 degrees Fahrenheit. (Or you can do my test. Fill the Dutch oven with oil so it comes up about halfway, and place over medium-high heat. When you place the straight end of a wooden spoon into the oil and little bubbles start running up the side of it, the oil is ready.)
3.) Taking a few onion rounds at a time, remove them from the buttermilk and allow the excess to drip off. Place in the flour and toss lightly to ensure the entire onion has been coated in flour. Then place carefully into the oil and repeat with remaining onion slices until all have been fried. Remove from oil and place on a paper towel to allow extra oil to drain. Sprinkle with salt.
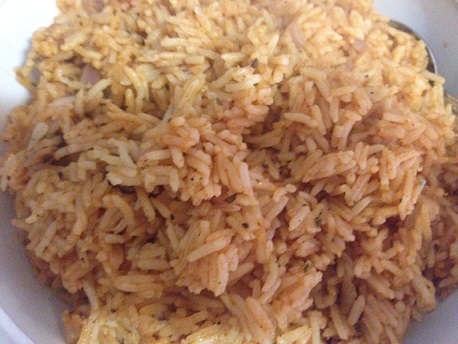
I’ve made Spanish rice before, and have found that typically, it contains way too many ingredients. So how do you make rice that’s got a little oomph, without overwhelming the dish or losing the rice in the meanwhile? You use this recipe and revel n=in the simplicity of it all.
Ingredients:
2 1/2 cups rice 4 3/4 cups chicken stock 1/2 cup tomato sauce 1 finely chopped onion 1/3 cup canola oil 1 teaspoon chili powder 1 teaspoon cumin 1 large clove garlic, finely minced
Directions:
1.) Place the oil in a saucepan set over high heat. When hot add rice, onion, and garlic. Stir until rice starts to become opaque and garlic and onions are starting to become aromatic. Add chicken broth, tomato paste, chili powder, and cumin.
2.) Bring mixture to a boil then turn heat to low, and cover. Cook for about 20 minutes and then turn heat off, but do not lift the lid or remove from the heat. Leave until ready to serve.