Originally published on February 18, 2016
Jelly bean cake was one of my favourites as a kid. My grandma made them for birthdays and while they’re so simple in concept, they really are something that’s truly special to me. Feeling nostalgic when Paige turned 10 last month, I decided to forego buying a cake and make her one myself (something I promised her I’d never do after a certain birthday cake disaster.) I knew I had to make the jelly bean cake.
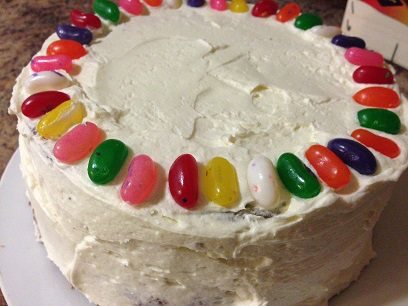
The cake is easy – two layers joined by rich and creamy frosting (or jam, if you want to stay authentically true to grandma), decorated by frosting and of course, jelly beans. But I never appreciated just how much time they can actually take – especially when you’re making a different kind of cake for each layer. This is also a spin off the original jelly bean cake that grandma used to make, but what the birthday girls wants, the birthday girl gets. It ended up looking pretty cool, and let’s face it. All you really need to make a jelly bean cake are some very colourful jelly beans.
Ingredients:
For the white cake:
- 1/4 cup butter, softened
- 1/4 cup vegetable shortening
- 1 1/2 cups granulated sugar
- 2 eggs, room temperature
- 1 egg yolk, room temperature
- 1 1/2 cups all-purpose flour
- 1 teaspoon baking powder
- 1/8 teaspoon salt
- 1/4 cup whole milk, room temperature
- 1/4 cup buttermilk, room temperature
- 1 teaspoon vanilla extract
For the chocolate cake:
- 1 cup all-purpose flour
- 1 cup sugar
- 1/2 cup cocoa powder
- 1 teaspoon baking powder
- 1 teaspoon baking soda
- 1/2 teaspoon salt
- 1/2 teaspoon espresso powder
- 1/2 cup milk
- 1/4 cup vegetable oil
- 1 egg
- 1 teaspoon vanilla extract
- 1/2 cup boiling water
For the frosting:
- 1 cup butter, softened
- 3 – 4 cups icing sugar, sifted
- 2 teaspoons vanilla extract
- 2 – 3 tablespoons heavy cream
- Pinch of salt
For the decoration:
- 30 – 40 jelly beans
Directions:
1.) Start by making the white cake. Preheat oven to 350 degrees Fahrenheit and coat a 9″ round cake pan with non-stick baking spray or butter and flour.
2.) With an electric mixer, cream together the butter and shortening until light and fluffy. Slowly add sugar, 1/4 cup at a time, making sure to fully incorporate each addition before adding another. Add eggs and egg yolk one at a time, also making sure each egg is fully incorporated before adding another.
3.) Sift together the flour, baking powder, and salt. Pour milks and vanilla extract into a measuring cup and whisk together with a fork. Add to butter and shortening mixture, alternating with milk mixture, beginning and ending with the dry ingredients.
4.) Gently stir all ingredients until well combined. Stop mixer and scrape down the sides and bottom of the bowl, making sure all ingredients are mixed well.
5.) Pour the cake batter into the cake pan, making sure that its’ even at the surface. Place in the preheated oven and bake for 25 – 30 minutes, until a toothpick inserted into the centre comes out clean. Remove and allow to cool slightly in cake pans for about 5 minutes before inverting and removing cake from pan, allowing it to cool completely on a wire rack.
6.) Next, make the chocolate cake. Keep the oven preheated at 350 degrees Fahrenheit and prepare another 9″ round cake pan by spraying with non-stick spray or by buttering and flouring.
7.) Add flour, sugar, cocoa, baking powder, baking soda, salt, and espresso powder to a large bowl or the bowl of a stand mixer. Whisk through to combine or, using your paddle attachment, stir through flour mixture until it’s well-combined.
8.) Add milk, vegetable oil, eggs, and vanilla to flour mixture and mix together on medium speed until it’s well combined. Reduce speed and carefully add boiling water to the cake batter. Beat on high speed for about 1 minute to add air to the batter.
9.) Pour the cake batter into the cake pan, making sure the surface is even. Place in the preheated oven and bake for 35 – 40 minutes, until a toothpick inserted into the centre comes out clean.
10.) Remove from the oven and allow to cool slightly in the cake pan for 5 minutes before removing from the cake pan and allowing to cool completely on a wire rack.
11.) Make the frosting. Place softened butter into the bowl of a stand mixer that has been fitted with the paddle attachment. Mix on medium setting and cream the butter until it is smooth and has lightened in colour, about 3 minutes.
12.) Add icing sugar, 1/2 cup at a time. After each cup has been incorporated, turn the mixer onto its highest speed for about 10 seconds to lighten the frosting.
13.) Add vanilla and a pinch of salt and combine until everything is fully incorporated.
14.) Add heavy cream, until the frosting has reached desired consistency. If frosting is too thick, add a touch more cream; if it’s too loose, add a bit more icing sugar.
15.) When cakes have completely cooled, start frosting. Level both of the cakes by cutting off any pointed or rounded tops, making sure the cake is completely level. Then, spread a layer of frosting across the top of one cake. Place the non-frosted cake on top of the frosted cake to make one layered cake.
16.) Place the cake on the plate you’ll serve it one and begin frosting. Start by coating the entire cake in a very thin layer of frosting. This is known as the “crumb layer” and will coat any crumbs on the sides and top of the cake so that they do not end up in the finishing frosting layer.
17.) Start really frosting the cake. Mound a large pile of frosting in the centre of the top of the cake. With a slanted spatula, or frosting spatula, push the frosting down and out towards the edges of the cake. It’s perfectly okay if the frosting slips over the edge and starts to travel down the sides of the cake. Move that frosting around the sides of the cake. Pick up more frosting with the slanted spatula and move around the sides of the cake until an even layer of frosting, at your desired thickness, has been applied. Then just use your slanted spatula to move around the cake, including on top, completely smoothing out the frosting and ensuring that it’s even.
18.) Place the jelly beans around the top edge of the cake.
19.) Serve and enjoy!